STEP 1
Open a new image 700 x 600
Transparent background
PSP9: Colour Depth = 16 Million Colors (24bit)
PSPX-X9: Colour Depth RGB = 8bits/channel
Flood fill with WHITE
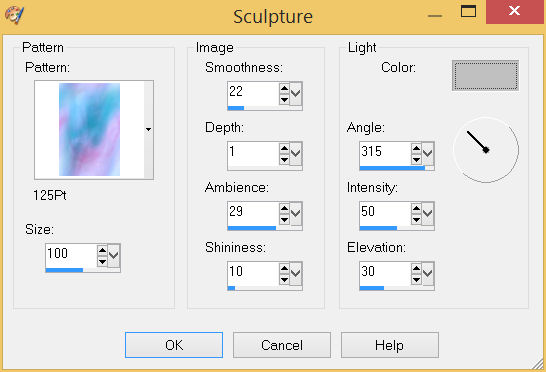
EFFECTS >>> TEXTURE EFFECTS >>> SCULPTURE
COLOR = #c0c0c0
PATTERN = 125Pt
.
|
STEP 2
Open up the flourish frame image in your PSP workspace
Right click on the Title Bar and select COPY from the options
Right click on the Title Bar of your frame image
and select PASTE AS NEW LAYER from the options.
CLOSE Raster 1
ADJUST >>> COLOUR BALANCE >>> NEGATIVE IMAGE
PSPX - X9: IMAGE >>> NEGATIVE IMAGE
ADJUST >>> HUE & SATURATION >>> COLORIZE
Hue = 0
Saturation = 255 |
|
STEP 3
ADJUST >>> COLOUR BALANCE >>> NEGATIVE IMAGE
PSPX - X9: IMAGE >>> NEGATIVE IMAGE
ADJUST >>> BRIGHTNESS and CONTRAST >>> BRIGHTNESS/CONTRAST
Brightness = 160
Contrast = 25
PSPX6-X9: Linear mode checked
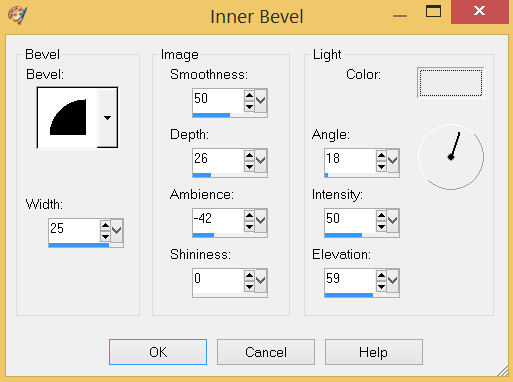
EFFECTS >>> 3D EFFECTS >>> INNER BEVEL
COLOUR = #eeecec
 , , |
STEP 4
EFFECTS >>> 3D EFFECTS >>> DROP SHADOW
Vertical & Horizontal offsets = 1
Colour = Black
Opacity = 70
Blur = 0
SAVE YOUR WORK |
|
STEP 5
Open up the 5655.png image in your PSP workspace
Choose your SELECTION TOOL
Selection Type = Rectangle
Mode = Replace
Feather = 0
Antialias = UNChecked
Select the top left corner |
|
STEP 6
Right click on the Title Bar and select COPY from the options
Right click on the Title Bar of your frame image
and select PASTE AS NEW LAYER from the options.
IMAGE >>> RESIZE = 30%
Check "Lock aspect ratio."
Ensure "Resize all layers" is UNCHECKED
Resample using WEIGHTED AVERAGE
LAYERS >>> DUPLICATE
LAYERS >>> MERGE >>> MERGE DOWN
EFFECTS >>> IMAGE EFFECTS >>> OFFSET
Horizontal Offset = - ( minus ) 275
Vertical Offset = 200
Edge Mode = Transparent |
|
STEP 7
ADJUST >>> BRIGHTNESS and CONTRAST >>> BRIGHTNESS/CONTRAST
Same settings
ADJUST >>> HUE & SATURATION >>> COLORIZE
Same settings
ADJUST >>> COLOUR BALANCE >>> NEGATIVE IMAGE
PSPX - X9: IMAGE >>> NEGATIVE IMAGE
ADJUST >>> BRIGHTNESS and CONTRAST >>> BRIGHTNESS/CONTRAST
Same settings, |
|
STEP 8
EFFECTS >>> PLUGINS >>> SIMPLE >>> TOP LEFT MIRROR
EFFECTS >>> 3D EFFECTS >>> DROP SHADOW
Vertical & Horizontal offsets = 1
Colour = Black
Opacity = 70
Blur = 0
SAVE YOUR WORK
|
|
STEP 9
ACTIVATE Raster 1 BUT leave closed
LAYERS >>> NEW RASTER LAYER
CLOSE Raster 2 & Raster 3
SELECTIONS >>> SELECT ALL
Open up the BLUE-c2 image in your PSP workspace
Right click on the Title Bar and select COPY from the options
Right click on the Title Bar of your frame image
and select PASTE INTO SELECTION from the options.
DESELECT
EFFECTS >>> 3D EFFECTS >>> DROP SHADOW
Same settings |
|
STEP 10
LAYERS >>> DUPLICATE
IMAGE >>> FLIP
LAYERS >>> MERGE >>> MERGE DOWN
EFFECTS >>> REFLECTION EFFECTS >>>
ROTATING MIRROR
Horizontal Offset = 0
Vertical Offset = n/a
Rotation Angle = 180
Edge Mode = Reflect
LAYERS >>> DUPLICATE
|
|
STEP 11
ADJUST >>> SHARPNESS >>> SHARPEN MORE
In your LAYER PALETTE change
the BLEND MODE to BURN
OPEN ALL LAYERS
ACTIVATE Raster 4
ADJUST >>> SHARPNESS >>> SHARPEN MORE
SAVE YOUR WORK
|
|
STEP 12
ACTIVATE Raster 2
With your MAGIC WAND
Mode = Replace
Match Mode = RGB Value
Tolerance = 0
Feather = 0
Antialias = UNchecked
Sample Merged = UNCHECKED
PSP9 - X9: Check CONTIGUOUS
PSPX - X9: There is no " Sample Merged"
Select the CENTRE area of your image
SELECTIONS >>> MODIFY >>> EXPAND = 2
, |
|
STEP 13
ACTIVATE Copy of Raster 4
EDIT >>> CLEAR
ACTIVATE Raster 4
EDIT >>> Repeat Clear
ACTIVATE Raster 1
EDIT >>> Repeat Clear
DESELECT, |
|
STEP 14
ACTIVATE Raster 2
With your MAGIC WAND
Mode = Add (Shift)
Match Mode = RGB Value
Tolerance = 0
Feather = 0
Antialias = UNchecked
Sample Merged = UNCHECKED
PSP9 - X9: Check CONTIGUOUS
PSPX - X9: There is no " Sample Merged"
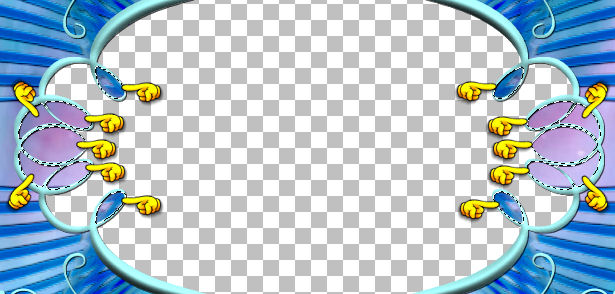
Select the areas indicated
SELECTIONS >>> MODIFY >>> EXPAND = 2
, |
STEP 15
ACTIVATE Copy of Raster 4
EDIT >>> CLEAR
ACTIVATE Raster 4
EDIT >>> Repeat Clear
ACTIVATE Raster 1
EDIT >>> Repeat Clear
DESELECT |
|
STEP 16
ACTIVATE Raster 2
EFFECTS >>> 3D EFFECTS >>> DROP SHADOW
Vertical & Horizontal offsets = 5
Colour = Black
Opacity = 70
Blur = 8.00
ACTIVATE Raster 3
EDIT >>> Repeat Drop Shadow
LAYERS >>> MERGE >>> MERGE VISIBLE
SAVE YOUR WORK
|
|
STEP 17
LAYERS >>> NEW RASTER LAYER
SELECTIONS >>> SELECT ALL
Flood fill with DARK BLUE #0071c9
SELECTIONS >>> MODIFY >>> CONTRACT = 3
EDIT >>> CLEAR
Flood fill with LIGHT BLUE #adfefe
SELECTIONS >>> MODIFY >>> CONTRACT = 5
EDIT >>> CLEAR
Flood fill with DARK BLUE #0071c9
SELECTIONS >>> MODIFY >>> CONTRACT = 3
EDIT >>> CLEAR
Flood fill with LIGHT BLUE #adfefe
SELECTIONS >>> MODIFY >>> CONTRACT = 3
EDIT >>> CLEAR
Flood fill with DARK BLUE #0071c9
SELECTIONS >>> MODIFY >>> CONTRACT = 2
EDIT >>> CLEAR
DESELECT |
|
STEP 18
With your MAGIC WAND
Mode = Replace
Match Mode = RGB Value
Tolerance = 0
Feather = 0
Antialias = UNchecked
Sample Merged = UNCHECKED
PSP9 - X9: Check CONTIGUOUS
PSPX - X9: There is no " Sample Merged"
Select the border indicated |
|
STEP 19
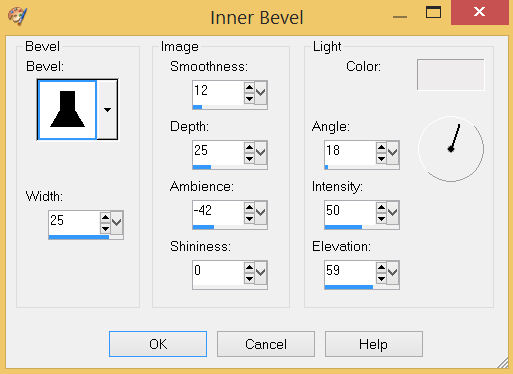
EFFECTS >>> 3D EFFECTS >>> INNER BEVEL
COLOR = #eeecec
, |
STEP 20
EDIT >>> Repeat Inner Bevel
DESELECT
ADJUST >>> SHARPNESS >>> SHARPEN
EFFECTS >>> 3D EFFECTS >>> DROP SHADOW
Vertical & Horizontal offsets = 4
Colour = Black
Opacity = 70
Blur = 8.00
Repeat Drop Shadow effect changing
Vertical & Horizontal Offsets to - ( minus ) 4
Click OK
LAYERS >>> MERGE >>> MERGE VISIBLE
Save as .pspimage image |
|
STEP 21
LAYERS >>> NEW RASTER LAYER
Flood fill with LILAC #cab4f3
EFFECTS >>> ILLUMINATION EFFECTS >>> SUNBURST
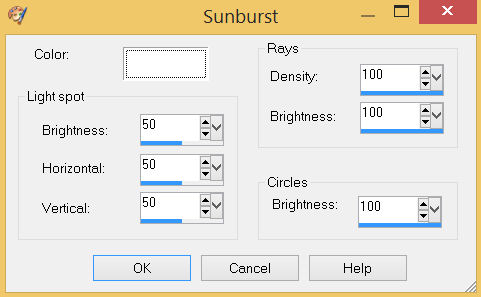
LAYERS >>> ARRANGE >>> MOVE DOWN
, |
STEP 22
Open up the pretty angel15 image in your PSP workspace
Right click on the Title Bar and select COPY from the options
Right click on the Title Bar of your frame image
and select PASTE AS NEW LAYER from the options.
IMAGE >>> RESIZE = 75%
Check "Lock aspect ratio."
Ensure "Resize all layers" is UNCHECKED
Resample using WEIGHTED AVERAGE
ADJUST >>> SHARPNESS >>> SHARPEN
Reposition with your MOVER tool |
|
STEP 23
EFFECTS >>> 3D EFFECTS >>> DROP SHADOW
Vertical & Horizontal offsets = 5
Colour = Black
Opacity = 90
Blur = 20.00 |
|
STEP 24
LAYERS >>> MERGE >>> MERGE VISIBLE
LAYERS >>> NEW RASTER LAYER
Select your TEXT tool
and with a font of your choice add your name
, |
STEP 25
LAYERS >>> MERGE >>> MERGE ALL (Flatten)
Save as .jpg image
, |
| |
|
| |
|