STEP 1
Open a new image 700 x 600
Transparent background
PSP9: Colour Depth = 16 Million Colors (24bit)
PSPX-X9: Colour Depth RGB = 8bits/channel
Flood fill with WHITE
LAYERS >>> NEW RASTER LAYER
SELECTIONS >>> SELECT ALL
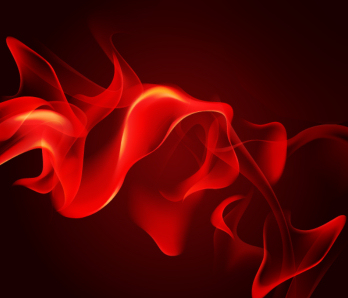
Open up the Fire-and-Flame-1 image in your PSP workspace
Right click on the Title Bar and select COPY from the options
(Minimize for now)
Right click on the Title Bar of your frame image
and select PASTE INTO SELECTION from the options.
DESELECT
|
 |
STEP 2
IMAGE >>> FLIP
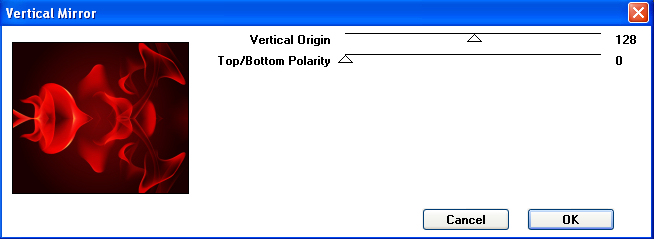
EFFECTS >>> PLUGINS >>> GRAPHICS PLUS >>> Vertical Mirror

, |
STEP 3
EFFECTS >>> REFLECTION EFFECTS >>>
ROTATING MIRROR
Horizontal Offset = 0
Vertical Offset = n/a
Rotation Angle = 0
Edge Mode = Reflect |
|
STEP 4
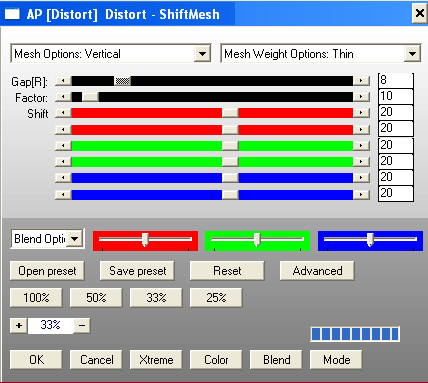
EFFECTS >>> PLUGINS >>> AP [Distort] >>> Shift Mesh
(or.... AP [INNOVATIONS] >>> Distort >>> Shift Mesh)

, |
STEP 5
EFFECTS >>> EDGE EFFECTS >>> ENHANCE
SAVE YOUR WORK |
|
STEP 6
LAYERS >>> NEW RASTER LAYER
Choose your SELECTION TOOL then click on the
CUSTOM SELECTION symbol
and enter these coordinates.
|
|
STEP 7
Maximize the Fire-and-Flame-1 image in your PSP workspace
Right click on the Title Bar and select COPY from the options
Right click on the Title Bar of your frame image
and select PASTE INTO SELECTION from the options.
DO NOT DESELECT |
|
STEP 8
LAYERS >>> NEW RASTER LAYER
Flood fill with WHITE
SELECTIONS >>> MODIFY >>> CONTRACT = 3
EDIT >>> CLEAR
DESELECT
EFFECTS >>> 3D EFFECTS >>> DROP SHADOW
Vertical & Horizontal offsets = 1
Colour = Black
Opacity = 70
Blur = 0
Repeat Drop Shadow effect changing
Vertical & Horizontal Offsets to - ( minus ) 1
Click OK
LAYERS >>> MERGE >>> MERGE DOWN |
|
STEP 9
Open up the JF_Pearl_Frames image in your PSP workspace
With Raster 1 closed and the 'small' layer active
Right click on the Title Bar and select COPY MERGED
from the options
Right click on the Title Bar of your frame image
and select PASTE AS NEW LAYER from the options.
|
|
STEP 10
With your MAGIC WAND
Mode = ADD (Shift)
Match Mode = RGB Value
Tolerance = 0
Feather = 2
Antialias = Checked
Sample Merged = UNCHECKED
PSP9 - X9: Check CONTIGUOUS
PSPX - X9: There is no " Sample Merged"
PSP9 - X9: ANTIALIAS = Outside
Select the centre of both pearl frames, |
|
STEP 11
SELECTIONS >>> MODIFY >>> EXPAND = 4
ACTIVATE Raster 3
EDIT >>> CLEAR
ACTIVATE Raster 2
EDIT >>> CLEAR
DESELECT |
|
STEP 12
Open up the design elements234 image in your PSP workspace
Activate Raster 4
Right click on the Title Bar and select COPY
from the options
Right click on the Title Bar of your frame image
and select PASTE AS NEW LAYER from the options.
ADJUST >>> COLOUR BALANCE >>> NEGATIVE IMAGE
PSPX - X9: IMAGE >>> NEGATIVE IMAGE
LAYERS >>> DUPLICATE
LAYERS >>> MERGE >>> MERGE DOWN
EFFECTS >>> IMAGE EFFECTS >>> OFFSET
Horizontal Offset = 270
Vertical Offset = 0
Edge Mode = Transparent
|
|
STEP 13
LAYERS >>> DUPLICATE
IMAGE >>> MIRROR
LAYERS >>> DUPLICATE
EFFECTS >>> IMAGE EFFECTS >>> OFFSET
Horizontal Offset = 300
Vertical Offset = 0
Edge Mode = Transparent
LAYERS >>> MERGE >>> MERGE DOWN
EDIT >>> Repeat Layer Merge Down
LAYERS >>> DUPLICATE
LAYERS >>> MERGE >>> MERGE DOWN
|
|
STEP 14
EFFECTS >>> 3D EFFECTS >>> DROP SHADOW
Vertical & Horizontal offsets = 1
Colour = Black
Opacity = 70
Blur = 0
SAVE YOUR WORK |
STEP 15
Open up the Deco-31157 image in your PSP workspace
Right click on the Title Bar and select COPY from the options
Right click on the Title Bar of your frame image
and select PASTE AS NEW LAYER from the options.
IMAGE >>> RESIZE = 80%
Check "Lock aspect ratio."
Ensure "Resize all layers" is UNCHECKED
Resample using WEIGHTED AVERAGE
ADJUST >>> SHARPNESS >>> SHARPEN
EFFECTS >>> IMAGE EFFECTS >>> OFFSET
Horizontal Offset = - ( minus ) 225
Vertical Offset = 200
Edge Mode = Transparent
EFFECTS >>> 3D EFFECTS >>> DROP SHADOW
Vertical offset = 2
Horizontal offset = - ( minus ) 2
Colour = WHITE
Opacity = 85
Blur = 0
|
|
STEP 16
LAYERS >>> DUPLICATE
IMAGE >>> MIRROR
LAYERS >>> MERGE >>> MERGE DOWN
LAYERS >>> DUPLICATE
IMAGE >>> FLIP
LAYERS >>> MERGE >>> MERGE DOWN
LAYERS >>> DUPLICATE
LAYERS >>> MERGE >>> MERGE DOWN
|
|
STEP 17
LAYERS >>> NEW RASTER LAYER
Flood fill with BLACK
SELECTIONS >>> SELECT ALL
SELECTIONS >>> MODIFY >>> CONTRACT = 5
EDIT >>> CLEAR
SELECTIONS >>> MODIFY >>> CONTRACT = 3
Flood fill with WHITE
SELECTIONS >>> MODIFY >>> CONTRACT = 5
EDIT >>> CLEAR
SELECTIONS >>> MODIFY >>> CONTRACT = 3
Flood fill with BLACK
SELECTIONS >>> MODIFY >>> CONTRACT = 5
EDIT >>> CLEAR
DESELECT
With your MAGIC WAND
Mode = ADD (Shift)
Match Mode = RGB Value
Tolerance = 0
Feather = 0
Antialias = UNChecked
Sample Merged = UNCHECKED
PSP9 - X9: Check CONTIGUOUS
PSPX - X9: There is no " Sample Merged"
Select both black borders
|
|
STEP 18
EFFECTS >>> 3D EFFECTS >>> DROP SHADOW
Vertical & Horizontal offsets = 1
Colour = WHITE
Opacity = 100
Blur = 0
Repeat Drop Shadow effect changing
Vertical & Horizontal Offsets to - ( minus ) 1
Click OK
DESELECT |
|
STEP 19
EFFECTS >>> 3D EFFECTS >>> DROP SHADOW
Vertical & Horizontal offsets = 5
Colour = Black
Opacity = 70
Blur = 10.00
ACTIVATE Raster 6
EDIT >>> Repeat Drop Shadow
ACTIVATE Raster 3
EDIT >>> Repeat Drop Shadow
Repeat Drop Shadow effect changing
Vertical & Horizontal Offsets to - ( minus ) 5
Click OK
ACTIVATE Raster 6
EDIT >>> Repeat Drop Shadow
ACTIVATE Raster 7
EDIT >>> Repeat Drop Shadow |
|
STEP 20
CLOSE Raster 1
LAYERS >>> MERGE >>> MERGE VISIBLE
OPEN & ACTIVATE Raster 1
Save as .pspimage image
|
|
STEP 21
Open up the cutie2.jpg image in your PSP workspace
Right click on the Title Bar and select COPY from the options
Right click on the Title Bar of your frame image
and select PASTE AS NEW LAYER from the options.
IMAGE >>> RESIZE = 55%
Check "Lock aspect ratio."
Ensure "Resize all layers" is UNCHECKED
Resample using WEIGHTED AVERAGE
ADJUST >>> SHARPNESS >>> SHARPEN
Reposition with your MOVER tool |
|
STEP 22
Open up the cutie2B.png image in your PSP workspace
Right click on the Title Bar and select COPY from the options
Right click on the Title Bar of your frame image
and select PASTE AS NEW LAYER from the options.
IMAGE >>> RESIZE = 40%
Check "Lock aspect ratio."
Ensure "Resize all layers" is UNCHECKED
Resample using WEIGHTED AVERAGE
ADJUST >>> SHARPNESS >>> SHARPEN
EFFECTS >>> IMAGE EFFECTS >>> OFFSET
Horizontal Offset = 155
Vertical Offset = - ( minus ) 15
Edge Mode = Transparent
|
|
STEP 23
EFFECTS >>> 3D EFFECTS >>> DROP SHADOW
Vertical & Horizontal offsets = 3
Colour = Black
Opacity = 70
Blur = 15.00 |
|
STEP 24
LAYERS >>> MERGE >>> MERGE VISIBLE
LAYERS >>> NEW RASTER LAYER
Select your TEXT tool
and with a font of your choice add your name
, |
|
STEP 25
LAYERS >>> MERGE >>> MERGE ALL (Flatten)
Save as .jpg image
, |
| |
|
| |
|