STEP 1
Open a new image 700 x 600
Transparent background
PSP9: Colour Depth = 16 Million Colors (24bit)
PSPX-X9: Colour Depth RGB = 8bits/channel
Flood fill with DARK BLUE #4f6087
EFFECTS >>> TEXTURE EFFECTS >>> TILES
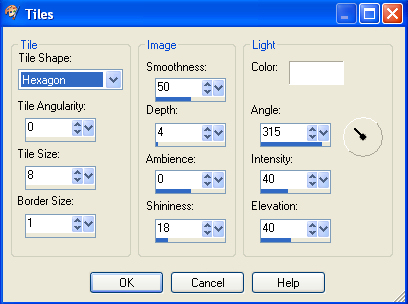 .
.
|
STEP 2
EFFECTS >>> PLUGINS >>> MEHDI >>> Sorting Tiles
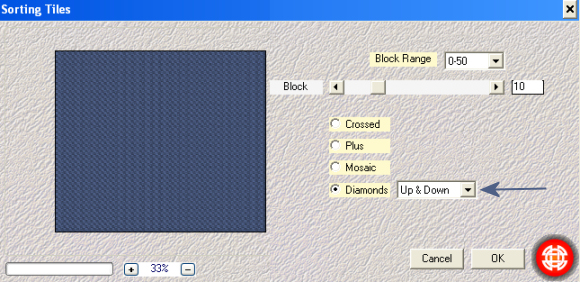 , , |
STEP 3
LAYERS >>> NEW RASTER LAYER
Flood fill with LIGHT BLUE #758dc4
SELECTIONS >>> SELECT ALL
Open up the Black-dot-texture image
in your PSP workspace
Right click on the Title Bar and select COPY from the options
Right click on the Title Bar of your frame image
and select PASTE INTO SELECTION from the options.
DESELECT
EFFECTS >>> EDGE EFFECTS >>> ENHANCE MORE
|
|
STEP 4
LAYERS >>> NEW RASTER LAYER
EFFECTS >>> PLUGINS >>> DRAGONFLY >>> SinedotsII
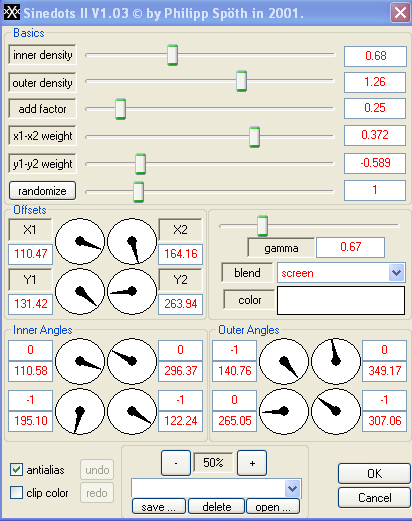
, |
STEP 5
EFFECTS >>> REFLECTION EFFECTS >>>
ROTATING MIRROR
Horizontal Offset = 0
Vertical Offset = n/a
Rotation Angle = 0
Edge Mode = Reflect
EFFECTS >>> PLUGINS >>> MIRROR RAVE >>> Quadrant Flip
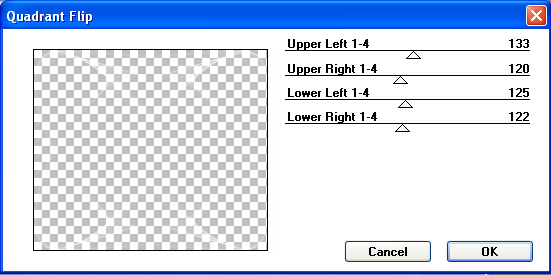
, |
STEP 6
CLOSE Raster 1
LAYERS >>> MERGE >>> MERGE VISIBLE
IMAGE >>> RESIZE = 90%
Check "Lock aspect ratio."
Ensure "Resize all layers" is UNCHECKED
Resample using WEIGHTED AVERAGE
ADJUST >>> SHARPNESS >>> SHARPEN
OPEN Raster 1
|
|
STEP 7
EFFECTS >>> PLUGINS >>> GRAPHICS PLUS >>> Cross Shadow
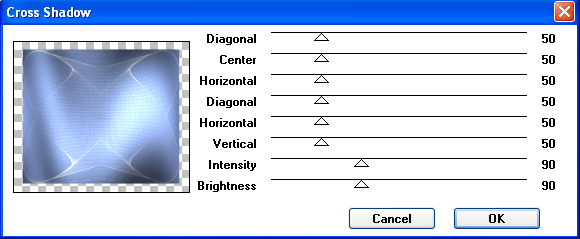
SAVE YOUR WORK
, |
STEP 8
Open up the Baroque.png image in your PSP workspace
WINDOW >>> DUPLICATE
Close the original Image
EFFECTS >>> PLUGINS >>> Adjust >>> Variations
In the following order...
Click MORE BLUE (Twice)
Click MORE CYAN (Twice)
Click MORE MAGENTA (Once)
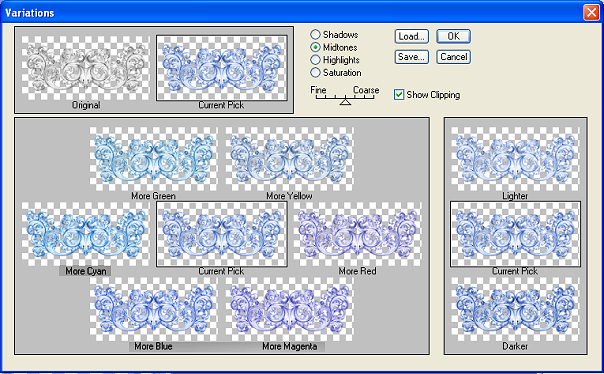
|
STEP 9
IMAGE >>> RESIZE = 70%
Check "Lock aspect ratio."
Ensure "Resize all layers" is UNCHECKED
Resample using WEIGHTED AVERAGE
ADJUST >>> SHARPNESS >>> SHARPEN
Right click on the Title Bar and select COPY from the options
Right click on the Title Bar of your frame image
and select PASTE AS NEW LAYER from the options.
EFFECTS >>> IMAGE EFFECTS >>> OFFSET
Horizontal Offset = 0
Vertical Offset = 195
Edge Mode = Transparent |
|
STEP 10
LAYERS >>> DUPLICATE
IMAGE >>> FLIP
LAYERS >>> DUPLICATE
PSP9: IMAGE >>> ROTATE >>> FREE ROTATE = LEFT 90
Ensure "All layers" is UNCHECKED
PSPX - PSPX9: IMAGE >>> FREE ROTATE = LEFT 90
Ensure "All layers" is UNCHECKED
EFFECTS >>> IMAGE EFFECTS >>> OFFSET
Horizontal Offset = 200
Vertical Offset = 195
Edge Mode = Transparent
LAYERS >>> DUPLICATE
IMAGE >>> MIRROR |
|
STEP 11
CLOSE the Merged layer and Raster 1
LAYERS >>> MERGE >>> MERGE VISIBLE
Rename this layer Merged2
OPEN the Merged layer and Raster 1
ACTIVATE the Merged layer
EFFECTS >>> REFLECTION EFFECTS >>>
ROTATING MIRROR
Horizontal Offset = 0
Vertical Offset = n/a
Rotation Angle = 0
Edge Mode = Reflect
SAVE YOUR WORK
, |
STEP 12
ACTIVATE
Merged 2
EFFECTS >>> 3D EFFECTS >>> INNER BEVEL |
|
STEP 13
EFFECTS >>> 3D EFFECTS >>> DROP SHADOW
Vertical & Horizontal offsets = - ( minus ) 1
Colour = Black
Opacity = 100
Blur = 0
With your MAGIC WAND
Mode = Replace
Match Mode = RGB Value
Tolerance = 0
Feather = 0
Antialias = Checked
Sample Merged = UNCHECKED
PSP9 - X9: Check CONTIGUOUS
PSPX - X9: There is no " Sample Merged"
PSP9 - X9: ANTIALIAS = Outside
Select the centre of your image |
|
STEP 14
SELECTIONS >>> MODIFY >>> EXPAND = 4
ACTIVATE the Merged layer
EDIT >>> CLEAR
ACTIVATE Raster 1
EDIT >>> CLEAR
DESELECT
SAVE YOUR WORK |
|
STEP 15
ACTIVATE the Merged2 layer
EFFECTS >>> PLUGINS >>> EYE CANDY 3 >>>
DROP SHADOW
~~~~~~~~~~~~
OR
EFFECTS >>> PLUGINS >>> EYE CANDY 4000 >>>
SHADOWLAB
Center Offset Direction = 315
Center Offset Distance = 10.00
Overall Opacity = 50
Overall Blur (Pixels) = 10.00
Perspectivel Blur (Pixels) = 0.00
Color = BLACK
Check 'Draw Only Outside Selection' |
|
STEP 16
EDIT >>> Repeat Drop Shadow.. change DIRECTION to 135
OR
EDIT >>> Repeat Shadowlab.. change DIRECTION to 135 |
|
STEP 17
ACTIVATE the Merged layer,
With your MAGIC WAND.... Same settings.
Select the area indicated |
|
STEP 18
SELECTIONS >>> INVERT
~~~~~~~~~~~~
EFFECTS >>> PLUGINS >>> EYE CANDY 3 >>>
DROP SHADOW
Same settings
EDIT >>> Repeat Drop Shadow.. change DIRECTION to 315
DESELECT
~~~~~~~~~~~~
OR
EFFECTS >>> PLUGINS >>> EYE CANDY 4000 >>>
SHADOWLAB
Same settings
EDIT >>> Repeat Shadowlab.. change DIRECTION to 315
DESELECT
|
|
STEP 19
ACTIVATE the Merged2 layer
Open up the scroll corner image in your PSP workspace
Right click on the Title Bar and select COPY from the options
Right click on the Title Bar of your frame image
and select PASTE AS NEW LAYER from the options.
ADJUST >>> COLOUR BALANCE >>> NEGATIVE IMAGE
PSPX - X9: IMAGE >>> NEGATIVE IMAGE
IMAGE >>> RESIZE = 30%
Check "Lock aspect ratio."
Ensure "Resize all layers" is UNCHECKED
Resample using WEIGHTED AVERAGE
LAYERS >>> DUPLICATE
LAYERS >>> MERGE >>> MERGE DOWN
EFFECTS >>> 3D EFFECTS >>> DROP SHADOW
Same settings |
|
STEP 20
EFFECTS >>> IMAGE EFFECTS >>> OFFSET
Horizontal Offset = - ( minus ) 255
Vertical Offset = 195
Edge Mode = Transparent
EFFECTS >>> PLUGINS >>> SIMPLE >>> TOP LEFT MIRROR
LAYERS >>> MERGE >>> MERGE VISIBLE
SAVE YOUR WORK
|
|
STEP 21
LAYERS >>> NEW RASTER LAYER
Flood fill with DARK BLUE #4f6087
SELECTIONS >>> SELECT ALL
SELECTIONS >>> MODIFY >>> CONTRACT = 3
EDIT >>> CLEAR
Flood fill with LIGHT BLUE #758dc4
SELECTIONS >>> MODIFY >>> CONTRACT = 3
EDIT >>> CLEAR
Flood fill with DARK BLUE #4f6087
SELECTIONS >>> MODIFY >>> CONTRACT = 2
EDIT >>> CLEAR
DESELECT
EFFECTS >>> EDGE EFFECTS >>> ENHANCE
|
|
STEP 22
EFFECTS >>> PLUGINS >>> EYE CANDY 3 >>>
DROP SHADOW
Same settings
EDIT >>> Repeat Drop Shadow.. change DIRECTION to 135
~~~~~~~~~~~~
OR
EFFECTS >>> PLUGINS >>> EYE CANDY 4000 >>>
SHADOWLAB
Same settings
EDIT >>> Repeat Shadowlab.. change DIRECTION to 135
LAYERS >>> MERGE >>> MERGE VISIBLE
Save as .pspimage image
|
|
STEP 23
LAYERS >>> NEW RASTER LAYER
Flood fill with DARK BLUE #4f6087
LAYERS >>> ARRANGE >>> MOVE DOWN
EFFECTS >>> TEXTURE EFFECTS >>> TEXTURE
TEXTURE = Paper coarse
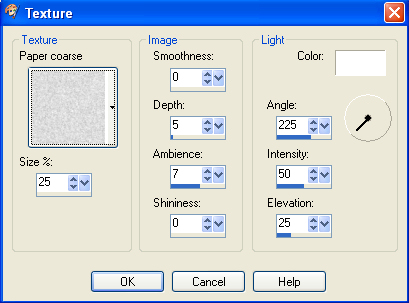
, |
STEP 24
Open up the Beauty_L image in your PSP workspace
Right click on the Title Bar and select COPY from the options
Right click on the Title Bar of your frame image
and select PASTE AS NEW LAYER from the options.
IMAGE >>> RESIZE = 65%
Check "Lock aspect ratio."
Ensure "Resize all layers" is UNCHECKED
Resample using WEIGHTED AVERAGE
ADJUST >>> SHARPNESS >>> SHARPEN
EFFECTS >>> PLUGINS >>> EYE CANDY 3 >>>
DROP SHADOW
Same settings
~~~~~~~~~~~~
OR
EFFECTS >>> PLUGINS >>> EYE CANDY 4000 >>>
SHADOWLAB
Same settings
|
|
STEP 25
LAYERS >>> MERGE >>> MERGE VISIBLE
LAYERS >>> NEW RASTER LAYER
Select your TEXT tool
and with a font of your choice add your name |
|
STEP 26
LAYERS >>> MERGE >>> MERGE ALL (Flatten)
Save as .jpg image
, |
| |
|
| |
|
| |
|