STEP 1
Open a new image 700 x 600
Transparent background
PSPX - X2: Colour Depth = 8bits/channel
PSPX3-X8: Colour Depth RGB = 8bits/channel
VIEW >>> RULERS
|
STEP 2
Choose your SELECTION TOOL then click on the
CUSTOM SELECTION symbol
and enter these coordinates. |
|
STEP 3
Flood fill with WHITE
SELECTIONS >>> MODIFY >>> CONTRACT = 4
EDIT >>> CLEAR
Flood fill with PURPLE #3e1bbf
SELECTIONS >>> MODIFY >>> EXPAND = 4
EFFECTS >>> PLUGINS >>> AAA FRAMES >>> FOTO FRAME
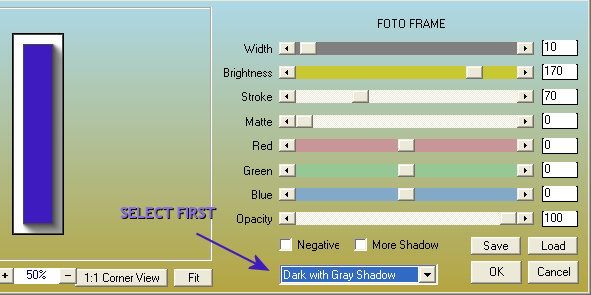
, |
STEP 4
EFFECTS >>> PLUGINS >>> AAA FRAMES >>> FOTO FRAME
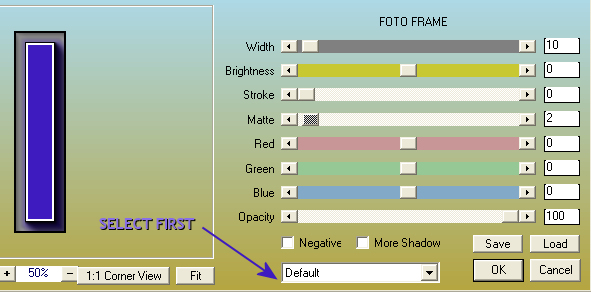 , , |
STEP 5
EFFECTS >>> PLUGINS >>> EYE CANDY 5 IMPACT >>>
EXTRUDE
Colour = #3e1bbf
|
|
STEP 6
DESELECT
EFFECTS >>> EDGE EFFECTS >>> ENHANCE
With your MAGIC WAND
Mode = Replace
Match Mode = RGB Value
Tolerance = 0
Feather = 0
Antialias = UNchecked
Sample Merged = UNCHECKED
PSP9 - X8: Check CONTIGUOUS
PSPX - X8: There is no " Sample Merged"
PSPX - X8: Use all layers = UNChecked
Select the area shown |
|
STEP 7
EFFECTS >>> PLUGINS >>> Greg's Factory Output Vol2 >>> Pool Shadow
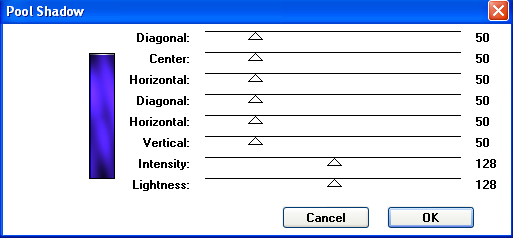 |
STEP 8
EDIT >>> Repeat Pool Shadow
EFFECTS >>> TEXTURE EFFECTS >>> TEXTURE
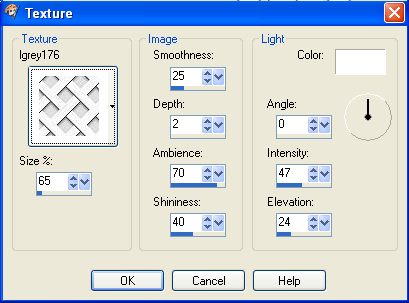 |
STEP 9
ADJUST >>> SHARPNESS >>> SHARPEN MORE
DESELECT |
|
STEP 10
LAYERS >>> DUPLICATE
IMAGE >>> MIRROR
LAYERS >>> DUPLICATE
CLOSE Copy (2) of Raster 1
ACTIVATE
Copy of Raster 1
LAYERS >>> MERGE >>> MERGE DOWN |
|
STEP 11
OPEN & ACTIVATE
Copy (2) of Raster 1
PSP9:IMAGE >>> ROTATE >>> FREE ROTATE = LEFT 90
Ensure "All layers" is UNCHECKED
PSPX - PSPX8: IMAGE >>> FREE ROTATE = LEFT 90
Ensure "All layers" is UNCHECKED
EFFECTS >>> IMAGE EFFECTS >>> OFFSET
Horizontal Offset = - (Minus) 185
Vertical Offset = 0
Edge Mode = Transparent
EFFECTS >>> REFLECTION EFFECTS >>>
ROTATING MIRROR
Horizontal Offset = 10
Vertical Offset = n/a
Rotation angle = 0
Edge Mode =Repeat
IMAGE >>> FLIP
|
|
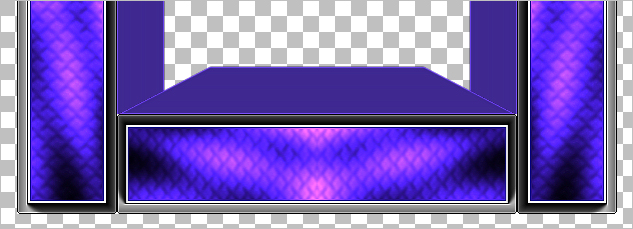
STEP 12
EFFECTS >>> IMAGE EFFECTS >>> OFFSET
Horizontal Offset = - (Minus) 35
Vertical Offset = - (Minus) 191
Edge Mode = Transparent
Select your RASTER DEFORM tool
Mode = SCALE
use default settings
PSPX-X8:Select your PICK tool
Drag the centre right node across to the 550 pixel mark
on your top ruler
Drag the centre left node across to the 150 pixel mark
on your top ruler
Click the RESET RECTANGLE arrow
Select your MOVER tool to disengage
the Deformation / Pick tool
, |
STEP 13
LAYERS >>> DUPLICATE
Right click on the Title Bar and select COPY from the options
Right click on the Title Bar of your tag image
and select PASTE AS NEW LAYER from the options.
DELETE Copy (3) of Raster 1
ACTIVATE Raster 2
EFFECTS >>> GEOMETRIC EFFECTS >>> CIRCLE
Edge Mode = Transparent
EDIT >>> Repeat Circle
IMAGE >>> FLIP
EFFECTS >>> DISTORTION EFFECTS >>>
POLAR COORDINATES
Rectangular to Polar
Edge Mode = Transparent
IMAGE >>> FLIP
|
|
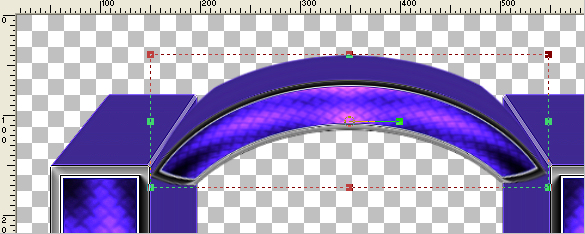
STEP 14
Select your RASTER DEFORM tool
Mode = SCALE
use default settings
PSPX-X8:Select your PICK tool
Drag the centre right node across to the 550 pixel mark
on your top ruler
Drag the centre left node across to the 150 pixel mark
on your top ruler
Drag the centre top node up to the 35 pixel mark
on your left ruler
Drag the centre bottom node up to the 170 pixel mark
on your left ruler
, |
STEP 15
Click the RESET RECTANGLE arrow
Select your MOVER tool to disengage
the Deformation / Pick tool
LAYERS >>> MERGE >>> MERGE VISIBLE
, |
STEP 16
LAYERS >>> NEW RASTER LAYER
Flood fill with LIGHT PURPLE #886ee9
EFFECTS >>> PLUGINS >>> Greg's Factory Output Vol2 >>> Pool Shadow
Same settings
LAYERS >>> ARRANGE >>> MOVE DOWN |
|
STEP 17
ACTIVATE the Merged layer
LAYERS >>> NEW RASTER LAYER
Flood fill with PURPLE #3e1bbf
EFFECTS >>> TEXTURE EFFECTS >>> TEXTURE
Same settings
EFFECTS >>> EDGE EFFECTS >>> ENHANCE MORE
SELECTIONS >>> SELECT ALL
SELECTIONS >>> MODIFY >>> CONTRACT = 12
EDIT >>> CLEAR
EFFECTS >>> 3D EFFECTS >>> DROP SHADOW
Vertical & Horizontal offsets = 2
Colour = WHITE
Opacity = 100
Blur = 0
Repeat Drop Shadow effect changing
Vertical & Horizontal Offsets to - ( minus ) 2
Click OK
|
|
STEP 18
SELECTIONS >>> INVERT
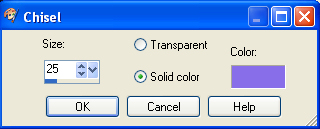
EFFECTS >>> 3D EFFECTS >>> CHISEL
COLOUR = #886ee9
DESELECT
SAVE YOUR WORK
|
|
|
|
|
|
|
|
|
|