The setup for this tutorial is quite long so please SAVE OFTEN
|
STEP 1
In your MATERIALS PALETTE
Load DARK GREEN ' #506d4f ' in your foreground
Load LIGHT GREEN ' #c9e6c8 ' in your background
.
|
STEP 2
Open a new image 700 x 600
Transparent background
PSPX - X2: Colour Depth = 8bits/channel
PSPX3-X8: Colour Depth RGB = 8bits/channel
Flood fill with LIGHT GREEN
VIEW >>> RULERS
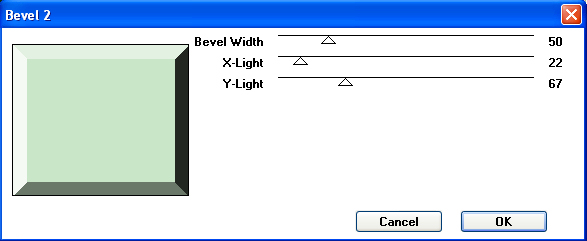
EFFECTS >>> PLUGINS >>> FILTER FACTORY GALLERY G >>> Bevel 2
.
|
STEP 3
EFFECTS >>> REFLECTION EFFECTS >>>
ROTATING MIRROR
Horizontal Offset = 0
Vertical Offset = n/a
Rotation angle = 0
Edge Mode =Reflect
With your MAGIC WAND
Mode = Replace
Match Mode = RGB Value
Tolerance = 0
Feather = 0
Antialias = UNchecked
Sample Merged = UNCHECKED
PSP9 - X8: Check CONTIGUOUS
PSPX - X8: There is no " Sample Merged"
PSPX - X8: Use all layers = UNChecked
Select the centre light green area
|
|
STEP 4
LAYERS >> NEW RASTER LAYER
Open up the Nature-Bgd image in your PSP workspace
Right click on the Title Bar and select
COPY from the options
Right click on the Title Bar of your tag image
and select PASTE INTO SELECTION from the options.
ADJUST >>> SHARPNESS >>> SHARPEN
EFFECTS >>> 3D EFFECTS >>> CHISEL
Colour = WHITE
SIZE = 4
DESELECT
|
|
STEP 5
LAYERS >> NEW RASTER LAYER
Flood fill with DARK GREEN
EFFECTS >>> PLUGINS >>> FILTER FACTORY GALLERY G >>> Bevel 2
Same settings
EFFECTS >>> REFLECTION EFFECTS >>>
ROTATING MIRROR
Same settings |
|
STEP 6
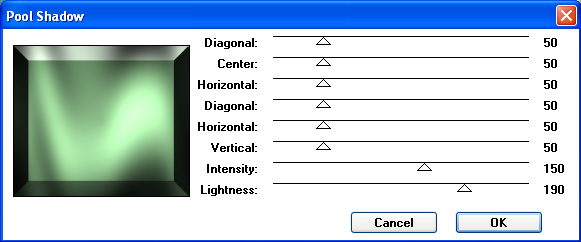
EFFECTS >>> PLUGINS >>> Greg's Factory Output Vol2 >>> Pool Shadow
LAYERS >>> ARRANGE >>> SEND TO THE BOTTOM |
STEP 7
ACTIVATE Raster 2
IMAGE >>> RESIZE = 81%
Ensure "Resize all layers" is UNCHECKED
Resample using WEIGHTED AVERAGE
ADJUST >>> SHARPNESS >>> SHARPEN
ACTIVATE Raster 1
IMAGE >>> RESIZE = 81%
Ensure "Resize all layers" is UNCHECKED
Resample using WEIGHTED AVERAGE
ADJUST >>> SHARPNESS >>> SHARPEN
With your MAGIC WAND
Mode = ADD (Shift )
Match Mode = RGB Value
Tolerance = 0
Feather = 0
Antialias = UNchecked
Sample Merged = UNCHECKED
PSP9 - X8: Check CONTIGUOUS
PSPX - X8: There is no " Sample Merged"
PSPX - X8: Use all layers = UNChecked
Select the 2 areas shown
|
|
STEP 8
Flood fill with #354834
DESELECT
With your MAGIC WAND ... Same settings
Select the 2 areas shown |
|
STEP 9
Flood fill upper section with LIGHT GREEN #c9e6c8
Flood fill lower section with DARK GREEN #506d4f
DESELECT
ACTIVATE Raster 2
LAYERS >>> MERGE >>> MERGE DOWN
Select your RASTER DEFORM tool
Mode = SCALE
use default settings
PSPX-X8:Select your PICK tool
Pull centre left and centre right nodes to meet the dark edges on left and right.
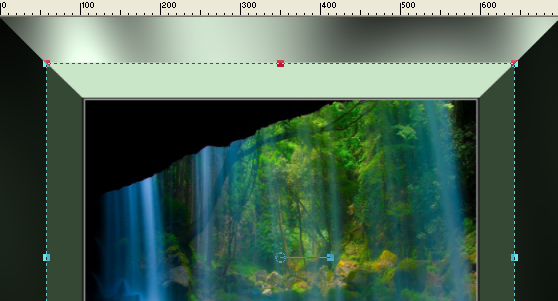
Click the RESET RECTANGLE arrow
Select your MOVER tool to disengage
the Deformation / Pick tool
ADJUST >>> SHARPNESS >>> SHARPEN MORE
LAYERS >>> MERGE >>> MERGE VISIBLE
, |
STEP 10
Select your RASTER DEFORM tool
Mode = SCALE
use default settings
PSPX-X8:Select your PICK tool
Pull centre left node inwards level with the 70 pixel
mark on your top ruler.
Pull the
centre right node inwards level with the 630 pixel
mark on your top ruler.
Pull the centre top node down level with the 30 pixel
mark on your left ruler.
Pull the centre bottom node up level with the 470 pixel
mark on your left ruler.
Click the RESET RECTANGLE arrow
Select your MOVER tool to disengage the
Deformation / Pick tool
ADJUST >>> SHARPNESS >>> SHARPEN |
|
STEP 11
LAYERS >>> DUPLICATE
Choose your SELECTION TOOL then click on the CUSTOM SELECTION symbol
and enter these coordinates. |
|
STEP 12
SELECTIONS >>> INVERT
EDIT >>> CLEAR
DESELECT
Rename this layer scene |
STEP 13
LAYERS >>> NEW RASTER LAYER
Flood fill with DARK GREEN #506d4f
LAYERS >>> ARRANGE >>> SEND TO BOTTOM
EFFECTS >>> PLUGINS >>> FILTER FACTORY GALLERY G >>> Bevel 2
Same settings
EFFECTS >>> REFLECTION EFFECTS >>>
ROTATING MIRROR
Horizontal Offset = 0
Vertical Offset = n/a
Rotation angle = 0
Edge Mode =Reflect |
|
STEP 14
EFFECTS >>> PLUGINS >>> Greg's Factory Output Vol2 >>> Pool Shadow
Same settings
Select your RASTER DEFORM tool
Mode = SCALE
use default settings
PSPX-X8:Select your PICK tool
Pull centre left node inwards level with the 15 pixel
mark on your top ruler.
Pull the centre right node inwards level with the 685 pixel
mark on your top ruler.
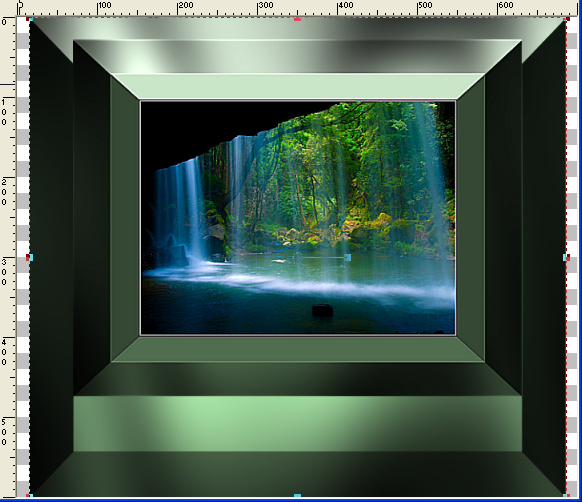
Click the RESET RECTANGLE arrow
Select your MOVER tool to disengage
the Deformation / Pick tool
, |
STEP 15
With your MAGIC WAND.... Same settings.
Select the 2 transparent areas
LAYERS >>> NEW RASTER LAYER
LAYERS >>> ARRANGE >>> BRING TO TOP
In your MATERIALS PALETTE
Click on the GRADIENT option on your Foreground
Locate the "Foreground-background" gradient
and use these settings.
LIGHT GREEN ' #c9e6c8 ' in your foreground
DARK GREEN ' #506d4f ' in your background
Angle = 45
Repeats = 3
|
|
STEP 16
Flood fill the transparent areas with the Gradient
EFFECTS >>> DISTORTION EFFECTS >>> PIXELATE
BLOCK WIDTH = 75
BLOCK HEIGHT = 46
EFFECTS >>> EDGE EFFECTS >>> ENHANCE MORE
PSP9 - PSPX8: ADJUST >>> BRIGHTNESS and CONTRAST >>> BRIGHTNESS/CONTRAST
Brightness = - (minus) 40
Contrast = 20
PSPX6 - PSPX8: Linear Mode checked
DESELECT
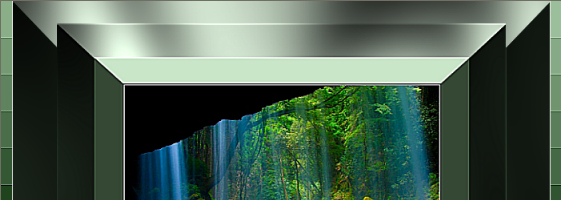
******* Rename this layer edges *******
, |
STEP 17
Open up the [Ming Yue] Sirène Coquillage image
in your PSP workspace
Right click on the Title Bar and select
COPY from the options
Right click on the Title Bar of your tag image
and select PASTE AS NEW LAYER from the options.
IMAGE >>> RESIZE = 55%
Ensure "Resize all layers" is UNCHECKED
Resample using WEIGHTED AVERAGE
ADJUST >>> SHARPNESS >>> SHARPEN
Reposition with your MOVER tool
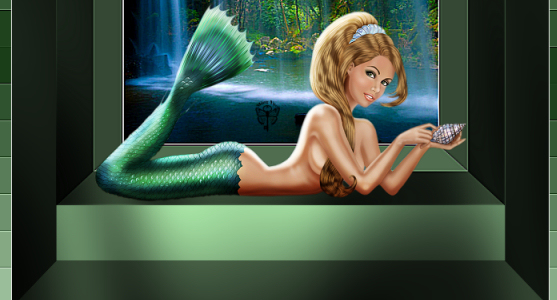 , , |
STEP 18
Choose your SELECTION TOOL
Selection Type = Rectangle
Mode = Replace
Feather = 0
Antialias = UNChecked
Select the tuber image and delete.
DESELECT
|
|
STEP 19
Open up the Seashells-SueK image
in your PSP workspace
Right click on the Title Bar and select
COPY from the options
Right click on the Title Bar of your tag image
and select PASTE AS NEW LAYER from the options.
IMAGE >>> RESIZE = 45%
Ensure "Resize all layers" is UNCHECKED
Resample using WEIGHTED AVERAGE
ADJUST >>> SHARPNESS >>> SHARPEN
Reposition with your MOVER tool
|
|
STEP 20
Open up the shells.pspimage image
in your PSP workspace
Right click on the Title Bar and select
COPY from the options
Right click on the Title Bar of your tag image
and select PASTE AS NEW LAYER from the options.
IMAGE >>> RESIZE = 55%
Ensure "Resize all layers" is UNCHECKED
Resample using WEIGHTED AVERAGE
ADJUST >>> SHARPNESS >>> SHARPEN
Reposition with your MOVER tool
|
|
STEP 21
EFFECTS >>> PLUGINS >>> EYE CANDY 3 >>>
DROP SHADOW |
|
STEP 22
ACTIVATE Raster 3
EDIT >>> Repeat Drop Shadow.
ACTIVATE Raster 2
EDIT >>> Repeat Drop Shadow.
ACTIVATE Raster 4
LAYERS >>> MERGE >>> MERGE DOWN
EDIT >>> Repeat Layer Merge Down
Rename this layer mermaid
|
STEP 23
CLOSE the top 3 layers
ACTIVATE the Raster 1
LAYERS >>> NEW RASTER LAYER
Flood fill with the GRADIENT
LAYERS >>> ARRANGE >>> MOVE DOWN
ACTIVATE the Raster 1
Choose your SELECTION TOOL then click on the CUSTOM SELECTION symbol
and enter these coordinates.
|
|
STEP 24
EDIT >>> CLEAR
DESELECT
Choose your SELECTION TOOL then click on the CUSTOM SELECTION symbol
and enter these coordinates. |
|
STEP 25
EDIT >>> CLEAR
DESELECT
Rename this layer bgd
OPEN the edges layer
With the bgd layer active
EFFECTS >>> PLUGINS >>> EYE CANDY 3 >>>
DROP SHADOW
Same settings
EDIT >>> Repeat Drop Shadow..
change DIRECTION to 135 |
|
STEP 26
Open up the ANCHOR320 image in your PSP workspace
Right click on the Title Bar and select
COPY from the options
Right click on the Title Bar of your tag image
and select PASTE AS NEW LAYER from the options.
LAYERS >>> ARRANGE >>> MOVE UP
IMAGE >>> RESIZE = 40%
Ensure "Resize all layers" is UNCHECKED
Resample using WEIGHTED AVERAGE
ADJUST >>> SHARPNESS >>> SHARPEN MORE
Reposition with your MOVER tool |
|
STEP 27
LAYERS >>> DUPLICATE
IMAGE >>> MIRROR
LAYERS >>> MERGE >>> MERGE DOWN
EFFECTS >>> PLUGINS >>> EYE CANDY 3 >>>
DROP SHADOW
Same settings
LAYERS >>> MERGE >>> MERGE DOWN |
|
STEP 28
ACTIVATE the mermaid layer...(no need to open)
LAYERS >>> NEW RASTER LAYER
Flood fill with #354834
SELECTIONS >>> SELECT ALL
SELECTIONS >>> MODIFY >>> CONTRACT = 2
EDIT >>> CLEAR
DESELECT
Rename this layer frame
|
|
STEP 28A
ACTIVATE the Merged layer
LAYERS >>> MERGE >>> MERGE DOWN
LAYERS >> NEW RASTER LAYER
Select your TEXT TOOL
with font and settings of your choice
add your name
LAYERS >>> MERGE >>> MERGE DOWN
SAVE YOUR WORK
|
STEP 29
Set up LAYER PALETTE as shown
Right click on Title Bar and select
Copy merged from the options
|
|
STEP 30
In ANIMATION SHOP
Right click the workspace and select
'Paste As New Animation' from the options.
Click the 'Paste After Current' icon on top menu ONCE

Click inside the first frame (F:1) to activate
, |
STEP 31
Effects >> Insert Image Effect >> Noise.
Click on the CUSTOMIZE BUTTON and enter settings below.
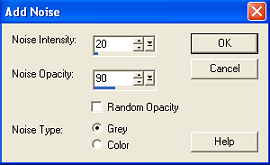
CLICK "OK"
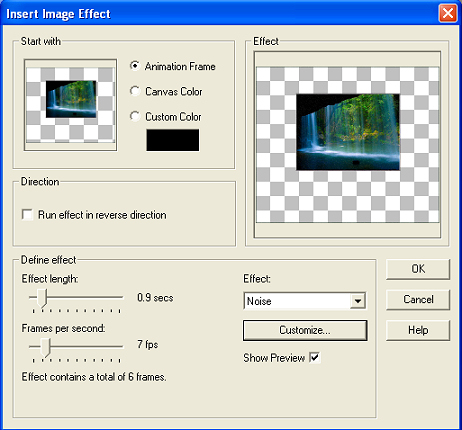
and enter these settings.
.
 , , |
STEP 32
Right click inside the last frame (F:8) to activate and select DELETE from the options.
Right click inside the first frame (F:1) to activate and select DELETE from the options.
You will have 6 frames left.

Minimize this animation (Animation1*) for now
.
|
STEP 33
Back to PSP.
Set up LAYER PALETTE as shown
Right click on Title Bar and select
Copy merged from the options
, |
|
STEP 34
In ANIMATION SHOP
Right click the workspace and select
'Paste As New Animation' from the options.
Click the 'Paste After Current' icon on top menu 5 times
so that you end up with 6 frames.
Minimize this animation (Animation2*) for now
Back to PSP.
Set up LAYER PALETTE as shown
Right click on Title Bar and select
Copy merged from the options
|
|
STEP 35
In ANIMATION SHOP
Right click the workspace and select
'Paste As New Animation' from the options.
Click the 'Paste After Current' icon on top menu 5 times
This is
Animation 3* (background)
, |
STEP 36
MAXIMIZE & ACTIVATE Animation 1* (scene)
Edit >> Select All
Edit >> Copy
Edit >> Propagate Paste
ACTIVATE Animation 3* (background)
Edit >> Select All
ZOOM in on the first frame (F:1)
Edit >> Paste into selected frame and click your left mouse button (without moving) to place.
View >> Animation.... to check that there is no movement
When satisfied close the animation view.
Minimize
Animation 1* (scene)
, |
STEP 37
MAXIMIZE & ACTIVATE Animation 2* (mermaid)
Edit >> Select All
Edit >> Copy
Edit >> Propagate Paste
ACTIVATE Animation 3* (background)
Edit >> Select All
ZOOM in on the first frame (F:1)
Edit >> Paste into selected frame and click your left mouse button (without moving) to place.
|
STEP 38
View >> Animation
and while it is still running,
File >> Save As
Locate the folder in which you wish to save it.
Name your animation.
With the Gif Optimiser keep pressing NEXT
until you get to the last one... click FINISH
Close the Animation
Close ALL the frames.
Close Animation Shop |
|
|
|
|
RESIZING ANIMATIONS
Click on the Title Bar of the frames
Animation >> Resize animation
Select width and height in pixels
Click OK
Save your animation |
|
|
|
|