|
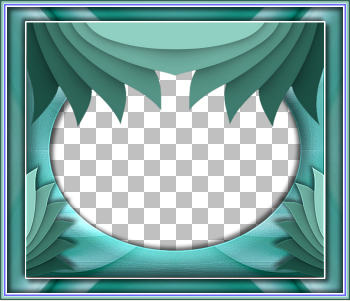
STEP 1
Open a new image 700 x 600
Transparent background
PSP9: Colour Depth = 16 Million Colors (24bit)
PSPX-X8: Colour Depth RGB = 8bits/channel
VIEW >>> RULERS
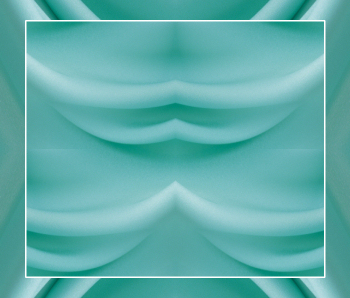
SELECTIONS >>> SELECT ALL
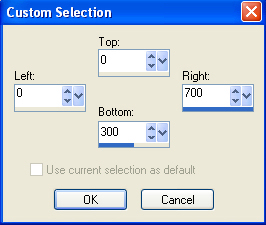
Open up the turquoise-cloth_tn2 image in your PSP workspace
Right click on the Title Bar and select COPY from the options
Right click on the Title Bar of your tag image
and select PASTE INTO SELECTION from the options.
DESELECT
LAYERS .>>> DUPLICATE
|
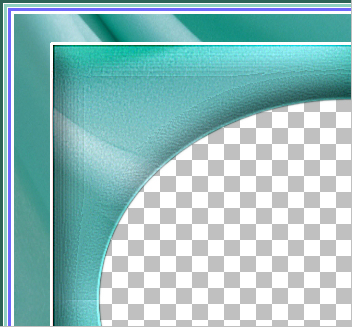
STEP 2
CLOSE Raster 1
EFFECTS >>> REFLECTION EFFECTS >>>
ROTATING MIRROR
Horizontal Offset = 0
Vertical Offset = n/a
Rotation Angle = 0
Edge Mode = Reflect
LAYERS >>> DUPLICATE
IMAGE >>> FLIP
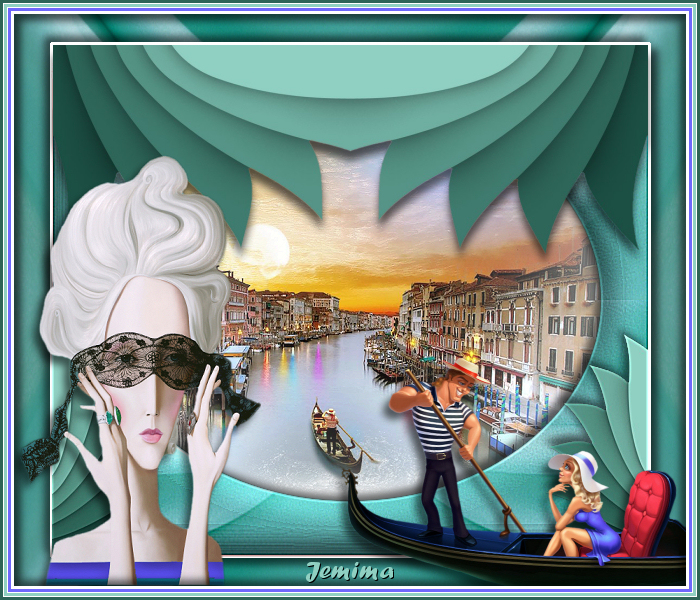
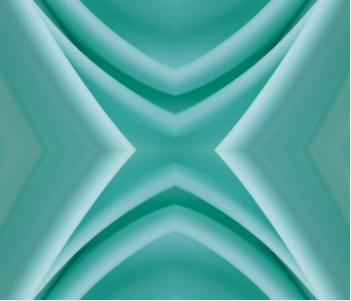
Choose your SELECTION TOOL then click on the
CUSTOM SELECTION symbol
and enter these coordinates.
|
|
STEP 3
EDIT >>> CLEAR
DESELECT
LAYERS >>> MERGE >>> MERGE DOWN
.
|
|
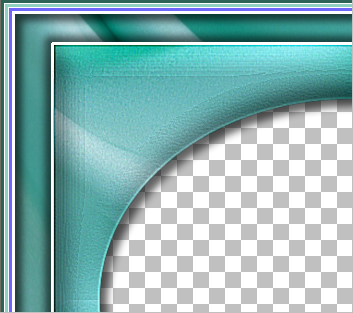
STEP 4
OPEN & ACTIVATE Raster 1
LAYERS >>> ARRANGE >>> MOVE UP
EFFECTS >>> REFLECTION EFFECTS >>>
ROTATING MIRROR
Horizontal Offset = 0
Vertical Offset = n/a
Rotation Angle = 180
Edge Mode = Reflect
IMAGE >>> RESIZE = 85%
Ensure "Resize all layers" is UNCHECKED
Resample using WEIGHTED AVERAGE
SELECTIONS >>> SELECT ALL
SELECTIONS >>> FLOAT
SELECTIONS >>> DEFLOAT
|
|
STEP 5
EFFECTS >>> PLUGINS >>> SIMPLE >>> QUICK TILE
SELECTIONS >>> INVERT
Flood fill with WHITE
SELECTIONS >>> INVERT
SELECTIONS >>> MODIFY >>> EXPAND = 3
SELECTIONS >>> INVERT
EDIT >>> CLEAR
DESELECT |
|
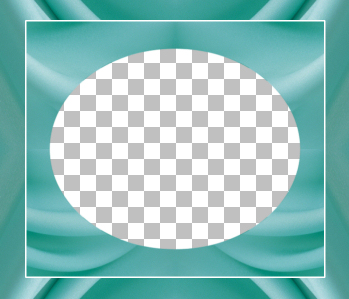
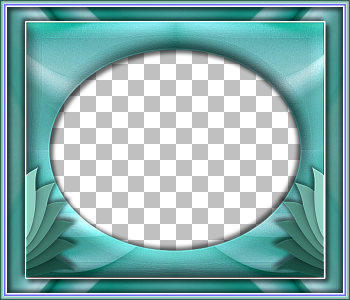
STEP 6
Choose your SELECTION TOOL
Selection Type = Ellipse
Mode = Replace
Feather = 2
Antialias = Checked
Starting at 350 pixels across and 300 pixels down
drag your cursor to 600 pixels across and 500 pixels down
and release.
EDIT >>> CLEAR
ACTIVATE Copy of Raster 1
EDIT >>> CLEAR
DESELECT
|
|
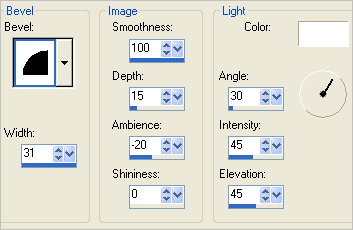
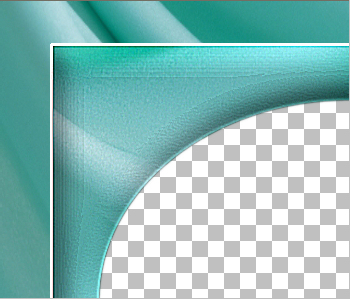
STEP 7
ACTIVATE Raster 1
EFFECTS >>> 3D EFFECTS >>> INNER BEVEL
|
|
STEP 8
ADJUST >>> SHARPNESS >>> SHARPEN MORE
EDIT >>> Repeat Sharpen More
|
|
STEP 9
LAYERS >>> NEW RASTER LAYER
Flood fill with DARK GREEN #2d6256
SELECTIONS >>> SELECT ALL
SELECTIONS >>> MODIFY >>> CONTRACT = 3
EDIT >>> CLEAR
Flood fill with WHITE #ffffff
SELECTIONS >>> MODIFY >>> CONTRACT = 1
EDIT >>> CLEAR
Flood fill with LIGHT GREEN #90d0c2
SELECTIONS >>> MODIFY >>> CONTRACT = 3
EDIT >>> CLEAR
Flood fill with WHITE #ffffff
SELECTIONS >>> MODIFY >>> CONTRACT = 1
EDIT >>> CLEAR
Flood fill with PURPLE #6656f5
SELECTIONS >>> MODIFY >>> CONTRACT = 3
EDIT >>> CLEAR
Flood fill with WHITE #ffffff
SELECTIONS >>> MODIFY >>> CONTRACT = 3
EDIT >>> CLEAR
DESELECT
|
|
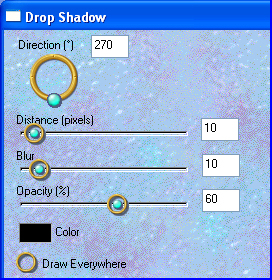
STEP 10
EFFECTS >>> PLUGINS >>> EYE CANDY 3 >>>
DROP SHADOW
|
|
STEP 11
ACTIVATE Raster 1
EDIT >>> Repeat Drop Shadow.. Same settings
EDIT >>> Repeat Drop Shadow.. change DIRECTION to 135
ACTIVATE Raster 2
EDIT >>> Repeat Drop Shadow.. Same settings
SAVE YOUR WORK
|
|
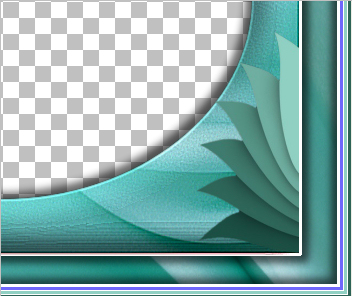
STEP 12
Open up the turquoise-leaves-15096 image
in your PSP workspace
Choose your SELECTION TOOL
Selection Type = Rectangle
Mode = Replace
Feather = 0
Antialias = UNChecked
Select the small leaves on extreme right
Right click on the Title Bar and select COPY from the options
Right click on the Title Bar of your tag image
and select PASTE AS NEW LAYER from the options.
EFFECTS >>> IMAGE EFFECTS >>> OFFSET
Horizontal Offset = 247
Vertical Offset = - ( minus ) 145
Edge Mode = Transparent |
|
STEP 13
EFFECTS >>> PLUGINS >>> EYE CANDY 3 >>>
DROP SHADOW
Same settings
LAYERS >>> DUPLICATE
IMAGE >>> MIRROR
LAYERS >>> MERGE >>> MERGE DOWN
ADJUST >>> SHARPNESS >>> SHARPEN MORE |
|
STEP 14
Back top the turquoise-leaves-15096 image
in your PSP workspace
With your SELECTION TOOL ... Same settings
Select the large leaves
Right click on the Title Bar and select COPY from the options
Right click on the Title Bar of your tag image
and select PASTE AS NEW LAYER from the options.
IMAGE >>> FLIP
EFFECTS >>> IMAGE EFFECTS >>> OFFSET
Horizontal Offset = - ( minus ) 97
Vertical Offset = 150
Edge Mode = Transparent
EFFECTS >>> REFLECTION EFFECTS >>>
ROTATING MIRROR
Horizontal Offset = 0
Vertical Offset = n/a
Rotation Angle = 180
Edge Mode = Reflect
|
|
STEP 15
EFFECTS >>> PLUGINS >>> EYE CANDY 3 >>>
DROP SHADOW |
|
STEP 16
CLOSE Copy of Raster 1
CLOSE Raster 2
ACTIVATE Raster 1
LAYERS >>> MERGE >>> MERGE VISIBLE
OPEN ALL LAYERS
ACTIVATE Copy of Raster 1
, |
STEP 17
LAYERS >>> NEW RASTER LAYER
Flood fill with WHITE
LAYERS >>> ARRANGE >>> MOVE DOWN
Open up the GINATUBES DIVERS 287 image
in your PSP workspace
Right click on the Title Bar and select COPY from the options
Right click on the Title Bar of your tag image
and select PASTE AS NEW LAYER from the options.
IMAGE >>> RESIZE = 70%
Ensure "Resize all layers" is UNCHECKED
Resample using WEIGHTED AVERAGE
ADJUST >>> SHARPNESS >>> SHARPEN |
|
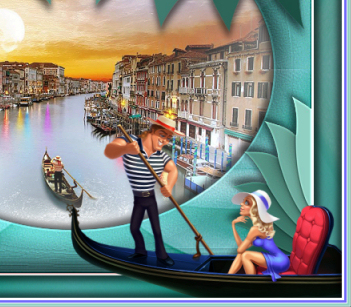
STEP 18
ACTIVATE the Merged layer
Open up the gondolier_by_ekaterina_frolova image
in your PSP workspace
Right click on the Title Bar and select COPY from the options
Right click on the Title Bar of your tag image
and select PASTE AS NEW LAYER from the options.
IMAGE >>> MIRROR
IMAGE >>> RESIZE = 50%
Ensure "Resize all layers" is UNCHECKED
Resample using WEIGHTED AVERAGE
ADJUST >>> SHARPNESS >>> SHARPEN
EFFECTS >>> IMAGE EFFECTS >>> OFFSET
Horizontal Offset = 165
Vertical Offset = - ( minus ) 175
Edge Mode = Transparent |
|
STEP 19
EFFECTS >>> PLUGINS >>> EYE CANDY 3 >>>
DROP SHADOW
Same settings BUT .. change DIRECTION to 225
|
STEP 20
Open up the slava-fokk-5 image
in your PSP workspace
Right click on the Title Bar and select COPY from the options
Right click on the Title Bar of your tag image
and select PASTE AS NEW LAYER from the options.
IMAGE >>> RESIZE = 70%
Ensure "Resize all layers" is UNCHECKED
Resample using WEIGHTED AVERAGE
ADJUST >>> SHARPNESS >>> SHARPEN
EFFECTS >>> IMAGE EFFECTS >>> OFFSET
Horizontal Offset = - ( minus ) 210
Vertical Offset = - ( minus ) 70
Edge Mode = Transparent
EFFECTS >>> PLUGINS >>> EYE CANDY 3 >>>
DROP SHADOW
Same settings
|
|
STEP 21
,LAYERS >>> MERGE >>> MERGE VISIBLE
LAYERS >>> NEW RASTER LAYER
SELECT your TEXT tool
With a font of your choice add your name
|
|
STEP 22
LAYERS >>> MERGE >>> MERGE ALL (Flatten)
Save as .jpg image
|
| |
|
| |
|
| |
|