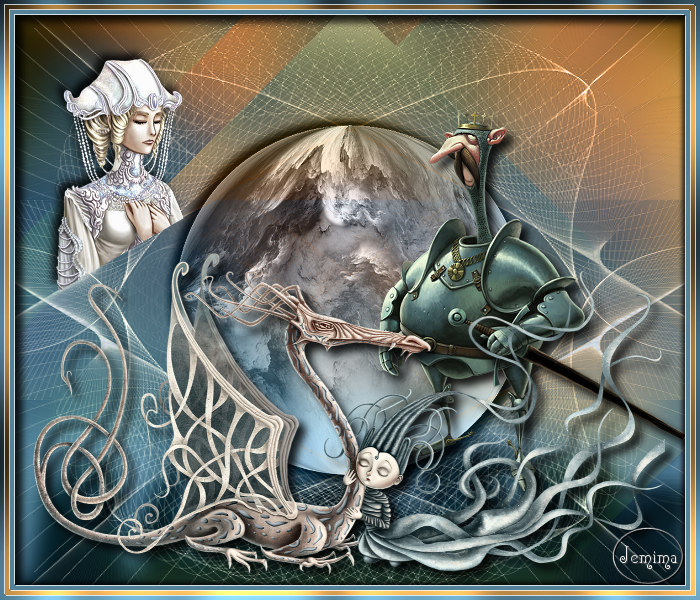
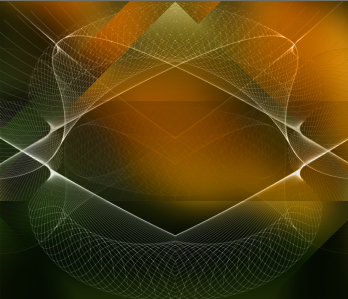
STEP 1
In your MATERIALS PALETTE
Load YELLOW ' #f1df92 ' in your foreground
Load GREEN ' #212d09 ' in your background.
Open a new image 700 x 600
Transparent background
PSP9: Colour Depth = 16 Million Colors (24bit)
PSPX-X8: Colour Depth RGB = 8bits/channel
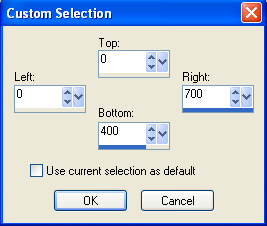
Choose your SELECTION TOOL then click on the
CUSTOM SELECTION symbol
and enter these coordinates. |
|
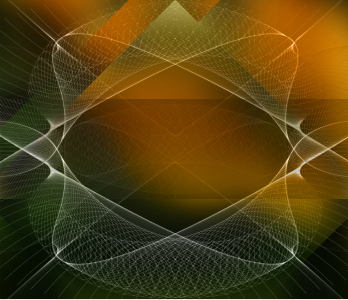
STEP 2
Flood fill with YELLOW
SELECTIONS >>> INVERT
Flood fill with GREEN
DESELECT
|
|
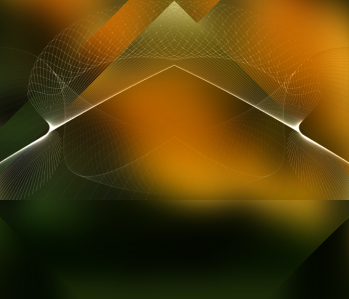
STEP 3
Open up the fant_bgd2 image in your PSP workspace
Right click on the Title Bar and select COPY from the options
Right click on the Title Bar of your tag image
and select PASTE AS NEW LAYER from the options.
LAYERS >>> DUPLICATE
In your LAYER PALETTE change the
BLEND MODE to MULTIPLY
|
|
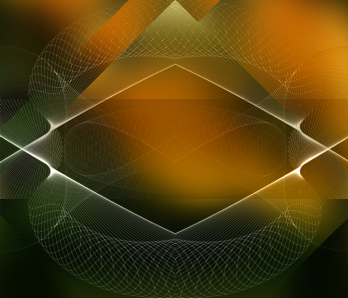
STEP 4
LAYERS >>> NEW RASTER LAYER
Choose your SELECTION TOOL then click on the
CUSTOM SELECTION symbol
Same settings
Open up the 053_free_vector image in your PSP workspace
Right click on the Title Bar and select COPY from the options
Right click on the Title Bar of your tag image
and select PASTE INTO SELECTION from the options.
EFFECTS >>> REFLECTION EFFECTS >>>
ROTATING MIRROR
Horizontal Offset = 0
Vertical Offset = n/a
Rotation Angle = 0
Edge Mode = Reflect.
DESELECT
In your LAYER PALETTE change the
BLEND MODE to LUMINANCE (L)
.
|
|
STEP 5
LAYERS >>> DUPLICATE
IMAGE >>> FLIP
LAYERS >>> MERGE >>> MERGE DOWN
ADJUST >>> SHARPNESS >>> SHARPEN
|
|
STEP 6
LAYERS >>> NEW RASTER LAYER
Choose your SELECTION TOOL then click on the
CUSTOM SELECTION symbol
Same settings
Back to the 053_free_vector image in your PSP workspace
Right click on the Title Bar and select COPY from the options
Right click on the Title Bar of your tag image
and select PASTE INTO SELECTION from the options.
EFFECTS >>> REFLECTION EFFECTS >>>
ROTATING MIRROR
Horizontal Offset = 0
Vertical Offset = n/a
Rotation Angle = 180
Edge Mode = Reflect.
DESELECT
In your LAYER PALETTE change the
BLEND MODE to LUMINANCE (L)
|
|
STEP 7
LAYERS >>> DUPLICATE
IMAGE >>> FLIP
LAYERS >>> MERGE >>> MERGE DOWN
ADJUST >>> SHARPNESS >>> SHARPEN
|
|
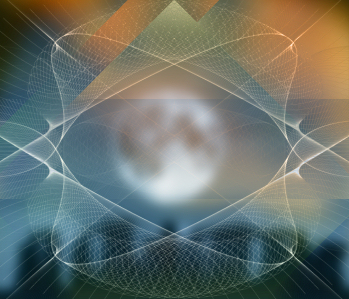
STEP 8
Open up the MKM 2015 JULY SERIES MOONS_T2 image
in your PSP workspace
Right click on the Title Bar and select COPY from the options
Right click on the Title Bar of your tag image
and select PASTE AS NEW LAYER from the options.
IMAGE >>> RESIZE = 120%
Ensure "Resize all layers" is UNCHECKED
Resample using WEIGHTED AVERAGE
In your LAYER PALETTE change the
BLEND MODE to SCREEN
ADJUST >>> BLUR >>> GAUSSIAN BLUR
Radius = 10.00
|
|
STEP 9
Open up the colorful-clouds image
in your PSP workspace
WINDOW >>> DUPLICATE
Close the original Image
LAYERS >>> Promote background layer
EFFECTS>>> GEOMETRIC EFFECTS >>> CIRCLE
Edge Mode = Transparent
IMAGE >>> RESIZE = 55%
Ensure "Resize all layers" is UNCHECKED
Resample using WEIGHTED AVERAGE
|
|
STEP 10
Right click on the Title Bar and select COPY from the options
Right click on the Title Bar of your tag image
and select PASTE AS NEW LAYER from the options.
In your LAYER PALETTE change the
BLEND MODE to LUMINANCE (L)
|
|
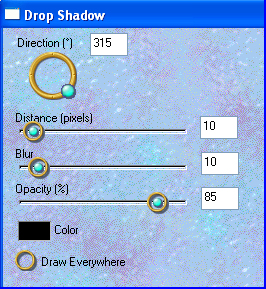
STEP 11
EFFECTS >>> PLUGINS >>> EYE CANDY 3 >>>
DROP SHADOW
|
|
STEP 12
EDIT >>> Repeat Drop Shadow.. change DIRECTION to 135
ADJUST >>> SHARPNESS >>> SHARPEN
|
|
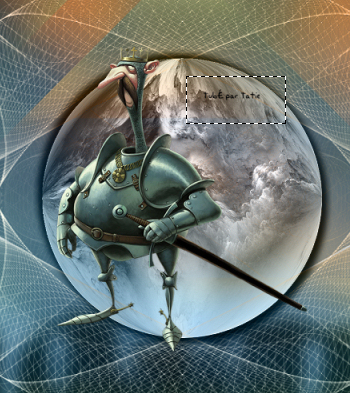
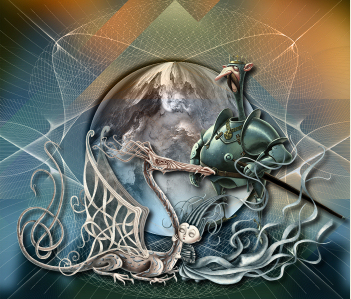
STEP 13
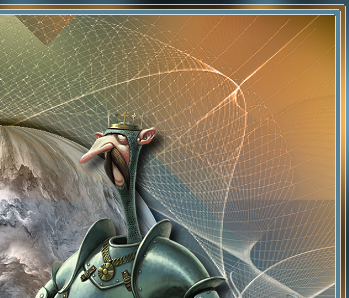
Open up the tubtatie_5-robot-zilber image
in your PSP workspace
Right click on the Title Bar and select COPY from the options
Right click on the Title Bar of your tag image
and select PASTE AS NEW LAYER from the options.
IMAGE >>> RESIZE = 50%
Ensure "Resize all layers" is UNCHECKED
Resample using WEIGHTED AVERAGE
ADJUST >>> SHARPNESS >>> SHARPEN
Choose your SELECTION TOOL
Selection Type = Rectangle
Mode = Replace
Feather = 0
Antialias = UNChecked
Select and delete the tuber text
DESELECT
|
|
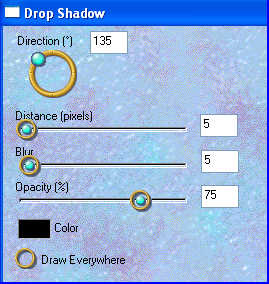
STEP 14
EFFECTS >>> IMAGE EFFECTS >>> OFFSET
Horizontal Offset = 185
Vertical Offset = 0
Edge Mode = Transparent
EFFECTS >>> PLUGINS >>> EYE CANDY 3 >>>
DROP SHADOW
Same settings BUT change DIRECTION to 315 |
|
STEP 15
Open up the tubtatie_d6z2q6w image
in your PSP workspace
Right click on the Title Bar and select COPY from the options
Right click on the Title Bar of your tag image
and select PASTE AS NEW LAYER from the options.
IMAGE >>> RESIZE = 50%
Ensure "Resize all layers" is UNCHECKED
Resample using WEIGHTED AVERAGE
ADJUST >>> SHARPNESS >>> SHARPEN
IMAGE >>> MIRROR
Choose your SELECTION TOOL
Same settings
Select and delete the tuber text
DESELECT |
|
STEP 16
EFFECTS >>> IMAGE EFFECTS >>> OFFSET
Horizontal Offset = 0
Vertical Offset = - ( minus ) 110
Edge Mode = Transparent
EFFECTS >>> PLUGINS >>> EYE CANDY 3 >>>
DROP SHADOW
Same settings |
|
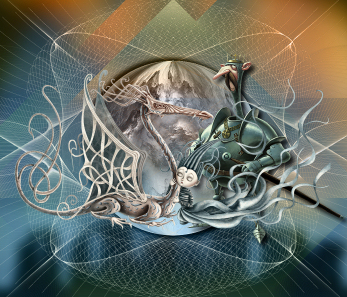
STEP 17
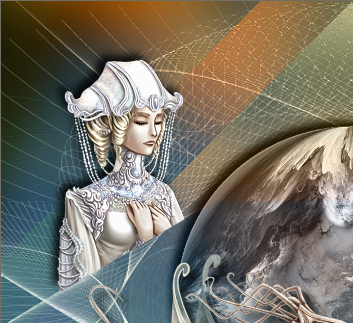
Open up the Agnieszka Miroslaw - Lucretia image
in your PSP workspace
Right click on the Title Bar and select COPY from the options
Right click on the Title Bar of your tag image
and select PASTE AS NEW LAYER from the options.
IMAGE >>> RESIZE = 35%
Ensure "Resize all layers" is UNCHECKED
Resample using WEIGHTED AVERAGE
ADJUST >>> SHARPNESS >>> SHARPEN
IMAGE >>> MIRROR
Choose your SELECTION TOOL
Same settings
Select and delete the tuber text
DESELECT |
|
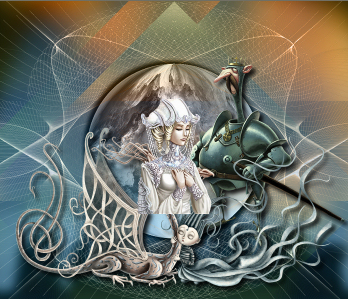
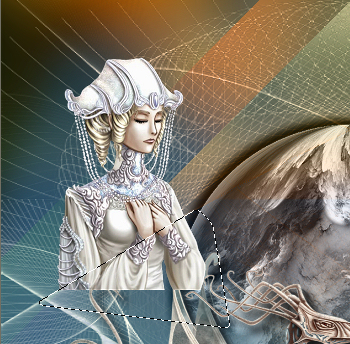
STEP 18
EFFECTS >>> IMAGE EFFECTS >>> OFFSET
Horizontal Offset = - ( minus ) 220
Vertical Offset = 135
Edge Mode = Transparent
Choose your FREEHAND SELECTION TOOL
Selection Type = Point to Point
Mode = Replace
Feather = 1
Smoothing = 5
Antialias = Checked
Select the area shown |
|
STEP 19
EDIT >>> CLEAR
DESELECT
EFFECTS >>> PLUGINS >>> EYE CANDY 3 >>>
DROP SHADOW
Same settings BUT change DIRECTION to 135 |
|
STEP 20
LAYERS >>> MERGE >>> MERGE VISIBLE
LAYERS >>> NEW RASTER LAYER
Flood fill with TEAL #548299
EFFECTS >>> PLUGINS >>> GREG'S FACTORY OUTPUT VOL2 >>> POOL SHADOW

SELECTIONS >>> SELECT ALL
SELECTIONS >>> MODIFY >>> CONTRACT = 5
EDIT >>> CLEAR
, |
STEP 21
EFFECTS >>> 3D EFFECTS >>> DROP SHADOW
Vertical & Horizontal offsets = 1
Colour = WHITE
Opacity = 75
Blur = 0
Repeat Drop Shadow effect changing
Vertical & Horizontal Offsets to - ( minus ) 1
Click OK
Flood fill with MUSTARD #c8934a
EFFECTS >>> PLUGINS >>> GREG'S FACTORY OUTPUT VOL2 >>> POOL SHADOW
Same settings
SELECTIONS >>> MODIFY >>> CONTRACT = 5
EDIT >>> CLEAR
Repeat both Drop Shadows
|
|
STEP 22
Flood fill with TEAL #548299
EFFECTS >>> PLUGINS >>> GREG'S FACTORY OUTPUT VOL2 >>> POOL SHADOW
Same settings
SELECTIONS >>> MODIFY >>> CONTRACT = 5
EDIT >>> CLEAR
Repeat both Drop Shadows
DESELECT |
|
STEP 23
EFFECTS >>> PLUGINS >>> EYE CANDY 3 >>>
DROP SHADOW |
|
STEP 24
EFFECTS >>> PLUGINS >>> EYE CANDY 3 >>>
DROP SHADOW
LAYERS >>> MERGE >>> MERGE VISIBLE
|
|
STEP 25
LAYERS >>> NEW RASTER LAYER
SELECT your TEXT tool
With a font of your choice add your name
|
|
STEP 26
LAYERS >>> MERGE >>> MERGE ALL (Flatten)
Save as .jpg image
, |
| |
|
| |
|
| |
|