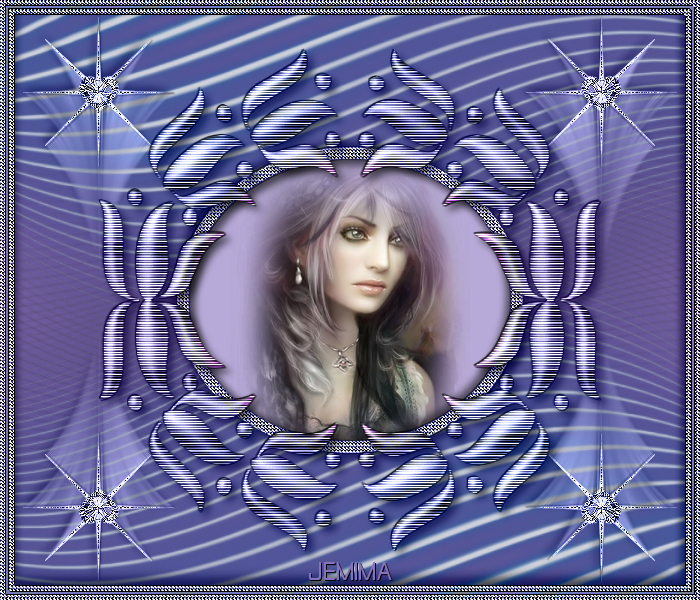
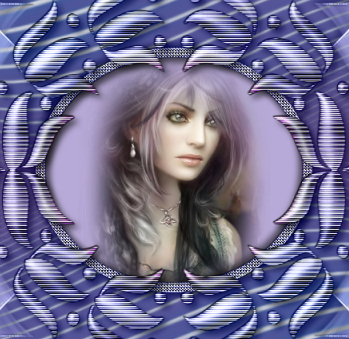
STEP 1
Open a new image 700 x 600
Transparent background
PSP9: Colour Depth = 16 Million Colors (24bit)
PSPX-X8: Colour Depth RGB = 8bits/channel
|
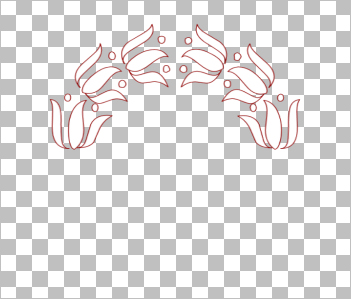
STEP 2
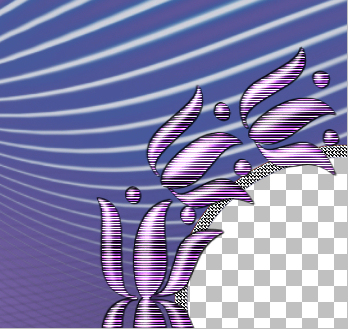
Open up the half-lotus42 image in your PSP workspace
Right click on the Title Bar and select COPY from the options
Right click on the Title Bar of your frame image
and select PASTE AS NEW LAYER from the options.
EFFECTS >>> IMAGE EFFECTS >>> OFFSET
Horizontal Offset = 0
Vertical Offset = 125
Edge Mode = Transparent |
|
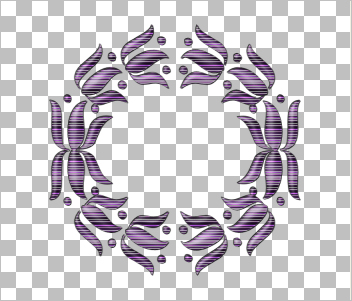
STEP 3
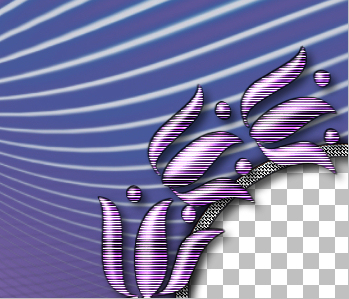
LAYERS >>> DUPLICATE
IMAGE >>> FLIP
LAYERS >>> MERGE >>> MERGE DOWN
EFFECTS >>> TEXTURE EFFECTS >>> SCULPTURE
PATTERN = t24-22.bmp
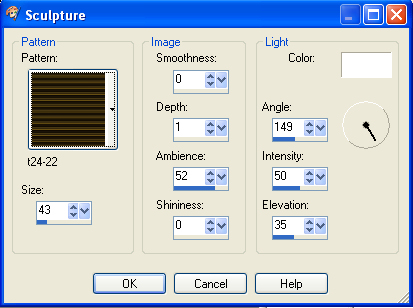
, |
STEP 4
ADJUST >>> HUE & SATURATION >>> COLORIZE
Hue = 200
Saturation = 110
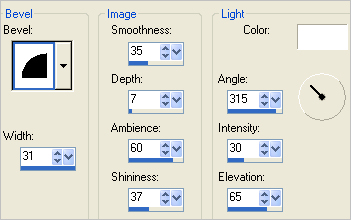
EFFECTS >>> 3D EFFECTS >>> INNER BEVEL |
|
STEP 5
EFFECTS >>> 3D EFFECTS >>> DROP SHADOW
Vertical & Horizontal offsets = 1
Colour = Black
Opacity = 100
Blur = 0
Repeat Drop Shadow effect changing
Vertical & Horizontal Offsets to - ( minus ) 1
Click OK |
|
STEP 6
ADJUST >>> BRIGHTNESS and CONTRAST >>> BRIGHTNESS/CONTRAST
Brightness = 48
Contrast = 50
PSPX6-X8: Linear mode checked |
STEP 7
ACTIVATE Raster 1
Flood fill with PURPLE #8771bb
LAYERS >>> NEW RASTER LAYER
SELECTIONS >>> SELECT ALL
Open up the dark-blue-waves image in your PSP workspace
Right click on the Title Bar and select COPY from the options
Right click on the Title Bar of your frame image
and select PASTE INTO SELECTION from the options.
DESELECT
LAYERS >>> DUPLICATE
IMAGE >>> FLIP
IMAGE >>> MIRROR
LAYERS >>> MERGE >>> MERGE DOWN |
|
STEP 8
Open up the sparkle-oval image in your PSP workspace
Right click on the Title Bar and select COPY from the options
Right click on the Title Bar of your frame image
and select PASTE AS NEW LAYER from the options.
SELECTIONS >>> SELECT ALL
SELECTIONS >>> FLOAT
SELECTIONS >>> DEFLOAT
EFFECTS >>> TEXTURE EFFECTS >>> SCULPTURE
PATTERN = goldenbeads
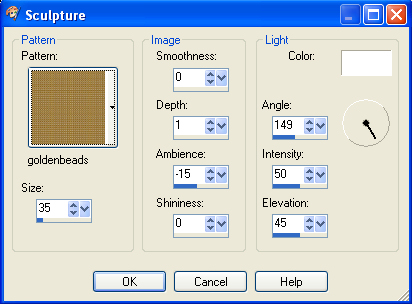 , , |
STEP 9
ADJUST >>> HUE & SATURATION >>> COLORIZE
Hue = 0
Saturation = 0
EFFECTS >>> EDGE EFFECTS >>> ENHANCE MORE
EDIT >>> Repeat Enhance Edges More
SELECTIONS >>> MODIFY >>> CONTRACT = 12
EDIT >>> CLEAR
ACTIVATE Raster 3
EDIT >>> CLEAR
ACTIVATE Raster 1
EDIT >>> CLEAR
DESELECT |
|
STEP 10
ACTIVATE Raster 4
EFFECTS >>> 3D EFFECTS >>> DROP SHADOW
Vertical & Horizontal offsets = 1
Colour = Black
Opacity = 100
Blur = 0
Repeat Drop Shadow effect changing
Vertical & Horizontal Offsets to - ( minus ) 1
Click OK
EFFECTS >>> PLUGINS >>> EYE CANDY 3 >>>
DROP SHADOW
|
|
STEP 11
ACTIVATE Raster 2
EDIT >>> Repeat Drop Shadow
ACTIVATE Raster 4
EDIT >>> Repeat Drop Shadow.. change DIRECTION to 135 |
|
STEP 12
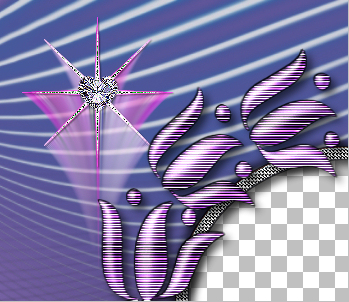
Open up the mcHT_10[1].24.05_Accents image
in your PSP workspace
Activate layer 3
Right click on the Title Bar and select COPY from the options
Right click on the Title Bar of your frame image
and select PASTE AS NEW LAYER from the options.
EFFECTS >>> IMAGE EFFECTS >>> OFFSET
Horizontal Offset = - ( minus ) 250
Vertical Offset = 155
Edge Mode = Transparent
LAYERS >>> DUPLICATE
LAYERS >>> MERGE >>> MERGE DOWN |
|
STEP 13
LAYERS >>> DUPLICATE
IMAGE >>> MIRROR
LAYERS >>> MERGE >>> MERGE DOWN
LAYERS >>> DUPLICATE
IMAGE >>> FLIP
LAYERS >>> MERGE >>> MERGE DOWN
EFFECTS >>> PLUGINS >>> EYE CANDY 3 >>>
DROP SHADOW
Same settings |
|
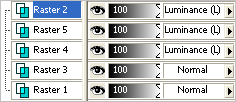
STEP 14
In your LAYER PALETTE change the
BLEND MODE to LUMINANCE (L)
on Raster layers 2, 5 and 4
Then activate Raster 2 |
|
STEP 15
LAYERS >>> NEW RASTER LAYER
Flood fill with PURPLE
EFFECTS >>> TEXTURE EFFECTS >>> SCULPTURE
PATTERN = goldenbeads
Same settings
ADJUST >>> HUE & SATURATION >>> COLORIZE
Hue = 0
Saturation = 0
EFFECTS >>> EDGE EFFECTS >>> ENHANCE MORE
EDIT >>> Repeat Enhance Edges More
SELECTIONS >>> SELECT ALL
SELECTIONS >>> MODIFY >>> CONTRACT = 6
EDIT >>> CLEAR
DO NOT DESELECT |
|
STEP 16
Flood fill with PURPLE
EFFECTS >>> 3D EFFECTS >>> DROP SHADOW
Vertical & Horizontal offsets = 1
Colour = Black
Opacity = 100
Blur = 0
Repeat Drop Shadow effect changing
Vertical & Horizontal Offsets to - ( minus ) 1
Click OK
SELECTIONS >>> MODIFY >>> CONTRACT = 3
EDIT >>> CLEAR
REPEAT both Drop Shadows
DO NOT DESELECT
|
|
STEP 17
Flood fill with PURPLE
EFFECTS >>> TEXTURE EFFECTS >>> SCULPTURE
PATTERN = goldenbeads
Same settings
ADJUST >>> HUE & SATURATION >>> COLORIZE
Hue = 0
Saturation = 0
EFFECTS >>> EDGE EFFECTS >>> ENHANCE MORE
EDIT >>> Repeat Enhance Edges More
SELECTIONS >>> MODIFY >>> CONTRACT = 6
EDIT >>> CLEAR
REPEAT both Drop Shadows
DESELECT
In your LAYER PALETTE change the
BLEND MODE to LUMINANCE (L)
|
|
STEP 18
EFFECTS >>> PLUGINS >>> EYE CANDY 3 >>>
DROP SHADOW
Same settings
EDIT >>> Repeat Drop Shadow.. change DIRECTION to 315
LAYERS >>> MERGE >>> MERGE VISIBLE
|
STEP 19
LAYERS >>> NEW RASTER LAYER
Flood fill with #b8aad8
LAYERS >>> ARRANGE >>> MOVE DOWN
, |
STEP 20
Open up the 1228506011_feerie image in your PSP workspace
Right click on the Title Bar and select COPY from the options
Right click on the Title Bar of your frame image
and select PASTE AS NEW LAYER from the options.
IMAGE >>> RESIZE = 60%
Ensure "Resize all layers" is UNCHECKED
Resample using WEIGHTED AVERAGE
LAYERS >>> DUPLICATE
LAYERS >>> MERGE >>> MERGE DOWN
Reposition with your MOVER tool |
|
STEP 21
LAYERS >>> MERGE >>> MERGE VISIBLE
LAYERS >>> NEW RASTER LAYER
Select your TEXT tool
and with a font of your choice add your name |
|
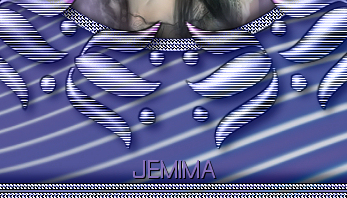
STEP 22
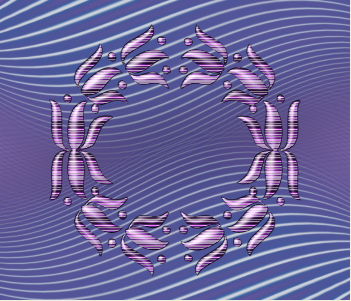
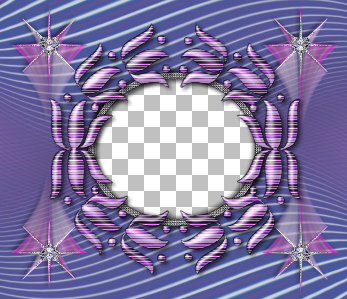
LAYERS >>> MERGE >>> MERGE ALL (Flatten)
Save as .jpg image
, |
| |
|
| |
|
| |
|