STEP 1
Open a new image 700 x 600
Transparent background
PSP9: Colour Depth = 16 Million Colors (24bit)
PSPX-X9: Colour Depth RGB = 8bits/channel
Open up the trend_background image in your PSP workspace
Right click on the Title Bar and select COPY from the options
Right click on the Title Bar of your frame image
and select PASTE AS NEW LAYER from the options.
IMAGE >>> RESIZE = 45%
Ensure "Resize all layers" is UNCHECKED
Resample using WEIGHTED AVERAGE
.
|
STEP 2
EFFECTS >>> IMAGE EFFECTS >>> OFFSET
Horizontal Offset = - ( minus ) 157
Vertical Offset = 173
Edge Mode = Transparent
LAYERS >>> DUPLICATE
IMAGE >>> MIRROR
LAYERS >>> MERGE >>> MERGE DOWN

|
STEP 3
LAYERS >>> DUPLICATE
IMAGE >>> FLIP
LAYERS >>> DUPLICATE
PSP9: IMAGE >>> ROTATE >>> FREE ROTATE = LEFT 90
Ensure "All layers" is UNCHECKED
PSPX - PSPX9: IMAGE >>> FREE ROTATE = LEFT 90
Ensure "All layers" is UNCHECKED
EFFECTS >>> IMAGE EFFECTS >>> OFFSET
Horizontal Offset = 217
Vertical Offset = 173
Edge Mode = Transparent
LAYERS >>> DUPLICATE
IMAGE >>> MIRROR
LAYERS >>> MERGE >>> MERGE DOWN
|
|
STEP 4
ACTIVATE Copy of Raster 2
LAYERS >>> MERGE >>> MERGE DOWN
ACTIVATE Copy (2) of Raster 2
LAYERS >>> ARRANGE >>> MOVE DOWN
Choose your SELECTION TOOL then click on the
CUSTOM SELECTION symbol
and enter these coordinates.
|
|
STEP 5
SELECTIONS >>> INVERT
EDIT >>> CLEAR
DESELECT |
|
STEP 6
Choose your SELECTION TOOL then click on the
CUSTOM SELECTION symbol
and enter these coordinates. |
|
STEP 7
ACTIVATE Raster 1
Flood fill with BLUE #7095ff
DESELECT
Choose your SELECTION TOOL then click on the
CUSTOM SELECTION symbol
and enter these coordinates. |
|
STEP 8
EDIT >>> CLEAR
LAYERS >>> NEW RASTER LAYER
LAYERS >>> ARRANGE >>> MOVE DOWN
SELECTIONS >>> INVERT
Flood fill with BLUE #7095ff
DESELECT
SAVE YOUR WORK
|
|
STEP 9
ACTIVATE Raster 2
EFFECTS >>> PLUGINS >>> EYE CANDY 3 >>>
DROP SHADOW
OR
EFFECTS >>> PLUGINS >>> EYE CANDY 4000 >>>
SHADOWLAB
Center Offset Direction = 270
Center Offset Distance = 10.00
Overall Opacity = 60
Overall Blur (Pixels) = 10.00
Perspective Blur (Pixels) = 0.00
Color = BLACK
Check 'Draw Only Outside Selection' |
|
STEP 10
EFFECTS >>> PLUGINS >>> EYE CANDY 3 >>>
DROP SHADOW
Same settings BUT change DIRECTION to 90
OR
EFFECTS >>> PLUGINS >>> EYE CANDY 4000 >>>
SHADOWLAB
Same settings BUT change DIRECTION to 90 |
|
STEP 11
CLOSE Raster 1, 2, 3
ACTIVATE Copy (2) of Raster 2
Choose your SELECTION TOOL then click on the
CUSTOM SELECTION symbol
and enter these coordinates. |
|
STEP 12
LAYERS >>> NEW RASTER LAYER
LAYERS >>> ARRANGE >>> MOVE DOWN
Flood fill with BLUE #7095ff
DESELECT
ACTIVATE Copy (2) of Raster 2
LAYERS >>> MERGE >>> MERGE DOWN
With your MAGIC WAND
Mode = Replace
Match Mode = RGB Value
Tolerance = 10
Feather = 2
Antialias = Checked
Sample Merged = UNCHECKED
PSP9 - X9: Check CONTIGUOUS
PSPX - X9: There is no " Sample Merged"
PSP9 - X9: ANTIALIAS = Inside
Select the area shown |
|
STEP 13
EDIT >>> CLEAR
EDIT >>> Repeat Clear
SELECTIONS >>> INVERT
EFFECTS >>> PLUGINS >>> EYE CANDY 3 >>>
DROP SHADOW
OR
EFFECTS >>> PLUGINS >>> EYE CANDY 4000 >>>
SHADOWLAB
Center Offset Direction = 180
Center Offset Distance = 10.00
Overall Opacity = 60
Overall Blur (Pixels) = 10.00
Perspective Blur (Pixels) = 0.00
Color = BLACK
Check 'Draw Only Outside Selection' |
|
STEP 14
EFFECTS >>> PLUGINS >>> EYE CANDY 3 >>>
DROP SHADOW
Same settings BUT change DIRECTION to 0
OR
EFFECTS >>> PLUGINS >>> EYE CANDY 4000 >>>
SHADOWLAB
Same settings BUT change DIRECTION to 0
DESELECT
OPEN ALL LAYERS
SAVE YOUR WORK
|
|
STEP 15
Still on Raster 4
EFFECTS >>> 3D EFFECTS >>> DROP SHADOW
Vertical & Horizontal offsets = 3
Colour = Black
Opacity = 75
Blur = 9.00
Repeat Drop Shadow effect changing
Vertical & Horizontal Offsets to - ( minus ) 3
Click OK |
|
STEP 16
Choose your SELECTION TOOL then click on the
CUSTOM SELECTION symbol
and enter these coordinates. |
|
STEP 17
EFFECTS >>> 3D EFFECTS >>> DROP SHADOW
Vertical & Horizontal offsets = 3
Colour = Black
Opacity = 75
Blur = 9.00
Repeat Drop Shadow effect changing
Vertical & Horizontal Offsets to - ( minus ) 3
Click OK
DESELECT |
|
STEP 18
Choose your SELECTION TOOL then click on the
CUSTOM SELECTION symbol
and enter these coordinates. |
|
STEP 19
LAYERS >>> NEW RASTER LAYER
EFFECTS >>> 3D EFFECTS >>> DROP SHADOW
Vertical & Horizontal offsets = 3
Colour = Black
Opacity = 75
Blur = 9.00
Repeat Drop Shadow effect changing
Vertical & Horizontal Offsets to - ( minus ) 3
Click OK
DESELECT
ACTIVATE Raster 3
With your MAGIC WAND.... Same settings.
Select the CENTRE transparent area
ACTIVATE Raster 5
EDIT >>> CLEAR
DESELECT
LAYERS >>> MERGE >>> MERGE DOWN
SAVE YOUR WORK
|
|
STEP 20
ACTIVATE Raster 2
LAYERS >>> NEW RASTER LAYER
Choose your SELECTION TOOL then click on the
CUSTOM SELECTION symbol
and enter these coordinates. |
|
STEP 21
Flood fill with WHITE
SELECTIONS >>> MODIFY >>> CONTRACT = 3
EDIT >>> CLEAR
DESELECT
EFFECTS >>> 3D EFFECTS >>> DROP SHADOW
Vertical & Horizontal offsets = 1
Colour = Black
Opacity = 80
Blur = 0
Repeat Drop Shadow effect changing
Vertical & Horizontal Offsets to - ( minus ) 1
Click OK |
|
STEP 22
LAYERS >>> DUPLICATE
IMAGE >>> RESIZE = 95%
Ensure "Resize all layers" is UNCHECKED
Resample using WEIGHTED AVERAGE
ADJUST >>> SHARPNESS >>> SHARPEN
LAYERS >>> DUPLICATE
IMAGE >>> RESIZE = 95%
Ensure "Resize all layers" is UNCHECKED
Resample using WEIGHTED AVERAGE
ADJUST >>> SHARPNESS >>> SHARPEN |
|
STEP 23
LAYERS >>> DUPLICATE
Rename this layer Raster 6
ACTIVATE Copy of Raster 5
LAYERS >>> DUPLICATE
Rename this layer Raster 7
~~~~~~~~~~~~~~~~~~~~~~~~~~~~~~~~~~~~~~~~~~~
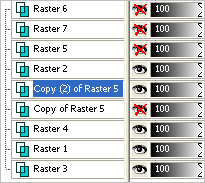
In your LAYER PALETTE move Copy of Raster 5 and Copy (2) of Raster 5 below Raster 2
Set up your LAYER PALETTE as shown


SAVE YOUR WORK |
STEP 24
OPEN & ACTIVATE Raster 6
Choose your SELECTION TOOL then click on the
CUSTOM SELECTION symbol
and enter these coordinates. |
|
STEP 25
EDIT >>> CLEAR
DESELECT
CLOSE Raster 6
OPEN & ACTIVATE Raster 7
Choose your SELECTION TOOL then click on the
CUSTOM SELECTION symbol
and enter these coordinates.
|
|
STEP 26
EDIT >>> CLEAR
DESELECT
OPEN ALL LAYERS
SAVE YOUR WORK

|
STEP 27
ACTIVATE Copy (2) of Raster 5
LAYERS >>> MERGE >>> MERGE DOWN
ACTIVATE Raster 6
EDIT >>> Repeat Layer Merge Down
and again
EDIT >>> Repeat Layer Merge Down
SAVE YOUR WORK |
|
STEP 28
With Raster 5 active
EFFECTS >>> PLUGINS >>> EYE CANDY 3 >>>
DROP SHADOW
OR
EFFECTS >>> PLUGINS >>> EYE CANDY 4000 >>>
SHADOWLAB
Center Offset Direction = 90
Center Offset Distance = 5.00
Overall Opacity = 60
Overall Blur (Pixels) = 5.00
Perspective Blur (Pixels) = 0.00
Color = BLACK
Check 'Draw Only Outside Selection' |
|
STEP 29
ACTIVATE Copy of Raster 5
EFFECTS >>> PLUGINS >>> EYE CANDY 3 >>>
DROP SHADOW
Same settings
OR
EFFECTS >>> PLUGINS >>> EYE CANDY 4000 >>>
SHADOWLAB
Same settings
.
|
STEP 30
EFFECTS >>> PLUGINS >>> EYE CANDY 3 >>>
DROP SHADOW
Same settings BUT change DIRECTION to 270
OR
EFFECTS >>> PLUGINS >>> EYE CANDY 4000 >>>
SHADOWLAB
Same settings BUT change DIRECTION to 270 |
STEP 31
ACTIVATE Raster 5
EFFECTS >>> PLUGINS >>> EYE CANDY 3 >>> DROP SHADOW
Same settings
OR
EFFECTS >>> PLUGINS >>> EYE CANDY 4000 >>> SHADOWLAB
Same settings
LAYERS >>> MERGE >>> MERGE VISIBLE
SAVE YOUR WORK
|
|
STEP 32
Open up the equine frame image in your PSP workspace
Right click on the Title Bar and select COPY from the options
Right click on the Title Bar of your tag image
and select PASTE AS NEW LAYER from the options.
|
STEP 33
EFFECTS >>> PLUGINS >>> EYE CANDY 3 >>>
DROP SHADOW
OR
EFFECTS >>> PLUGINS >>> EYE CANDY 4000 >>>
SHADOWLAB
Center Offset Direction = 315
Center Offset Distance = 5.00
Overall Opacity = 60
Overall Blur (Pixels) = 5.00
Perspective Blur (Pixels) = 0.00
Color = BLACK
Check 'Draw Only Outside Selection' |
|
STEP 34
EFFECTS >>> PLUGINS >>> EYE CANDY 3 >>>
DROP SHADOW
Same settings BUT change DIRECTION to 135
OR
EFFECTS >>> PLUGINS >>> EYE CANDY 4000 >>>
SHADOWLAB
Same settings BUT change DIRECTION to 135
LAYERS >>> MERGE >>> MERGE DOWN
|
|
STEP 35
Open up the equine element image in your PSP workspace
Right click on the Title Bar and select COPY from the options
Right click on the Title Bar of your tag image
and select PASTE AS NEW LAYER from the option
LAYERS >>> MERGE >>> MERGE VISIBLE
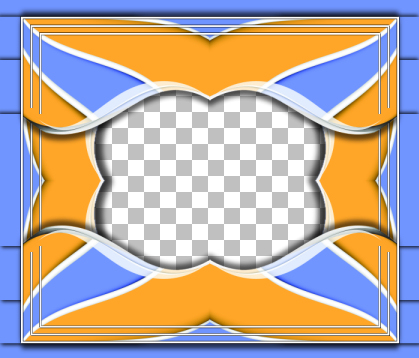
This is your frame
Save as .pspimage |
|
| |
|
| |
|
STEP 36
Open up the acwron.jpg image in your PSP workspace
Right click on the Title Bar and select COPY from the options
Right click on the Title Bar of your tag image
and select PASTE AS NEW LAYER from the options.
IMAGE >>> RESIZE = 70%
Ensure "Resize all layers" is UNCHECKED
Resample using WEIGHTED AVERAGE
ADJUST >>> SHARPNESS >>> SHARPEN
LAYERS >>> ARRANGE >>> MOVE DOWN |
|
STEP 37
Open up the 23592.png image in your PSP workspace
Right click on the Title Bar and select COPY from the options
Right click on the Title Bar of your tag image
and select PASTE AS NEW LAYER from the options.
IMAGE >>> RESIZE = 50%
Ensure "Resize all layers" is UNCHECKED
Resample using WEIGHTED AVERAGE
ADJUST >>> SHARPNESS >>> SHARPEN
EFFECTS >>> IMAGE EFFECTS >>> OFFSET
Horizontal Offset = - ( minus ) 60
Vertical Offset = - ( minus ) 40
Edge Mode = Transparent |
|
STEP 38
LAYERS >>> DUPLICATE
LAYERS >>> ARRANGE >>> BRING TO TOP
Choose your SELECTION TOOL then click on the
CUSTOM SELECTION symbol
and enter these coordinates. |
|
STEP 39
EDIT >>> CLEAR
DESELECT
EFFECTS >>> PLUGINS >>> EYE CANDY 3 >>>
DROP SHADOW
OR
EFFECTS >>> PLUGINS >>> EYE CANDY 4000 >>>
SHADOWLAB
Click SETTINGS Tab and Select DROP SHADOW
Enter these settings
Center Offset Direction = 315
Center Offset Distance (pixels) = 10.00
Overall Opacity % = 60
Overall Blur (pixels) = 10.00
Perspective Blur (pixels) = 0.00
Color = Black
CHECK "Draw Only Outside Selection" |
|
STEP 40
LAYERS >>> MERGE >>> MERGE VISIBLE
LAYERS >> NEW RASTER LAYER
Select your TEXT TOOL
with font and settings of your choice
add your name |
|
STEP 41
LAYERS >>> MERGE >>> MERGE ALL (Flatten)
Save as .jpg image
, |
| |
|
| |
|
| |
|