STEP 1
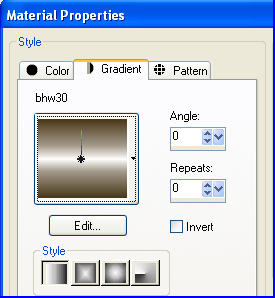
In your MATERIALS PALETTE load
bhw30 gradient in the foreground using these settings
|
 |
STEP 2
Open a new image 724 x 300
Transparent background
PSP9: Colour Depth = 16 Million Colors (24bit)
PSPX-X8: Colour Depth RGB = 8bits/channel
Flood fill with gradient
VIEW >>> RULERS
Select your RASTER DEFORM tool
Mode = SCALE
use default settings
PSPX - X8:Select your PICK tool
Pull the centre top node UP to the 100 pixel mark on your left ruler.
Push the centre bottom node down to the 150 pixel mark on your left ruler.

Click the RESET RECTANGLE arrow
Select another tool to disengage the DEFORMATION / PICK TOOL
, |
STEP 3
To centre the image...
Right click on the Title Bar and select CUT from the options
Right click on the Title Bar of your frame image
and select PASTE AS NEW LAYER from the options.
LAYERS >>> MERGE >>> MERGE VISIBLE
EFFECTS>>> GEOMETRIC EFFECTS >>> SKEW |
|
STEP 4
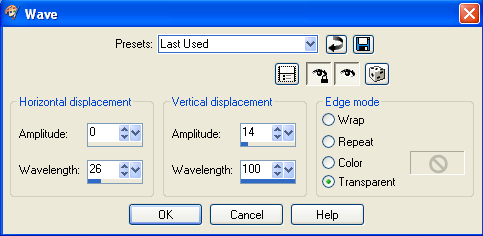
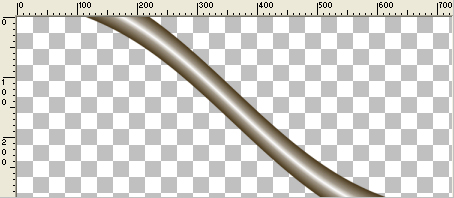
EFFECTS >>> DISTORTION EFFECTS >>> WAVE
, |
STEP 5
EFFECTS >>> PLUGINS >>> FLAMING PEAR >>> FLEXIFY 2 |
|
STEP 6
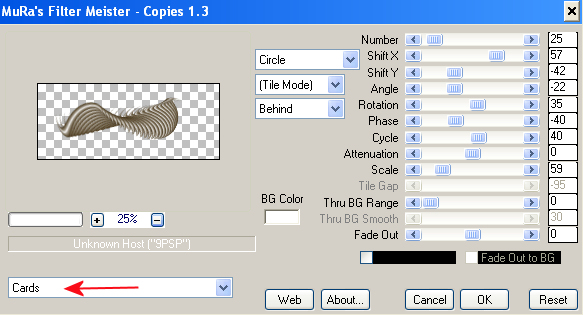
EFFECTS >>> PLUGINS >>> MuRa's Meister >>> Copies
, |
STEP 7
EFFECTS >>> IMAGE EFFECTS >>> OFFSET
Horizontal Offset = - ( minus ) 70
Vertical Offset = 50
Edge Mode = Transparent
LAYERS >>> DUPLICATE
IMAGE >>> MIRROR
LAYERS >>> MERGE >>> MERGE DOWN
ADJUST >>> BRIGHTNESS and CONTRAST >>> BRIGHTNESS/CONTRAST
Brightness = - ( minus ) 15
Contrast = 20
PSPX6-X8: Linear mode checked
SAVE YOUR WORK as deco.png |
|
STEP 8
On your deco.png image
Right click on the Title Bar and select COPY from the options
Open a new image 700 x 600
Transparent background
PSP9: Colour Depth = 16 Million Colors (24bit)
PSPX-X8: Colour Depth RGB = 8bits/channel
Right click on the Title Bar of your frame image
and select PASTE AS NEW LAYER from the options.
IMAGE >>> RESIZE = 75%
Ensure "Resize all layers" is UNCHECKED
Resample using WEIGHTED AVERAGE
ADJUST >>> SHARPNESS >>> SHARPEN
EFFECTS >>> IMAGE EFFECTS >>> OFFSET
Horizontal Offset = 0
Vertical Offset = 195
Edge Mode = Transparent |
|
STEP 9
LAYERS >>> DUPLICATE
IMAGE >>> FLIP
LAYERS >>> DUPLICATE
PSP9: IMAGE >>> ROTATE >>> FREE ROTATE = RIGHT 90
Ensure "All layers" is UNCHECKED
PSPX - PSPX8: IMAGE >>> FREE ROTATE = RIGHT 90
Ensure "All layers" is UNCHECKED
EFFECTS >>> IMAGE EFFECTS >>> OFFSET
Horizontal Offset = - ( minus ) 195
Vertical Offset = 195
Edge Mode = Transparent |
|
STEP 10
LAYERS >>> DUPLICATE
IMAGE >>> MIRROR
CLOSE Raster 1
LAYERS >>> MERGE >>> MERGE VISIBLE
|
|
STEP 11
Back to your deco.png image
Right click on the Title Bar and select COPY from the options
Right click on the Title Bar of your frame image
and select PASTE AS NEW LAYER from the options.
IMAGE >>> RESIZE = 45%
Ensure "Resize all layers" is UNCHECKED
Resample using WEIGHTED AVERAGE
ADJUST >>> SHARPNESS >>> SHARPEN
PSP9: IMAGE >>> ROTATE >>> FREE ROTATE = RIGHT 90
Ensure "All layers" is UNCHECKED
PSPX - PSPX8: IMAGE >>> FREE ROTATE = RIGHT 90
Ensure "All layers" is UNCHECKED
|
STEP 12
EFFECTS >>> IMAGE EFFECTS >>> OFFSET
Horizontal Offset = - ( minus ) 295
Vertical Offset = 0
Edge Mode = Transparent
LAYERS >>> DUPLICATE
IMAGE >>> MIRROR
LAYERS >>> MERGE >>> MERGE DOWN |
|
STEP 13
In your MATERIALS PALETTE
Change the GRADIENT settings to 'sunburst' |
|
STEP 14
OPEN & ACTIVATE Raster 1
Flood fill with the gradient
ADJUST >>> BLUR >>> GAUSSIAN BLUR
Radius = 50
SELECTIONS >>> SELECT ALL
SELECTIONS >>> MODIFY >>> CONTRACT = 15
SELECTIONS >>> INVERT |
|
STEP 15
EFFECTS >>> PLUGINS >>> AP 01 [Innovations] >>>Lines >>> SilverLining
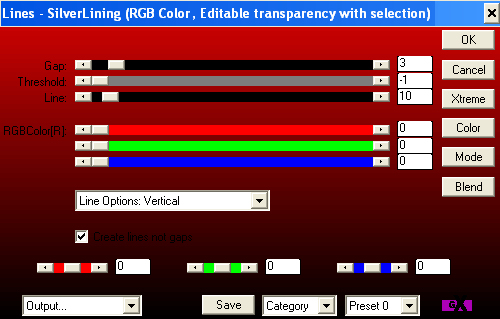
, |
STEP 16
EFFECTS >>> 3D EFFECTS >>> INNER BEVEL |
|
STEP 17
EFFECTS >>> 3D EFFECTS >>> DROP SHADOW
Vertical & Horizontal offsets = 1
Colour = Black
Opacity = 70
Blur = 0
Repeat Drop Shadow effect changing
Vertical & Horizontal Offsets to - ( minus ) 1
Click OK
EFFECTS >>> PLUGINS >>> EYE CANDY 3 >>>
DROP SHADOW |
|
STEP 18
EDIT >>> Repeat Drop Shadow.. change DIRECTION to 135
DESELECT |
|
STEP 19
LAYERS >>> NEW RASTER LAYER
SELECTIONS >>> SELECT ALL
SELECTIONS >>> MODIFY >>> CONTRACT = 15
Open up the 10_Scan_Line_Brushes_by_PAULW_4 image
in your PSP workspace
Right click on the Title Bar and select COPY from the options
Right click on the Title Bar of your frame image
and select PASTE INTO SELECTION from the options.
EFFECTS >>> REFLECTION EFFECTS >>>
ROTATING MIRROR
Horizontal Offset = 0
Vertical Offset = n/a
Rotation Angle = 180
Edge Mode = Reflect
DESELECT |
|
STEP 20
LAYERS >>> DUPLICATE
IMAGE >>> FLIP
LAYERS >>> MERGE >>> MERGE DOWN
ACTIVATE the Merged layer
With your MAGIC WAND
Mode = Replace
Match Mode = RGB Value
Tolerance = 0
Feather = 0
Antialias = UNchecked
Sample Merged = UNCHECKED
PSP9 - X8: Check CONTIGUOUS
PSPX - X8: There is no " Sample Merged"
Select the centre of your image
SELECTIONS >>> MODIFY >>> EXPAND = 7 |
|
STEP 21
ACTIVATE Raster 3
EDIT >>> CLEAR
ACTIVATE Raster 1
EDIT >>> CLEAR
DESELECT
ACTIVATE the Merged layer
With your MAGIC WAND ...same settings
Select the CENTRE transparent area
SELECTIONS >>> MODIFY >>> EXPAND = 5
|
|
STEP 22
SELECTIONS >>> INVERT
LAYERS >>> NEW RASTER LAYER
LAYERS >>> ARRANGE >>> MOVE DOWN
EFFECTS >>> PLUGINS >>> EYE CANDY 3 >>>
DROP SHADOW |
|
STEP 23
EDIT >>> Repeat Drop Shadow.. change DIRECTION to 135
DESELECT
LAYERS >>> MERGE >>> MERGE VISIBLE
Save as .pspimage image
,
|
STEP 24
Open up the owl on branch.jpg image in your PSP workspace
Right click on the Title Bar and select COPY from the options
Right click on the Title Bar of your frame image
and select PASTE AS NEW LAYER from the options.
IMAGE >>> RESIZE = 50%
Ensure "Resize all layers" is UNCHECKED
Resample using WEIGHTED AVERAGE
ADJUST >>> SHARPNESS >>> SHARPEN
LAYERS >>> ARRANGE >>> MOVE DOWN |
|
STEP 25
LAYERS >>> MERGE >>> MERGE VISIBLE
LAYERS >>> NEW RASTER LAYER
Select your TEXT tool
and with a font of your choice add your name
LAYERS >>> MERGE >>> MERGE ALL (Flatten)
Save as .jpg image
, |
| |
|
| |
|
| |