STEP 1
Open a new image 700 x 600
Transparent background
PSP9: Colour Depth = 16 Million Colors (24bit)
PSPX-X7: Colour Depth RGB = 8bits/channel
VIEW >>> RULERS
|
STEP 2
In your MATERIALS PALETTE
Load BLACK in your background
Those using higher versions of PSP may need to change the SIZE of the font to around 660. |
Select your TEXT tool ... use these settings.
FONT = Vertigo Upright BRK

Place your cursor at the centre bottom of your blank image
Type capital letter O in your text box
Click APPLY
SELECT >>> NONE
,
|
STEP 3
Choose your FREEHAND SELECTION TOOL
Selection Type = Point to Point
Mode = Replace
Feather = 0
Smoothing = 5
Antialias = UNChecked
Select the inner circle |
|
STEP 4
Right click on the Title Bar and select CUT from the options
DESELECT
Right click on the Title Bar of your frame image
and select PASTE AS NEW LAYER from the options.
ACTIVATE Raster 1
Right click on the Title Bar and select COPY from the options
Right click on the Title Bar of your frame image
and select PASTE AS NEW LAYER from the options.
DELETE Raster 1
(This is to centre the images)
|
STEP 5
ACTIVATE Raster 2
Select your RASTER DEFORM tool
Mode = SCALE
use default settings
PSPX - X8:Select your PICK tool
Pull the centre top node UP to the 35 pixel mark
on your left ruler.
Pull the centre bottom node DOWN to the 565 pixel mark
on your left ruler. |
|
STEP 6
Click the RESET RECTANGLE arrow
Select another tool to disengage the
DEFORMATION / PICK TOOL
LAYERS >>> MERGE >>> MERGE VISIBLE
IMAGE >>> RESIZE = 80%
Ensure "Resize all layers" is UNCHECKED
Resample using WEIGHTED AVERAGE |
|
STEP 7
SELECTIONS >>> SELECT ALL
SELECTIONS >>> FLOAT
SELECTIONS >>> DEFLOAT
Flood fill with PEACH #de8f70
SELECTIONS >>> MODIFY >>> CONTRACT = 9
EDIT >>> CLEAR
Flood fill with DARK PEACH #b04c24 |
|
STEP 8
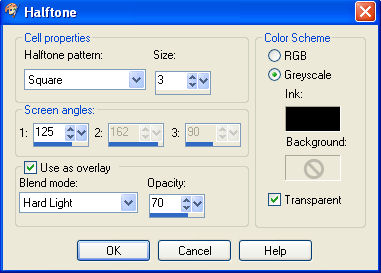
EFFECTS >>> ARTISTIC EFFECTS >>> HALF TONE
 , , |
STEP 9
EFFECTS >>> PLUGINS >>> EYE CANDY 3 >>>
DROP SHADOW |
|
STEP 10
EDIT >>> Repeat Drop Shadow.. change DIRECTION to 135
DESELECT
|
|
STEP 11
With your MAGIC WAND
Mode = ADD (Shift)
Match Mode = RGB Value
Tolerance = 0
Feather = 0
Antialias = UNchecked
Sample Merged = UNCHECKED
PSP9 - X8: Check CONTIGUOUS
PSPX - X8: There is no " Sample Merged"
Select the 2 areas shown
SELECTIONS >>> MODIFY >>> EXPAND = 10
|
|
STEP 12
LAYERS >>> NEW RASTER LAYER
LAYERS >>> ARRANGE >>> MOVE DOWN
Flood fill the selections with DARK PEACH #b04c24
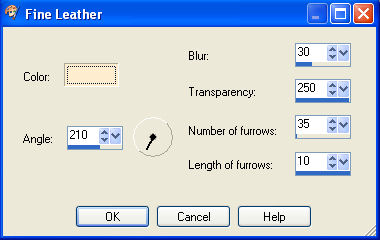
EFFECTS >>> TEXTURE EFFECTS >>> FINE LEATHER
COLOUR = #ffedcf
 , , |
STEP 13
EFFECTS >>> 3D EFFECTS >>> INNER BEVEL |
|
STEP 14
SELECTIONS >>> INVERT
EFFECTS >>> PLUGINS >>> EYE CANDY 3 >>>
DROP SHADOW |
|
STEP 15
EDIT >>> Repeat Drop Shadow.. change DIRECTION to 135
DESELECT |
|
STEP 16
ACTIVATE the Merged layer
EFFECTS >>> 3D EFFECTS >>> INNER BEVEL |
|
STEP 17
LAYERS >>> MERGE >>> MERGE VISIBLE
LAYERS >>> NEW RASTER LAYER
LAYERS >>> ARRANGE >>> MOVE DOWN
Flood fill with PEACH #de8f70
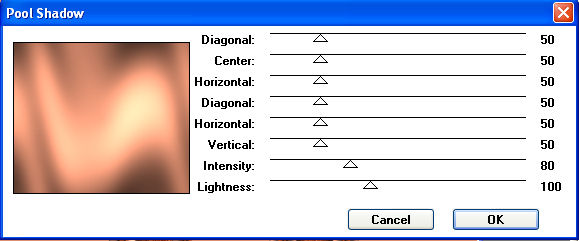
EFFECTS >>> PLUGINS >>> Greg's Factory Output Vol II >>> Pool Shadow

, |
STEP 18
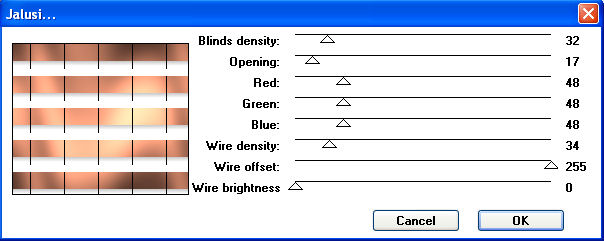
EFFECTS >>> PLUGINS >>> Unplugged Tools >>> Jalusi

, |
STEP 19
IMAGE >>> RESIZE = 85%
Ensure "Resize all layers" is UNCHECKED
Resample using WEIGHTED AVERAGE
EFFECTS >>> IMAGE EFFECTS >>> OFFSET
Horizontal Offset = 2
Vertical Offset = 0
Edge Mode = Repeat |
|
STEP 20
Right click on the Title Bar and select COPY from the options
Right click on the Title Bar of your frame image
and select PASTE AS NEW LAYER from the options.
DELETE Raster 1
(This is to centre the image)
ACTIVATE the Merged layer
With your MAGIC WAND
Mode = Replace
Match Mode = RGB Value
Tolerance = 0
Feather = 0
Antialias = UNchecked
Sample Merged = UNCHECKED
PSP9 - X8: Check CONTIGUOUS
PSPX - X8: There is no " Sample Merged"
Select the area shown
SELECTIONS >>> MODIFY >>> EXPAND = 10
|
|
STEP 21
ACTIVATE Raster 2
EDIT >>> CLEAR
DESELECT
LAYERS >>> NEW RASTER LAYER
Flood fill with DARK PEACH #b04c24
LAYERS >>> ARRANGE >>> MOVE DOWN
ACTIVATE Raster 2
Choose your SELECTION TOOL then click on the
CUSTOM SELECTION symbol
and enter these coordinates. |
|
STEP 22
EDIT >>> CLEAR
DESELECT
In your LAYER PALETTE change the
BLEND MODE to MULTIPLY
ADJUST >>> SHARPNESS >>> SHARPEN MORE
With your MAGIC WAND
Same settings
Select the area shown
|
|
STEP 23
ACTIVATE Raster 1
EFFECTS >>> ARTISTIC EFFECTS >>> HALF TONE
Same settings
DESELECT
SELECTIONS >>> SELECT ALL
SELECTIONS >>> MODIFY >>> CONTRACT = 8
LAYERS >>> NEW RASTER LAYER
Flood fill with PEACH #de8f70
SELECTIONS >>> MODIFY >>> CONTRACT = 8
Flood fill with DARK PEACH #b04c24
SELECTIONS >>> MODIFY >>> CONTRACT = 8
EFFECTS >>> ARTISTIC EFFECTS >>> HALF TONE
Same settings
SELECTIONS >>> MODIFY >>> CONTRACT = 8
EDIT >>> CLEAR
|
|
STEP 24
EFFECTS >>> 3D EFFECTS >>> DROP SHADOW
Vertical & Horizontal offsets = 1
Colour = Black
Opacity = 100
Blur = 0
Repeat Drop Shadow effect changing
Vertical & Horizontal Offsets to - ( minus ) 1
Click OK
SELECTIONS >>> INVERT
EFFECTS >>> PLUGINS >>> EYE CANDY 3 >>>
DROP SHADOW
, |
|
STEP 25
EDIT >>> Repeat Drop Shadow.. change DIRECTION to 135
DESELECT |
|
STEP 26
ACTIVATE Raster 2
EFFECTS >>> PLUGINS >>> EYE CANDY 3 >>>
DROP SHADOW
Same settings
EDIT >>> Repeat Drop Shadow.. change DIRECTION to 315
|
|
STEP 27
ACTIVATE the Merged layer
EFFECTS >>> PLUGINS >>> EYE CANDY 3 >>>
DROP SHADOW
Same settings
EDIT >>> Repeat Drop Shadow.. change DIRECTION to 135
, |
STEP 28
ACTIVATE Raster 3
With your MAGIC WAND
Same settings
Select the PEACH border |
|
STEP 29
EFFECTS >>> 3D EFFECTS >>> INNER BEVEL
DESELECT
|
|
STEP 30
With your MAGIC WAND
Same settings
Select the DARK PEACH border
EFFECTS >>> 3D EFFECTS >>> INNER BEVEL
Same settings
DESELECT
SAVE YOUR WORK |
|
STEP 31
With Raster 1 active
Open up the Jan Series Art 4 - 1 image in your PSP workspace
Right click on the Title Bar and select COPY from the options
Right click on the Title Bar of your frame image
and select PASTE AS NEW LAYER from the options.
IMAGE >>> RESIZE = 65%
Ensure "Resize all layers" is UNCHECKED
Resample using WEIGHTED AVERAGE
ADJUST >>> SHARPNESS >>> SHARPEN
|
|
STEP 32
LAYERS >>> MERGE >>> MERGE VISIBLE
LAYERS >>> NEW RASTER LAYER
Select your TEXT tool
and with a font of your choice add your name |
STEP 33
LAYERS >>> MERGE >>> MERGE ALL (Flatten)
Save as .jpg image |
| |
|
| |
|
| |
|