Open up the 806-blue-curves.jpg image
and
the
abstract-design-art-2.jpg image
in your PSP workspace
and minimize.
|
STEP 1
Open a new image 700 x 600
Transparent background
PSP9: Colour Depth = 16 Million Colors (24bit)
PSPX-X7: Colour Depth RGB = 8bits/channel
Flood fill with RED #a70a11
LAYERS >>> NEW RASTER LAYER
Flood fill with WHITE
.
|
STEP 2
LAYERS >>> NEW MASK LAYER >>> FROM IMAGE
SOURCE WINDOW = 806-blue-curves.jpg
|
|
STEP 3
LAYERS >>> MERGE >>> MERGE GROUP
EFFECTS >>> REFLECTION EFFECTS >>>
ROTATING MIRROR
Horizontal Offset = 0
Vertical Offset = n/a
Rotation Angle = 180
Edge Mode = Reflect
.
|
|
STEP 4
LAYERS >>> NEW RASTER LAYER
Flood fill with GREEN #409d00
LAYERS >>> NEW MASK LAYER >>> FROM IMAGE
SOURCE WINDOW = abstract-design-art-2.jpg
|
|
STEP 5
LAYERS >>> MERGE >>> MERGE GROUP
EFFECTS >>> REFLECTION EFFECTS >>>
ROTATING MIRROR
Same settings
In your LAYER PALETTE change the
BLEND MODE to MULTIPLY
|
|
STEP 6
Open up the Fantasia_0173.psp image in your PSP workspace
CLOSE the Trama 4 and Trama 2 layers
ACTIVATE the Trama 1 layer
Right click on the Title Bar and select COPY MERGED
from the options
Close the original image
Right click in your PSP workspace
and select PASTE AS NEW IMAGE from the options.
IMAGE >>> RESIZE
|
|
STEP 7
Right click on the Title Bar and select COPY
from the options
Right click on the Title Bar of your tag image
and select PASTE AS NEW LAYER from the options.
|
|
STEP 8
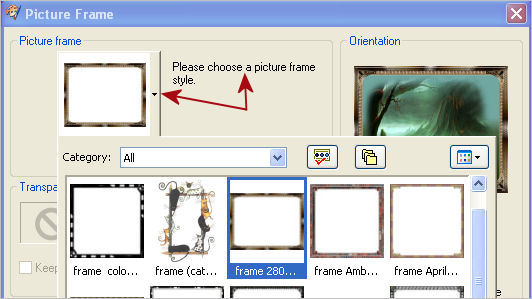
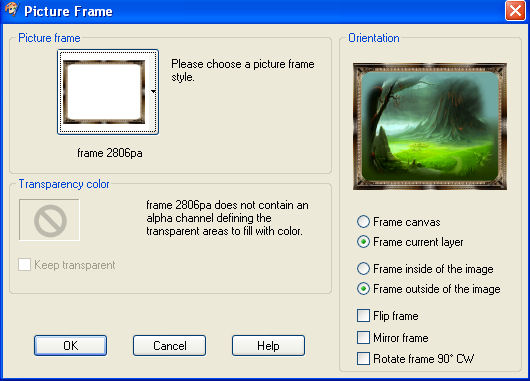
IMAGE >>> PICTURE FRAME
Locate the frame 2806pa frame


Click OK
ADJUST >>> SHARPNESS >>> SHARPEN MORE
|
STEP 9
With your MAGIC WAND
Mode = Replace
Match Mode = RGB Value
Tolerance = 0
Feather = 0
Antialias = UNchecked
Sample Merged = UNCHECKED
PSP9 - X7: Check CONTIGUOUS
PSPX - X7: There is no " Sample Merged"
PSPX - X7: Use all layers = UNChecked
Select the inner centre of the frame
SELECTIONS >>> MODIFY >>> EXPAND = 4
|
|
STEP 10
LAYERS >>> NEW RASTER LAYER
LAYERS >>> ARRANGE >>> MOVE DOWN
SELECTIONS >>> INVERT
EFFECTS >>> PLUGINS >>> EYE CANDY 3 >>>
DROP SHADOW |
|
STEP 11
EDIT >>> Repeat Drop Shadow.. change DIRECTION to 135
DESELECT
|
|
STEP 12
ACTIVATE Raster 2 Picture Frame
With your MAGIC WAND ... Same settings
Select the OUTER area of the frame.
SELECTIONS >>> INVERT
EFFECTS >>> PLUGINS >>> EYE CANDY 3 >>>
DROP SHADOW
Same settings
EDIT >>> Repeat Drop Shadow.. change DIRECTION to 315
DESELECT
|
|
STEP 13
Open up the butterflyswarm image in your PSP workspace
Right click on the Title Bar and select COPY from the options
Right click on the Title Bar of your tag image
and select PASTE AS NEW LAYER from the options.
|
|
STEP 14
ACTIVATE Raster 2 Picture Frame
Open up the captive audience image in your PSP workspace
With Raster 2 active
Right click on the Title Bar and select COPY from the options
Right click on the Title Bar of your tag image
and select PASTE AS NEW LAYER from the options.
IMAGE >>> RESIZE = 70%
Ensure "Resize all layers" is UNCHECKED
Resample using WEIGHTED AVERAGE
ADJUST >>> SHARPNESS >>> SHARPEN
Reposition with your MOVER tool
|
|
STEP 15
Choose your SELECTION TOOL
Selection Type = Rectangle
Mode = Replace
Feather = 0
Antialias = UNChecked
Select the area shown
|
|
STEP 16
EDIT >>> CLEAR
DESELECT
Reposition with your MOVER tool if necessary |
|
STEP 17
EFFECTS >>> PLUGINS >>> EYE CANDY 3 >>>
PERSPECTIVE SHADOW
SAVE YOUR WORK
|
|
STEP 18
ACTIVATE the upper Group - Raster 2 layer |
|
STEP 19
Open up the CA-Elements image in your PSP workspace
With Raster 2 active
Right click on the Title Bar and select COPY from the options
Right click on the Title Bar of your tag image
and select PASTE AS NEW LAYER from the options.
EFFECTS >>> IMAGE EFFECTS >>> OFFSET
Horizontal Offset = 0
Vertical Offset = 260
Edge Mode = Transparent |
|
STEP 20
LAYERS >>> DUPLICATE
IMAGE >>> FLIP
LAYERS >>> DUPLICATE
PSP9: IMAGE >>> ROTATE >>> FREE ROTATE = RIGHT 90
Ensure "All layers" is UNCHECKED
PSPX - PSPX7: IMAGE >>> FREE ROTATE = RIGHT 90
Ensure "All layers" is UNCHECKED
EFFECTS >>> IMAGE EFFECTS >>> OFFSET
Horizontal Offset = - (Minus) 305
Vertical Offset = 260
Edge Mode = Transparent
LAYERS >>> DUPLICATE
IMAGE >>> MIRROR
LAYERS >>> MERGE >>> MERGE DOWN (3 Times)
 , ,
|
STEP 21
Back to the CA-Elements image in your PSP workspace
With Raster 1 active
Right click on the Title Bar and select COPY from the options
Right click on the Title Bar of your tag image
and select PASTE AS NEW LAYER from the options.
EFFECTS >>> IMAGE EFFECTS >>> OFFSET
Horizontal Offset = - (Minus) 305
Vertical Offset = 228
Edge Mode = Transparent
|
|
STEP 22
EFFECTS >>> PLUGINS >>> SIMPLE >>>
TOP LEFT MIRROR
|
|
STEP 23
ACTIVATE Raster 4
Open up the CA-Frame image in your PSP workspace
Right click on the Title Bar and select COPY from the options
Right click on the Title Bar of your tag image
and select PASTE AS NEW LAYER from the options.
EFFECTS >>> PLUGINS >>> EYE CANDY 3 >>>
DROP SHADOW |
|
STEP 24
EDIT >>> Repeat Drop Shadow.. change DIRECTION to 135 |
|
STEP 25
LAYERS >>> MERGE >>> MERGE VISIBLE
Open up the Tube_filly_ butterfly2 image in your PSP workspace
Right click on the Title Bar and select COPY from the options
Right click on the Title Bar of your tag image
and select PASTE AS NEW LAYER from the options
IMAGE >>> RESIZE = 40%
Ensure "Resize all layers" is UNCHECKED
Resample using WEIGHTED AVERAGE
ADJUST >>> SHARPNESS >>> SHARPEN
EFFECTS >>> PLUGINS >>> EYE CANDY 3 >>>
DROP SHADOW
Same settings
Reposition with your MOVER tool |
|
STEP 26
Open up the butterfly-sdh. image in your PSP workspace
Right click on the Title Bar and select COPY from the options
Right click on the Title Bar of your tag image
and select PASTE AS NEW LAYER from the options
IMAGE >>> MIRROR
IMAGE >>> RESIZE = 40%
Ensure "Resize all layers" is UNCHECKED
Resample using WEIGHTED AVERAGE
ADJUST >>> SHARPNESS >>> SHARPEN
EFFECTS >>> PLUGINS >>> EYE CANDY 3 >>>
DROP SHADOW
Same settings
Reposition with your MOVER tool |
|
STEP 27
LAYERS >>> NEW RASTER LAYER
Select your TEXT tool
Using a font of your choice
Add your name
|
STEP 28
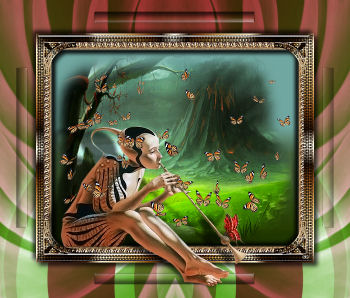
LAYERS >>> MERGE >>> MERGE ALL (Flatten)
Save as .jpg image
|
| |
|
| |
|
|
|