STEP 1
Open a new image 700 x 600
Transparent background
PSP9: Colour Depth = 16 Million Colors (24bit)
PSPX-X7: Colour Depth RGB = 8bits/channel
VIEW >>> RULERS
|
STEP 2
In your MATERIALS PALETTE
Load BLACK in your background
Those using higher versions of PSP may need to change the SIZE of the font
to around 660.
For an indication of the size see STEP 2A below |
Select your TEXT tool ... use these settings.
FONT = PonsonbyNF
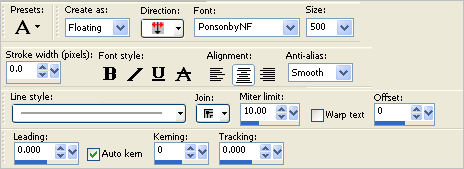
Place your cursor at the centre bottom of your blank image
Type capital letter O
in your text box
Click APPLY
SELECT >>> NONE |
STEP 2A
I moved the image to the left so that
you have some idea of the dimensions.
TOP level with 40 pixels
BOTTOM level with 560 pixels
Leave yours in the centre please.
|
|
STEP 3
Right click on the Title Bar and select COPY from the options
Right click on the Title Bar of your frame image
and select PASTE AS NEW LAYER from the options.
DELETE Raster 1
(This centres the image)
Choose your SELECTION TOOL then click on the
CUSTOM SELECTION symbol
and enter these coordinates. |
|
STEP 4
EDIT >>> CLEAR
DESELECT
LAYERS >>> DUPLICATE
EFFECTS >>> IMAGE EFFECTS >>> OFFSET
Horizontal Offset = 197
Vertical Offset = 0
Edge Mode = Transparent |
|
STEP 5
LAYERS >>> DUPLICATE
EFFECTS >>> IMAGE EFFECTS >>> OFFSET
Horizontal Offset = - (Minus) 394
Vertical Offset = 0
Edge Mode = Transparent
LAYERS >>> MERGE >>> MERGE VISIBLE
|
|
STEP 6
In your MATERIALS PALETTE load
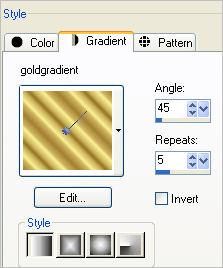
goldgradient in the foreground
using these settings
and
GREEN #738658 in the background |
 . .  |
STEP 7
SELECTIONS >>> SELECT ALL
SELECTIONS >>> FLOAT
SELECTIONS >>> DEFLOAT
SELECTIONS >>> MODIFY >>> CONTRACT = 2
EDIT >>> CLEAR
Flood fill with GREEN
SELECTIONS >>> MODIFY >>> CONTRACT = 3
EDIT >>> CLEAR
Flood fill with Gradient
SELECTIONS >>> MODIFY >>> CONTRACT = 2
EDIT >>> CLEAR |
|
STEP 8
SELECTIONS >>> INVERT
EFFECTS >>> 3D EFFECTS >>> INNER BEVEL |
|
STEP 9
SELECTIONS >>> INVERT
Flood fill with GREEN
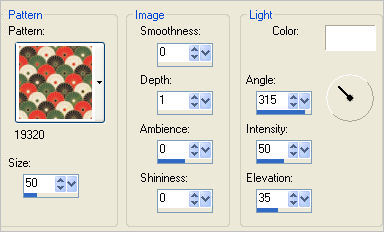
EFFECTS >>> TEXTURE EFFECTS >>> SCULPTURE
PATTERN = 19320
 , , |
STEP 10
SELECTIONS >>> INVERT
EFFECTS >>> PLUGINS >>> EYE CANDY 3 >>>
DROP SHADOW |
|
STEP 11
EDIT >>> Repeat Drop Shadow.. change DIRECTION to 135
BUT CHANGE BLUR to 5
DESELECT |
|
STEP 12
IMAGE >>> RESIZE = 90%
Ensure "Resize all layers" is UNCHECKED
Resample using WEIGHTED AVERAGE
ADJUST >>> SHARPNESS >>> SHARPEN
LAYERS >>> NEW RASTER LAYER
Flood fill with GREEN
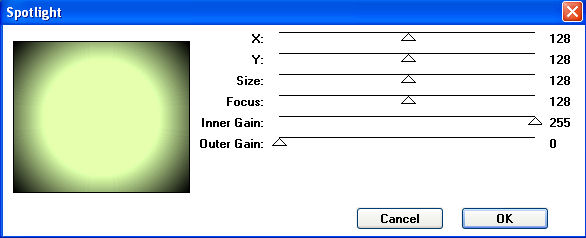
EFFECTS >>> PLUGINS >>> Greg's Factory Output Vol II >>> Spotlight
, |
STEP 13
EFFECTS >>> PLUGINS >>> Greg's Factory Output Vol II >>> Radial Hilite
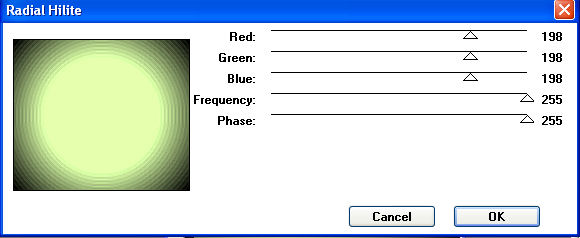
EFFECTS >>> EDGE EFFECTS >>> ENHANCE MORE
ADJUST >>> SHARPNESS >>> SHARPEN MORE
LAYERS >>> ARRANGE >>> MOVE DOWN
, |
STEP 14
ACTIVATE the Merged layer
With your MAGIC WAND
Mode = Replace
Match Mode = RGB Value
Tolerance = 0
Feather = 0
Antialias = UNchecked
Sample Merged = UNCHECKED
PSP9 - X8: Check CONTIGUOUS
PSPX - X8: There is no " Sample Merged"
Select the area outside the frame |
|
STEP 15
ACTIVATE Raster 1
SELECTIONS >>> INVERT
SELECTIONS >>> MODIFY >>> CONTRACT = 4
EDIT >>> CLEAR
DESELECT |
|
STEP 16
ACTIVATE the Merged layer
LAYERS >>> NEW RASTER LAYER
Flood fill with GREEN
SELECTIONS >>> SELECT ALL
SELECTIONS >>> MODIFY >>> CONTRACT = 3
EDIT >>> CLEAR
EFFECTS >>> 3D EFFECTS >>> DROP SHADOW
Vertical & Horizontal offsets = 1
Colour = Black
Opacity = 100
Blur = 0
Repeat Drop Shadow effect changing
Vertical & Horizontal Offsets to - ( minus ) 1
Click OK
SELECTIONS >>> MODIFY >>> CONTRACT = 1
*******
Flood fill with the Gradient
SELECTIONS >>> MODIFY >>> CONTRACT = 3
EDIT >>> CLEAR
EFFECTS >>> 3D EFFECTS >>> DROP SHADOW
Vertical & Horizontal offsets = 1
Colour = Black
Opacity = 100
Blur = 0
Repeat Drop Shadow effect changing
Vertical & Horizontal Offsets to - ( minus ) 1
Click OK |
|
STEP 17
Flood fill with GREEN
EFFECTS >>> TEXTURE EFFECTS >>> SCULPTURE
Same settings BUT change SIZE to 25
SELECTIONS >>> MODIFY >>> CONTRACT = 5
EDIT >>> CLEAR
EFFECTS >>> 3D EFFECTS >>> DROP SHADOW
Vertical & Horizontal offsets = 1
Colour = Black
Opacity = 70
Blur = 0
Repeat Drop Shadow effect changing
Vertical & Horizontal Offsets to - ( minus ) 1
Click OK
|
|
STEP 18
SELECTIONS >>> MODIFY >>> EXPAND = 6
EFFECTS >>> 3D EFFECTS >>> INNER BEVEL |
|
STEP 19
DESELECT |
|
STEP 20
EFFECTS >>> PLUGINS >>> EYE CANDY 3 >>>
DROP SHADOW |
|
STEP 21
EDIT >>> Repeat Drop Shadow.. change DIRECTION to 135 |
|
STEP 22
Open up the bamboo1 image in your PSP workspace
Right click on the Title Bar and select COPY from the options
Right click on the Title Bar of your frame image
and select PASTE AS NEW LAYER from the options.
EFFECTS >>> IMAGE EFFECTS >>> OFFSET
Horizontal Offset = - (MINUS) 300
Vertical Offset = 0
Edge Mode = Transparent |
|
STEP 23
LAYERS >>> DUPLICATE
IMAGE >>> MIRROR
LAYERS >>> MERGE >>> MERGE DOWN
ACTIVATE the Merged layer
EFFECTS >>> PLUGINS >>> EYE CANDY 3 >>> DROP SHADOW
Same settings
EDIT >>> Repeat Drop Shadow.. change DIRECTION to 315
LAYERS >>> MERGE >>> MERGE VISIBLE
Save as .pspimage image, |
STEP 24
VIEW >>> RULERS
Open up the japan-tsunami-relief image
in your PSP workspace
Right click on the Title Bar and select COPY from the options
Right click on the Title Bar of your frame image
and select PASTE AS NEW LAYER from the options.
Select your RASTER DEFORM tool
Mode = SCALE
use default settings
PSPX - X8:Select your PICK tool
Pull the centre top node down to the 150 pixel mark
on your left ruler |
|
STEP 25
Click the RESET RECTANGLE arrow
Select another tool to disengage the
DEFORMATION / PICK TOOL
LAYERS >>> ARRANGE >>> MOVE DOWN |
|
STEP 26
Open up the oriental-ladies image
in your PSP workspace
Activate Raster 1
Right click on the Title Bar and select COPY from the options
Right click on the Title Bar of your frame image
and select PASTE AS NEW LAYER from the options.
Reposition with your MOVER tool
|
|
STEP 27
Back to the oriental-ladies image in your PSP workspace
Activate Raster 3
Right click on the Title Bar and select COPY from the options
Right click on the Title Bar of your frame image
and select PASTE AS NEW LAYER from the options.
Reposition with your MOVER tool |
|
STEP 28
Back to the oriental-ladies image in your PSP workspace
Activate Raster 2
Right click on the Title Bar and select COPY from the options
Right click on the Title Bar of your frame image
and select PASTE AS NEW LAYER from the options.
Reposition DOWN with your MOVER tool |
|
STEP 29
LAYERS >>> MERGE >>> MERGE VISIBLE
LAYERS >>> NEW RASTER LAYER
Select your TEXT tool
and with a font of your choice add your name
, |
STEP 30
LAYERS >>> MERGE >>> MERGE ALL (Flatten)
Save as .jpg image
, |
|
|
|
|
|
|