NOTE:
I supplied the PattyDay font for your collection even though we do not
actually use it in the tutorial.
Because the sizing problems in higher versions than PSP9
I created the 'wordart' to save hassles.
This way the size will be the same no matter which version of PSP you use.
|
STEP 1
Open a new image 600 x 450
Transparent background
PSPX - X2: Colour Depth = 8bits/channel
PSPX3-6: Colour Depth RGB = 8bits/channel
Flood fill with GREEN #24542f
Open up the ABS5Small image in your PSP workspace
Right click on the Title Bar and select COPY from the options
Right click on the Title Bar of your tag image
and select PASTE AS NEW LAYER from the options.
|
STEP 2
EFFECTS >>> REFLECTION EFFECTS >>> FEEDBACK
|
|
STEP 3
IMAGE >>> MIRROR
EFFECTS >>> REFLECTION EFFECTS >>>
ROTATING MIRROR
|
|
STEP 4
IMAGE >>> RESIZE = 90%
Ensure "Resize all layers" is UNCHECKED
Resample using WEIGHTED AVERAGE
In your LAYER PALETTE change the
BLEND MODE to LUMINANCE (L)
|
|
STEP 5
EFFECTS >>> 3D EFFECTS >>> DROP SHADOW
Vertical & Horizontal offsets = 5
Colour = Black
Opacity = 75
Blur = 9.00
Repeat Drop Shadow effect changing
Vertical & Horizontal Offsets to - ( minus ) 5
Click OK
LAYERS >>> DUPLICATE
In your LAYER PALETTE change the
BLEND MODE to MULTIPLY
LAYERS >>> MERGE >>> MERGE DOWN
|
|
STEP 6
Open up the STP-Clover image in your PSP workspace
Activate Raster 1
Right click on the Title Bar and select COPY from the options
Right click on the Title Bar of your tag image
and select PASTE AS NEW LAYER from the options.
IMAGE >>> RESIZE = 90%
Ensure "Resize all layers" is UNCHECKED
Resample using WEIGHTED AVERAGE
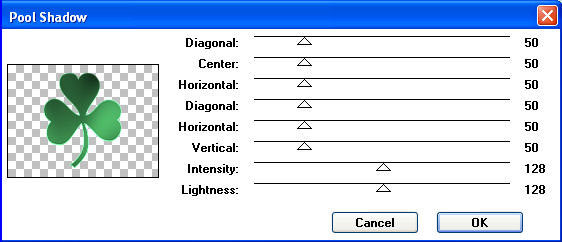
EFFECTS >>> PLUGINS >>> Greg's Factory Output Vol2 >>> Pool Shadow

|
STEP 7
EFFECTS >>> 3D EFFECTS >>> DROP SHADOW
Vertical & Horizontal offsets = 5
Colour = Black
Opacity = 75
Blur = 9.00 |
|
STEP 8
Open up the STP-WA-JF image in your PSP workspace
Activate frame layer
Right click on the Title Bar and select COPY from the options
Right click on the Title Bar of your tag image
and select PASTE AS NEW LAYER from the options.
EFFECTS >>> 3D EFFECTS >>> DROP SHADOW
Vertical & Horizontal offsets = 5
Colour = Black
Opacity = 75
Blur = 9.00
Repeat Drop Shadow effect changing
Vertical & Horizontal Offsets to - ( minus ) 5
Click OK
LAYERS >>> MERGE >>> MERGE VISIBLE
|
|
STEP 9
Back to the STP-WA-JF image in your PSP workspace
Activate HappySTPD layer
Right click on the Title Bar and select COPY from the options
Right click on the Title Bar of your tag image
and select PASTE AS NEW LAYER from the options.
EFFECTS >>> 3D EFFECTS >>> DROP SHADOW
Vertical & Horizontal offsets = 1
Colour = Black
Opacity = 75
Blur = 0.00
Repeat Drop Shadow effect changing
Vertical & Horizontal Offsets to - ( minus ) 1
Click OK
Rename this layer STP1
|
|
STEP 10
LAYERS >>> DUPLICATE
Rename this layer STP2
LAYERS >>> DUPLICATE
Rename this layer STP3
EFFECTS >>> TEXTURE EFFECTS >>> BLINDS
COLOUR = #004000
|
|
STEP 11
CLOSE layer STP3
Activate STP2
EFFECTS >>> TEXTURE EFFECTS >>> BLINDS
COLOUR = #004000
|
|
STEP 12
CLOSE layer STP2
Activate STP1
EFFECTS >>> TEXTURE EFFECTS >>> BLINDS
COLOUR = #004000 |
|
STEP 13
Back to the STP-WA-JF image in your PSP workspace
Activate Clover layer
Right click on the Title Bar and select COPY from the options
Right click on the Title Bar of your tag image
and select PASTE AS NEW LAYER from the options.
EFFECTS >>> IMAGE EFFECTS >>> OFFSET
Rename this layer CL1 |
|
STEP 14
EFFECTS >>> 3D EFFECTS >>> DROP SHADOW
Vertical & Horizontal offsets = 1
Colour = Black
Opacity = 75
Blur = 0.00
LAYERS >>> DUPLICATE
Rename this layer CL2
LAYERS >>> DUPLICATE
Rename this layer CL3 |
STEP 15
With your MAGIC WAND

Select the areas shown

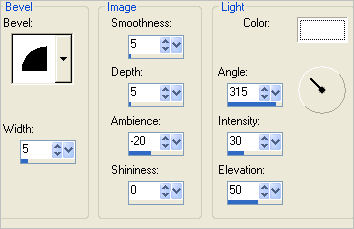
EFFECTS >>> 3D EFFECTS >>> INNER BEVEL
 DESELECT

|
STEP 16
CLOSE layer CL3
Activate CL2
With your MAGIC WAND ....Same settings
Select the areas shown

EFFECTS >>> 3D EFFECTS >>> INNER BEVEL
Same settings
DESELECT

|
STEP 17
CLOSE layer CL2
Activate CL1
With your MAGIC WAND ....Same settings
Select the areas shown

EFFECTS >>> 3D EFFECTS >>> INNER BEVEL
Same settings
DESELECT

|
STEP 18
Activate CL3
Back to the STP-WA-JF image in your PSP workspace
Activate dots layer
Right click on the Title Bar and select COPY from the options
Right click on the Title Bar of your tag image
and select PASTE AS NEW LAYER from the options.
EFFECTS >>> IMAGE EFFECTS >>> OFFSET
Change Vertical offset to - (minus) 185
EFFECTS >>> 3D EFFECTS >>> DROP SHADOW
Vertical & Horizontal offsets = 2
Colour = Black
Opacity = 75
Blur = 0.00
Rename this layer dot1 |
|
STEP 19
LAYERS >>> DUPLICATE
Rename this layer dot2
LAYERS >>> DUPLICATE
Rename this layer dot3
With your MAGIC WAND ....Same settings
Select the areas shown

EFFECTS >>> 3D EFFECTS >>> INNER BEVEL
Same settings
DESELECT

|
STEP 20
CLOSE layer dot3
ACTIVATE layer dot2
With your MAGIC WAND ....Same settings
Select the areas shown

EFFECTS >>> 3D EFFECTS >>> INNER BEVEL
Same settings
DESELECT

|
STEP 21
CLOSE layer dot2
ACTIVATE layer dot1
With your MAGIC WAND ....Same settings
Select the areas shown

EFFECTS >>> 3D EFFECTS >>> INNER BEVEL
Same settings
DESELECT

|
STEP 22
Activate dot3
Back to the dancing image in your PSP workspace
Right click on the Title Bar and select COPY from the options
Right click on the Title Bar of your tag image
and select PASTE AS NEW LAYER from the options.
IMAGE >>> RESIZE = 40%
Ensure "Resize all layers" is UNCHECKED
Resample using WEIGHTED AVERAGE
ADJUST >>> SHARPNESS >>> SHARPEN
EFFECTS >>> IMAGE EFFECTS >>> OFFSET
Change Vertical offset to 145
EFFECTS >>> 3D EFFECTS >>> DROP SHADOW
Vertical & Horizontal offsets = 2
Colour = Black
Opacity = 75
Blur = 9.00
Rename this layer dancers |
|
STEP 23
LAYERS >> NEW RASTER LAYER
Select your TEXT TOOL
with font and settings of your choice
add your name
Rename this layer name. |
|
STEP 24
Set up LAYER PALETTE as shown
Right click on Title Bar and select
Copy merged from the options
|
|
STEP 25
In ANIMATION SHOP
Right click the workspace and select
'Paste As New Animation' from the options.
Back to PSP.
Set up LAYER PALETTE as shown
Right click on Title Bar and select
Copy merged from the options
|
|
STEP 26
In ANIMATION SHOP
Right click top of frame image and select
'Paste After Current Frame' from the options.
Back to PSP.
Set up LAYER PALETTE as shown
Right click on Title Bar and select
Copy merged from the options
|
|
STEP 27
In ANIMATION SHOP
Right click top of frame image and select
'Paste After Current Frame' from the options.
|
STEP 28
View >> Animation
and while it is still running,
File >> Save As
Locate the folder in which you wish to save it.
Name your animation.
With the Gif Optimiser keep pressing NEXT
until you get to the last one... click FINISH
Close the Animation
Close the frames.
Close Animation Shop |
|
|
|
|