STEP 1
Open a new image 600 x 600
Transparent background
PSPX - X2: Colour Depth = 8bits/channel
PSPX3-X6: Colour Depth RGB = 8bits/channel
|
STEP 2
Open up the 680806.png image
in your PSP workspace
Right click on the Title Bar and select COPY from the options
Right click on the Title Bar of your tag image
and select PASTE AS NEW LAYER from the options. |
STEP 3
Open up the barque et poissons volants image
in your PSP workspace
Right click on the Title Bar and select COPY from the options
Right click on the Title Bar of your tag image
and select PASTE AS NEW LAYER from the options.
IMAGE >>> RESIZE = 80%
Ensure "Resize all layers" is UNCHECKED
Resample using WEIGHTED AVERAGE
ADJUST >>> SHARPNESS >>> SHARPEN
Choose your SELECTION TOOL
Selection Type = Rectangle
Mode = Replace
Feather = 0
Smoothing = 6
Antialias = UNChecked
Select the text
EDIT >>> CLEAR
DESELECT
Reposition DOWN with your MOVER tool
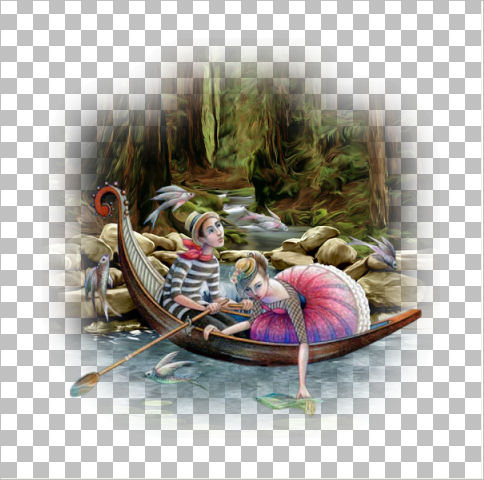
|
STEP 4
LAYERS >>> DUPLICATE
CLOSE Raster 2
Choose your FREEHAND SELECTION TOOL
Selection Type = Point to Point
Mode = Replace
Feather = 0
Smoothing = 6
Antialias = UNChecked
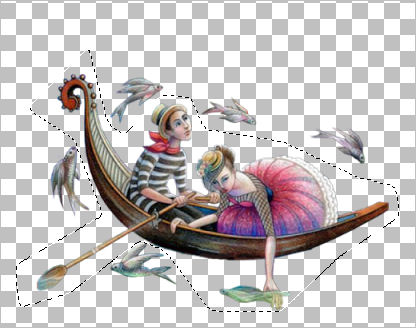
Select the area shown so that all the fish EXCEPT the one in the lady's hand
are outside the selected area.
|
STEP 5
EDIT >>> CLEAR
ACTIVATE Raster 3
SELECTIONS >>> INVERT
EDIT >>> CLEAR
DESELECT
CLOSE Raster 3
ACTIVATE Copy of Raster 3
LAYERS >>> DUPLICATE
LAYERS >>> MERGE >>> MERGE DOWN
ADJUST >>> SHARPNESS >>> SHARPEN
|
|
STEP 6
LAYERS >>> DUPLICATE
4 times
Close the top 4 layers
Activate Copy of Raster 3
Choose your SELECTION TOOL
Selection Type = Rectangle
Mode = Replace
Feather = 0
Antialias = UNChecked
Select the fish shown
EDIT >>> CLEAR
DESELECT
|
|
STEP 7
CLOSE Copy of Raster 3
OPEN & Activate Copy (2) of Raster 3
Choose your SELECTION TOOL
Same settings
Select the fish shown
EDIT >>> CLEAR
DESELECT
|
|
STEP 8
CLOSE Copy (2) of Raster 3
OPEN & Activate Copy (3) of Raster 3
Choose your SELECTION TOOL
Same settings
Select the fish shown
EDIT >>> CLEAR
DESELECT |
|
STEP 9
Still on Copy (3) of Raster 3
Choose your SELECTION TOOL
Same settings
Select the fish shown
EDIT >>> CLEAR
DESELECT |
|
STEP 10
CLOSE Copy (3) of Raster 3
OPEN & Activate Copy (4) of Raster 3
Choose your SELECTION TOOL
Same settings and while depressing your SHIFT KEY
Select the fish shown
EDIT >>> CLEAR
DESELECT |
|
STEP 11
CLOSE Copy (4) of Raster 3
OPEN & Activate Copy (5) of Raster 3
Choose your SELECTION TOOL
Same settings and while depressing your SHIFT KEY
Select the fish shown
EDIT >>> CLEAR
DESELECT |
|
STEP 12
ACTIVATE
Raster 1
Flood fill with BLUE #5d7980
|
STEP 13
Set up your LAYER PALETTE as shown |
|
STEP 14
With Raster 2 active
Activate your SELECTION TOOL
On your top menu select
"Create selection from" >> Layer opaque option |
|
STEP 15
SELECTIONS >>> INVERT |
|
STEP 16
ACTIVATE
Raster 1
ADJUST >>> BRIGHTNESS and CONTRAST >>> BRIGHTNESS/CONTRAST

EFFECTS >>> TEXTURE EFFECTS >>> TEXTURE
TEXTURE = winni.texture.039
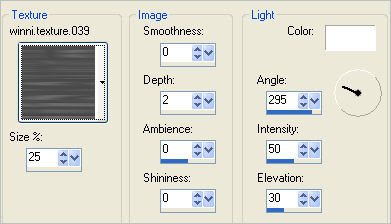
EFFECTS >>> EDGE EFFECTS >>> ENHANCE
|
STEP 17
EFFECTS >>> 3D EFFECTS >>> DROP SHADOW |
|
STEP 18
EFFECTS >>> 3D EFFECTS >>> DROP SHADOW
DESELECT
|
|
STEP 19
SELECTIONS >>> SELECT ALL
SELECTIONS >>> MODIFY >>> CONTRACT = 10
SELECTIONS >>> INVERT
Flood fill with BLUE
ADJUST >>> BRIGHTNESS and CONTRAST >>> BRIGHTNESS/CONTRAST
Same settings
EFFECTS >>> 3D EFFECTS >>> DROP SHADOW
AS IN STEP 17
EFFECTS >>> 3D EFFECTS >>> DROP SHADOW
AS IN STEP 18
DESELECT
|
|
STEP 20
LAYERS >>> NEW RASTER LAYER
Select your TEXT TOOL
with font and settings of your choice
add your name
|
|
STEP 21
Set up your LAYER PALETTE as shown |
|
STEP 22
LAYERS >>> MERGE >>> MERGE VISIBLE
Right click on Title Bar and select
Copy from the options
In ANIMATION SHOP
Right click the workspace and select
'Paste As New Animation' from the options.
|
STEP 23
Back to PSP.
OPEN Copy of Raster 3
.Right click on Title Bar and select
Copy Merged from the options
In ANIMATION SHOP
Right click top of frame image and select
'Paste After Current Frame' from the options.
|
STEP 24
Back to PSP.
OPEN Copy (2) of Raster 3
CLOSE Copy of Raster 3
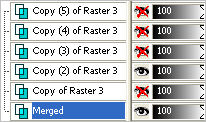
.Right click on Title Bar and select Copy Merged from the options
In ANIMATION SHOP
Right click top of frame image and select
'Paste After Current Frame' from the options. |
STEP 25
Back to PSP.
OPEN Copy (3) of Raster 3
CLOSE Copy (2) of Raster 3
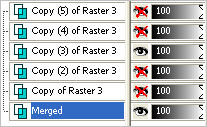
.Right click on Title Bar and select Copy Merged from the options
In ANIMATION SHOP
Right click top of frame image and select
'Paste After Current Frame' from the options. |
STEP 26
Back to PSP.
OPEN Copy (4) of Raster 3
CLOSE Copy (3) of Raster 3
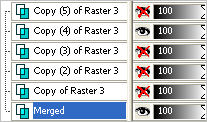
.Right click on Title Bar and select Copy Merged from the options
In ANIMATION SHOP
Right click top of frame image and select
'Paste After Current Frame' from the options. |
STEP 27
Back to PSP.
OPEN Copy (5) of Raster 3
CLOSE Copy (4) of Raster 3
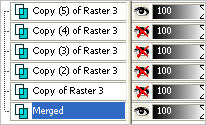
.Right click on Title Bar and select Copy Merged from the options
In ANIMATION SHOP
Right click top of frame image and select
'Paste After Current Frame' from the options. |
STEP 28
Edit >> Select All
Right click on Title Bar of frames
Select 'Frame Properties' from the options
Display time = 55
|
|
STEP 29
View >> Animation
and while it is still running,
File >> Save As
Locate the folder in which you wish to save it.
Name your animation.
With the Gif Optimiser keep pressing NEXT
until you get to the last one... click FINISH
Close the Animation
Close the frames.
Close Animation Shop
|
|
|
|
|
|
|