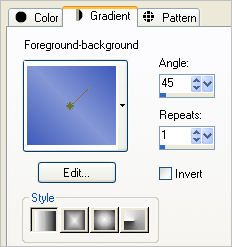
STEP 1
In your MATERIALS PALETTE
Load CREAM" #e5c7ba " in your foreground
Load BROWN " #7d412a " in your background
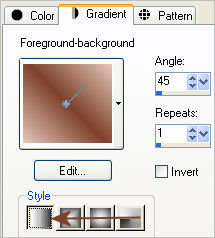
Then click on the GRADIENT option in your foreground palette
and select the "Foreground_background" gradient
with these settings
|
 ..  |
STEP 2
Open a new image 500 x 500
Transparent background
PSPX - X2: Colour Depth = 8bits/channel
PSPX3-6: Colour Depth RGB = 8bits/channel
Flood fill with the gradient
EFFECTS >>> TEXTURE EFFECTS >>> WEAVE
|
|
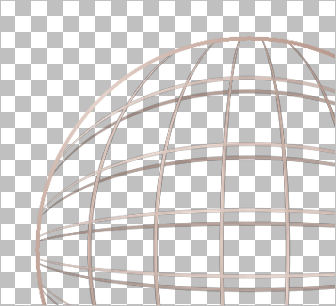
STEP 3
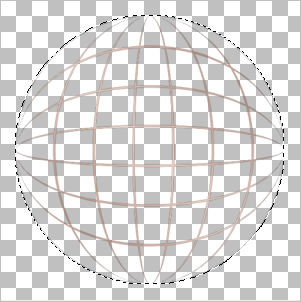
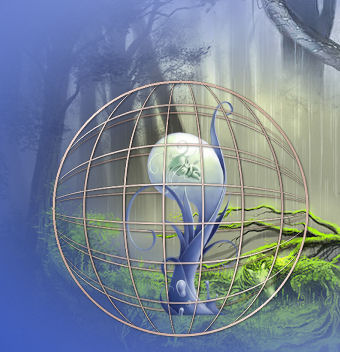
EFFECTS>>> GEOMETRIC EFFECTS >>> CIRCLE
Edge Mode = Transparent
IMAGE >>> RESIZE = 90%
Ensure "Resize all layers" is UNCHECKED
Resample using WEIGHTED AVERAGE
SELECTIONS >>> SELECT ALL
SELECTIONS >>> FLOAT
SELECTIONS >>> DEFLOAT
EFFECTS >>> PLUGINS >>> Transparency >>>
Eliminate Black
DO NOT DESELECT
|
|
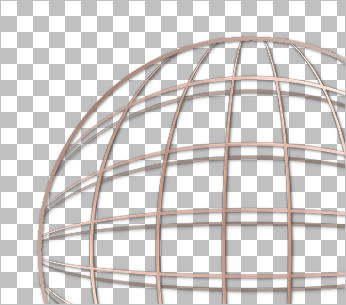
STEP 4
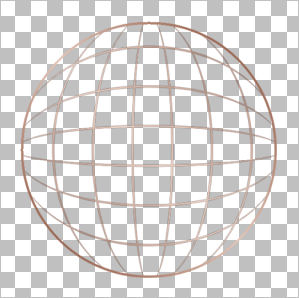
SELECTIONS >>> MODIFY >>> CONTRACT = 10
SELECTIONS >>> INVERT
EDIT >>> CLEAR
SELECTIONS >>> INVERT
LAYERS >>> NEW RASTER LAYER
Flood fill with the gradient
SELECTIONS >>> MODIFY >>> CONTRACT = 4
EDIT >>> CLEAR
DESELECT
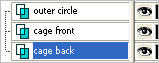
Rename this layer "outer circle"
|
|
STEP 5
ACTIVATE Raster 1
LAYERS >>> DUPLICATE
LAYERS >>> MERGE >>> MERGE DOWN
LAYERS >>> DUPLICATE
IMAGE >>> FLIP
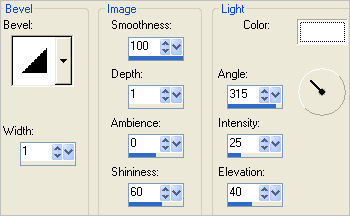
EFFECTS >>> 3D EFFECTS >>> INNER BEVEL
Rename this layer "cage back "
|
|
STEP 6
ACTIVATE Raster 1
EFFECTS >>> 3D EFFECTS >>> INNER BEVEL
Same settings
BUT
Change "Shininess" to 80
Rename this layer "cage front "
|
|
STEP 7
ACTIVATE outer circle layer
EFFECTS >>> 3D EFFECTS >>> INNER BEVEL
Same settings
ACTIVATE cage back
LAYERS >>> ARRANGE >>> MOVE DOWN
|
|
STEP 8
EFFECTS >>> 3D EFFECTS >>> DROP SHADOW
Vertical & Horizontal offsets = 1
Colour = Black
Opacity = 50
Blur = 4.00
ACTIVATE cage front
EDIT >>> Repeat Drop Shadow
ADJUST >>> BRIGHTNESS and CONTRAST >>> BRIGHTNESS/CONTRAST
Brightness = 30
Contrast = 30
PSPX6: Linear mode Checked
ACTIVATE cage back
EDIT >>> Repeat Drop Shadow
In your LAYER PALETTE change the OPACITY to 70%
Save as circularcage.pspimage
Minimize for now
|
|
Now... let's do something with it...
|
STEP 9
In your MATERIALS PALETTE
Load DARK BLUE " #3e5bba " in your foreground
Load LIGHT BLUE " #8598d7 " in your background
Then click on the GRADIENT option in your foreground palette
and select the "Foreground_background" gradient
with these settings |
|
STEP 10
Open up the 1228506071_feerie image
in your PSP workspace
WINDOW >>> DUPLICATE
Close the original Image
Choose your SELECTION TOOL
Selection Type = Rectangle
Mode = Replace
Feather = 0
Antialias = UNChecked
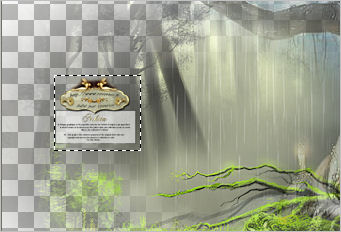
Select the watermark
Hit your DELETE key
DESELECT
|
|
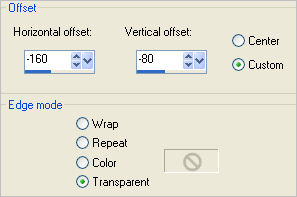
STEP 11
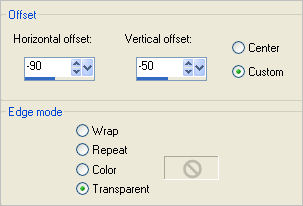
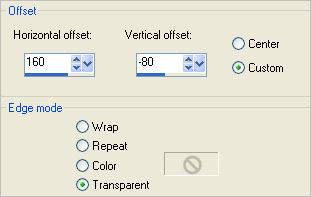
EFFECTS >>> IMAGE EFFECTS >>> OFFSET |
|
STEP 12
Open up the 13186825882_feerique_nikita image
in your PSP workspace
Right click on the Title Bar and select COPY from the options
Right click on the Title Bar of your tag image
and select PASTE AS NEW LAYER from the options.
Choose your SELECTION TOOL
Selection Type = Rectangle
Mode = Replace
Feather = 0
Antialias = UNChecked
Select the watermark
Hit your DELETE key
DESELECT
|
|
STEP 13
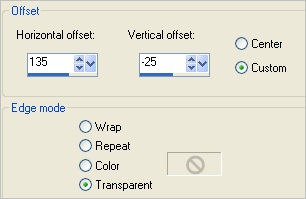
EFFECTS >>> IMAGE EFFECTS >>> OFFSET |
|
STEP 14
LAYERS >>> NEW RASTER LAYER
Flood fill with BLUE gradient
LAYERS >>> ARRANGE >>> SEND TO BOTTOM
|
|
STEP 15
ACTIVATE Raster 2
Open up the WS1-Fairy_NewBorn191108 image
in your PSP workspace
Right click on the Title Bar and select COPY from the options
Right click on the Title Bar of your tag image
and select PASTE AS NEW LAYER from the options.
IMAGE >>> RESIZE = 50%
Ensure "Resize all layers" is UNCHECKED
Resample using WEIGHTED AVERAGE
ADJUST >>> SHARPNESS >>> SHARPEN
EFFECTS >>> IMAGE EFFECTS >>> OFFSET
|
|
STEP 16
Maximize your circularcage image
Activate the cage back layer
Right click on the Title Bar and select COPY from the options
Right click on the Title Bar of your tag image
and select PASTE AS NEW LAYER from the options.
IMAGE >>> RESIZE = 60%
Ensure "Resize all layers" is UNCHECKED
Resample using WEIGHTED AVERAGE
ADJUST >>> SHARPNESS >>> SHARPEN
EFFECTS >>> IMAGE EFFECTS >>> OFFSET
Same settings
LAYERS >>> ARRANGE >>> MOVE DOWN
|
|
STEP 17
ACTIVATE Raster 4
Back to your circularcage image
Activate the cage front layer
Right click on the Title Bar and select COPY from the options
Right click on the Title Bar of your tag image
and select PASTE AS NEW LAYER from the options.
IMAGE >>> RESIZE = 60%
Ensure "Resize all layers" is UNCHECKED
Resample using WEIGHTED AVERAGE
ADJUST >>> SHARPNESS >>> SHARPEN
EFFECTS >>> IMAGE EFFECTS >>> OFFSET
Same settings |
|
STEP 18
Back to your circularcage image
Activate the outer circle layer
Right click on the Title Bar and select COPY from the options
Right click on the Title Bar of your tag image
and select PASTE AS NEW LAYER from the options.
IMAGE >>> RESIZE = 60%
Ensure "Resize all layers" is UNCHECKED
Resample using WEIGHTED AVERAGE
ADJUST >>> SHARPNESS >>> SHARPEN
EFFECTS >>> IMAGE EFFECTS >>> OFFSET
Same settings |
|
STEP 19
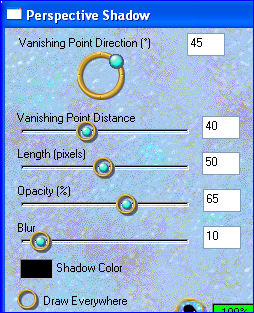
EFFECTS >>> PLUGINS >>> EYE CANDY 3 >>> PERSPECTIVE SHADOW
|
|
STEP 20
ACTIVATE Raster 6
EDIT >>> Repeat Perspective Shadow
ACTIVATE Raster 4
EDIT >>> Repeat Perspective Shadow
ACTIVATE Raster 5
EDIT >>> Repeat Perspective Shadow
On layers Raster 5, Raster 6 and Raster 7
Change the BLEND MODE to MULTIPLY
|
|
STEP 21
ACTIVATE Raster 7
Open up the Wizmus1 image
in your PSP workspace
Right click on the Title Bar and select COPY from the options
Right click on the Title Bar of your tag image
and select PASTE AS NEW LAYER from the options.
IMAGE >>> RESIZE = 80%
Ensure "Resize all layers" is UNCHECKED
Resample using WEIGHTED AVERAGE
ADJUST >>> SHARPNESS >>> SHARPEN
EFFECTS >>> IMAGE EFFECTS >>> OFFSET
EFFECTS >>> PLUGINS >>> EYE CANDY 3 >>> PERSPECTIVE SHADOW
Same settings
|
|
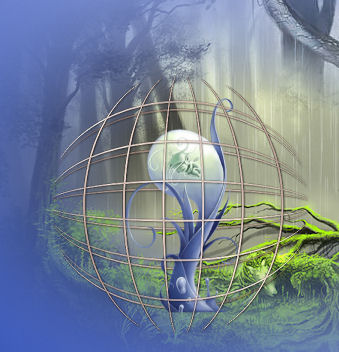
STEP 22
Open up the caged-frame image in your PSP workspace
Right click on the Title Bar and select COPY from the options
Right click on the Title Bar of your tag image
and select PASTE AS NEW LAYER from the options. |
STEP 23
LAYERS >>> MERGE >>> MERGE VISIBLE
LAYERS >>> NEW RASTER LAYER
Add your name
LAYERS >>> MERGE >>> MERGE ALL (Flatten)
Save as .jpg image
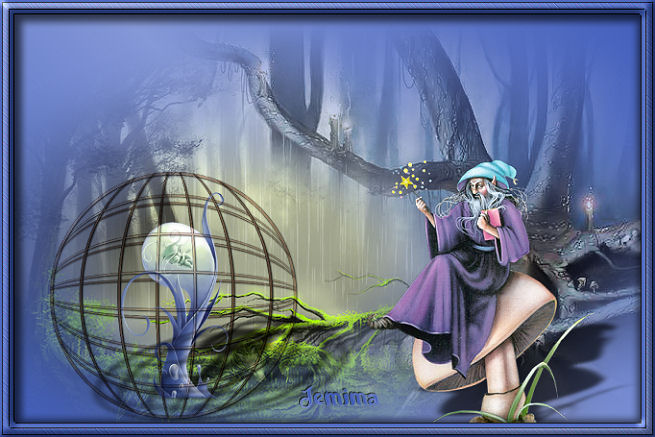
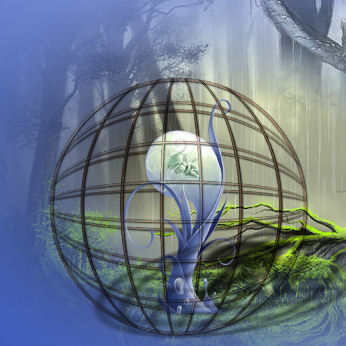
NOTE: I resized my result before posting it at the top of this tutorial
|
|
|
|
|
|
|