A QUICK TUTORIAL *S*
|
STEP 1
Open a new image 700 x 500
Transparent background
PSP9: Colour Depth = 16 Million Colors (24bit)
PSPX-X6: Colour Depth RGB = 8bits/channel
VIEW >>> RULERS
In your MATERIALS PALETTE
Load MUSTARD ' #a76323 ' in your background
Flood fill with MUSTARD
|
STEP 2
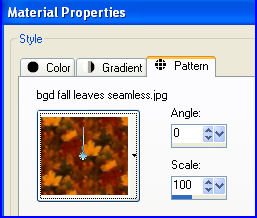
In your MATERIALS PALETTE
Load the ' bgd fall leaves seamless ' pattern
in your foreground
using these settings. |
|
STEP 3
LAYERS >>> NEW RASTER LAYER
Flood fill with pattern
In your LAYER PALETTE change the
BLEND MODE to LUMINANCE (L) |
|
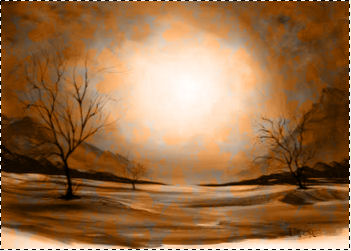
STEP 4
LAYERS >>> NEW RASTER LAYER
SELECTIONS >>> SELECT ALL
Open up the Colorful-Abstract-Painting image
in your PSP workspace
Right click on the Title Bar and select COPY from the options
Right click on the Title Bar of your tag image
and select PASTE INTO SELECTION from the options.
In your LAYER PALETTE change the
BLEND MODE to LUMINANCE (L)
DO NOT DESELECT
|
|
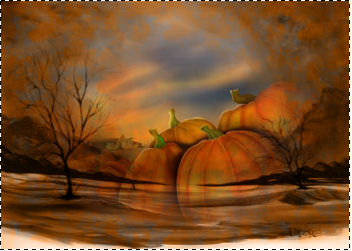
STEP 5
LAYERS >>> NEW RASTER LAYER
Open up the
k@rine_ dreams _Misted_Pumpkin_2044_Octobre_2011
image
in your PSP workspace
Right click on the Title Bar and select COPY from the options
Right click on the Title Bar of your tag image
and select PASTE INTO SELECTION from the options.
In your LAYER PALETTE change the
BLEND MODE to MULTIPLY
DO NOT DESELECT
|
|
STEP 6
LAYERS >>> DUPLICATE
In your LAYER PALETTE change the
BLEND MODE to LUMINANCE
EFFECTS >>> EDGE EFFECTS >>> ENHANCE
DESELECT
|
|
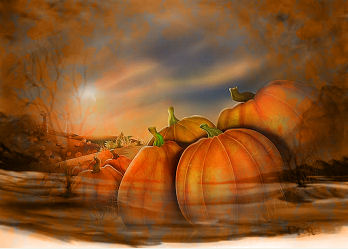
STEP 7
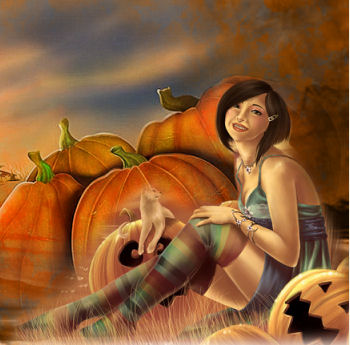
Open up the In_the_Pumpkin_Patch_by_cerona image
in your PSP workspace
Right click on the Title Bar and select COPY from the options
Right click on the Title Bar of your tag image
and select PASTE AS NEW LAYER from the options.
IMAGE >>> RESIZE = 75%
Ensure "Resize all layers" is UNCHECKED
Resample using WEIGHTED AVERAGE
ADJUST >>> SHARPNESS >>> SHARPEN
Reposition with your MOVER tool |
|
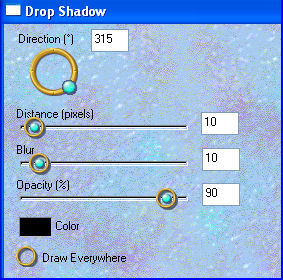
STEP 8
LAYERS >>> DUPLICATE
EFFECTS >>> PLUGINS >>> EYE CANDY 3 >>>
DROP SHADOW
LAYERS >>> MERGE >>> MERGE DOWN |
|
STEP 9
In your MATERIALS PALETTE
Load BROWN" #7e3806 " in your foreground
LAYERS >>> NEW RASTER LAYER
Flood fill with BROWN
SELECTIONS >>> SELECT ALL
SELECTIONS >>> MODIFY >>> CONTRACT = 5
EDIT >>> CLEAR
SELECTIONS >>> MODIFY >>> CONTRACT = 3
Flood fill with MUSTARD
SELECTIONS >>> MODIFY >>> CONTRACT = 5
EDIT >>> CLEAR
DESELECT
|
|
STEP 10
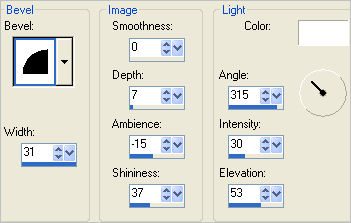
EFFECTS >>> 3D EFFECTS >>> DROP SHADOW
Vertical & Horizontal offsets = 1
Colour = Black
Opacity = 100
Blur = 0
Repeat Drop Shadow effect changing
Vertical & Horizontal Offsets to - ( minus ) 1
Click OK
EFFECTS >>> EDGE EFFECTS >>> ENHANCE MORE
EFFECTS >>> 3D EFFECTS >>> INNER BEVEL |
|
STEP 11
LAYERS >>> DUPLICATE
Select your RASTER DEFORM tool
Mode = SCALE
use default settings
PSPX-X6:Select your PICK tool
Drag the centre left node to the right..
to the 50 pixel mark
on your top ruler.
Drag the centre right node to the left..
to the 650 pixel mark
on your top ruler.
Click the RESET RECTANGLE arrow
Select the MOVER tool to disengage the
DEFORMATION tool (PICK tool)
LAYERS >>> ARRANGE >>> MOVE DOWN |
|
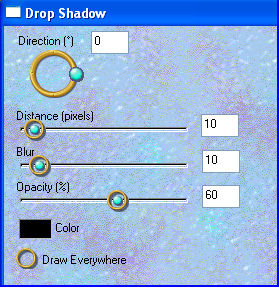
STEP 12
EFFECTS >>> PLUGINS >>> EYE CANDY 3 >>>
DROP SHADOW |
|
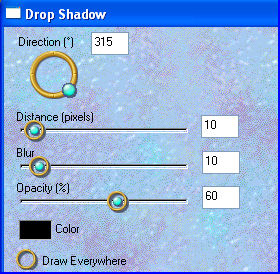
STEP 13
EDIT >>> Repeat Drop Shadow..
change DIRECTION to 180
ADJUST >>> SHARPNESS >>> SHARPEN MORE
|
|
STEP 14
ACTIVATE Raster 6
EFFECTS >>> PLUGINS >>> EYE CANDY 3 >>>
DROP SHADOW |
|
STEP 15
EDIT >>> Repeat Drop Shadow..
change DIRECTION to 135
LAYERS >>> MERGE >>> MERGE DOWN |
|
STEP 16
Open up the Happy-Thanksgiving-Day image
in your PSP workspace
Right click on the Title Bar and select COPY from the options
Right click on the Title Bar of your tag image
and select PASTE AS NEW LAYER from the options.
IMAGE >>> RESIZE = 60%
Ensure "Resize all layers" is UNCHECKED
Resample using WEIGHTED AVERAGE
ADJUST >>> SHARPNESS >>> SHARPEN
EFFECTS >>> 3D EFFECTS >>> DROP SHADOW
Vertical offset = 2
Horizontal offset = - ( minus ) 2
Colour = Black
Opacity = 80
Blur = 2.00
Reposition with your MOVER tool

|
STEP 17
Open up the autumnraccoonspumpkins_kathy2005 image
in your PSP workspace
Right click on the Title Bar and select COPY from the options
Right click on the Title Bar of your tag image
and select PASTE AS NEW LAYER from the options.
IMAGE >>> RESIZE = 90%
Ensure "Resize all layers" is UNCHECKED
Resample using WEIGHTED AVERAGE
Sharpen if you wish
EFFECTS >>> PLUGINS >>> EYE CANDY 3 >>>
DROP SHADOW
Same settings
Reposition with your MOVER tool |
|
STEP 18
LAYERS >>> MERGE >>> MERGE VISIBLE
LAYERS >>> NEW RASTER LAYER
Select your TEXT tool
Using a font of your choice
Add your name |
|
STEP 19
LAYERS >>> MERGE >>> MERGE ALL (Flatten)
Save as .jpg image |
|
|
|
|
|
|