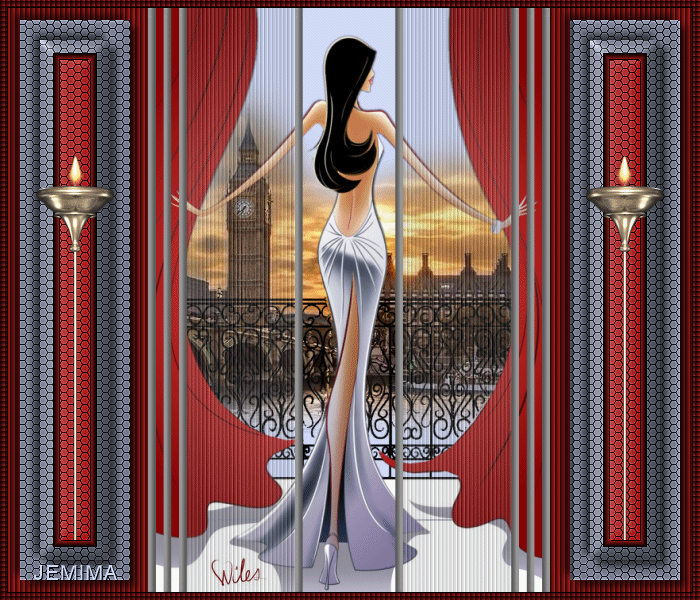
This tutorial includes a small animation BUT it is OPTIONAL.
|
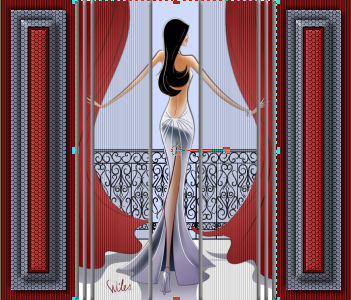
STEP 1
Open a new image 700 x 600
Transparent background
PSP9: Colour Depth = 16 Million Colors (24bit)
PSPX-X6: Colour Depth RGB = 8bits/channel
Flood fill with PALE BLUE #d0dbfc
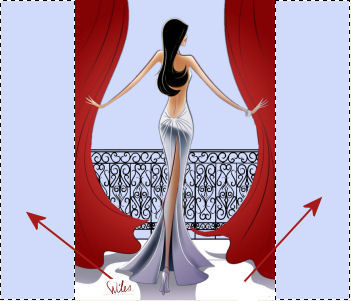
Open up the Paris_by_relic.png image in your PSP workspace
Right click on the Title Bar and select COPY from the options
Right click on the Title Bar of your tag image
and select PASTE AS NEW LAYER from the options.
VIEW >>> RULERS
|
STEP 2
With your MAGIC WAND
Mode = ADD (Shift)
Match Mode = RGB Value
Tolerance = 0
Feather = 0
Antialias = UNchecked
Sample Merged = UNCHECKED
PSP9 - X6: Check CONTIGUOUS
PSPX - X6: There is no " Sample Merged"
Select the 2 areas shown
|
|
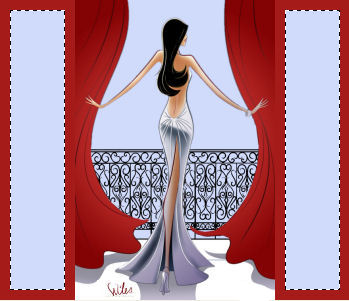
STEP 3
LAYERS >>> NEW RASTER LAYER
Flood fill with RED #a41b19
LAYERS >>> NEW RASTER LAYER
SELECTIONS >>> MODIFY >>> CONTRACT = 20
Flood fill with PALE BLUE #d0dbfc
, |
|
STEP 4
EFFECTS >>> TEXTURE EFFECTS >>> TILES
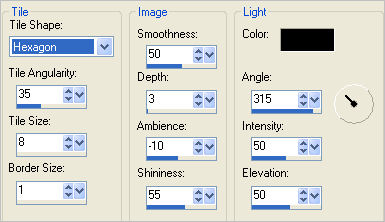
, |
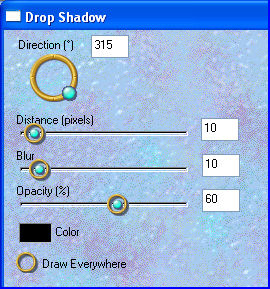
STEP 5
EFFECTS >>> PLUGINS >>> EYE CANDY 3 >>>
DROP SHADOW |
|
STEP 6
EDIT >>> Repeat Drop Shadow.. change DIRECTION to 135
SELECTIONS >>> MODIFY >>> CONTRACT = 20
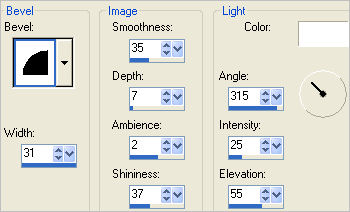
EFFECTS >>> 3D EFFECTS >>> INNER BEVEL |
|
STEP 7
EFFECTS >>> PLUGINS >>> EYE CANDY 3 >>>
DROP SHADOW
Same settings
EDIT >>> Repeat Drop Shadow.. change DIRECTION to 315
|
|
STEP 8
SELECTIONS >>> MODIFY >>> CONTRACT = 20
EFFECTS >>> 3D EFFECTS >>> CHISEL
COLOUR = RED #a41b19

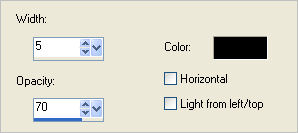
EFFECTS >>> 3D EFFECTS >>> DROP SHADOW
Vertical & Horizontal offsets = 1
Colour = Black
Opacity = 100
Blur = 0
Repeat Drop Shadow effect changing
Vertical & Horizontal Offsets to - ( minus ) 1
Click OK
|
|
STEP 9
ADJUST >>> HUE & SATURATION >>> COLORIZE
Hue = 0
Saturation = 180
ADJUST >>> BRIGHTNESS and CONTRAST >>> BRIGHTNESS/CONTRAST
Brightness = - (minus) 30
Contrast = 0
PSPX6: Linear mode ticked
DESELECT
|
|
STEP 10
ACTIVATE Raster 3
EFFECTS >>> TEXTURE EFFECTS >>> BLINDS |
|
STEP 11
ACTIVATE Raster 4
Open up the JF-Element221M image in your PSP workspace
Right click on the Title Bar and select COPY MERGED
from the options
Right click on the Title Bar of your tag image
and select PASTE AS NEW LAYER from the options.
Select your RASTER DEFORM tool
Mode = SCALE
use default settings
PSPX-X6:Select your PICK tool
Drag the centre left node to the 150 pixel mark
on your top ruler and
the centre right node to the 550 pixel mark
on your top ruler |
|
STEP 12
Click the RESET RECTANGLE arrow
Select the MOVER tool to disengage the
DEFORMATION tool (PICK tool)
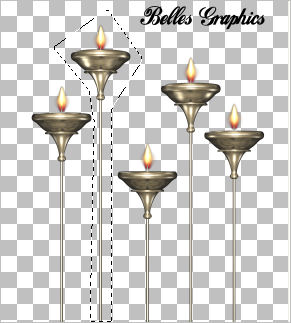
Open up the ElvenCandles-BellesGraphics
image in your PSP workspace
Choose your FREEHAND SELECTION TOOL
Selection Type = Point to Point
Mode = Replace
Feather = 0
Smoothing = 5
Antialias = UNChecked
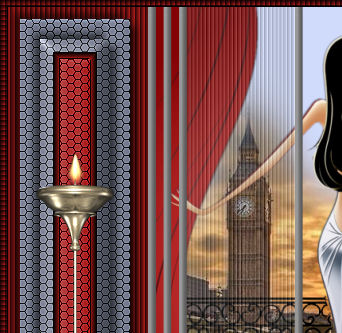
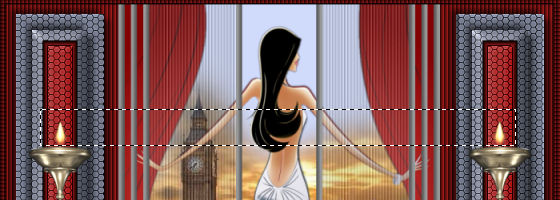
Select the candle holder shown |
|
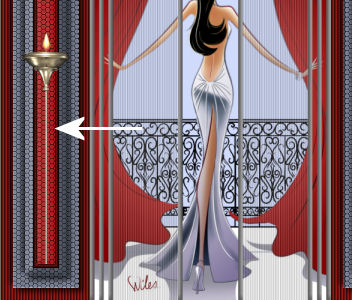
STEP 13
Right click on the Title Bar and select COPY from the options
Right click on the Title Bar of your tag image
and select PASTE AS NEW LAYER from the options.
IMAGE >>> RESIZE = 65%
Ensure "Resize all layers" is UNCHECKED
Resample using WEIGHTED AVERAGE
ADJUST >>> SHARPNESS >>> SHARPEN
Reposition with your MOVER tool
|
|
STEP 14
LAYERS >>> DUPLICATE
IMAGE >>> MIRROR
LAYERS >>> MERGE >>> MERGE DOWN
, |
STEP 15
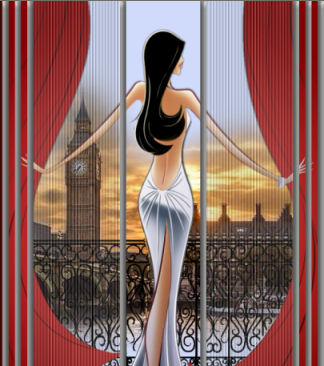
ACTIVATE Raster 1
Open up the MKM 2014 SEPTEMBER SERIES CITIES image
in your PSP workspace
Right click on the Title Bar and select COPY from the options
Right click on the Title Bar of your tag image
and select PASTE AS NEW LAYER from the options.
IMAGE >>> RESIZE = 80%
Ensure "Resize all layers" is UNCHECKED
Resample using WEIGHTED AVERAGE
ADJUST >>> SHARPNESS >>> SHARPEN
EFFECTS >>> IMAGE EFFECTS >>> OFFSET
Horizontal Offset = 0
Vertical Offset = 40
Edge Mode = Transparent
LAYERS >>> DUPLICATE
LAYERS >>> MERGE >>> MERGE DOWN |
|
STEP 16
ACTIVATE Raster 6
LAYERS >>> NEW RASTER LAYER
Flood fill with RED
SELECTIONS >>> SELECT ALL
SELECTIONS >>> MODIFY >>> CONTRACT = 7
EDIT >>> CLEAR
DESELECT
EFFECTS >>> TEXTURE EFFECTS >>> BLINDS
Same settings
EDIT >>> Repeat Blinds BUT this time
Check HORIZONTAL
EFFECTS >>> 3D EFFECTS >>> DROP SHADOW
Vertical & Horizontal offsets = 1
Colour = Black
Opacity = 100
Blur = 0
Repeat Drop Shadow effect changing
Vertical & Horizontal Offsets to - ( minus ) 1
Click OK
|
|
STEP 17
IF YOU DO NOT WISH TO ANIMATE
LAYERS >>> NEW RASTER LAYER
Select your TEXT tool
Using a font of your choice
Add your name
LAYERS >>> MERGE >>> MERGE ALL (Flatten)
Save as .jpg image
, |
|
|
|
|
IF YOU WISH TO ANIMATE |
STEP 18
LAYERS >>> NEW RASTER LAYER
Select your TEXT tool
Using a font of your choice
Add your name
CLOSE Raster 6 (The candle holders)
ACTIVATE one of the other layers
LAYERS >>> MERGE >>> MERGE VISIBLE
OPEN & ACTIVATE Raster 6
Make sure Raster 6 is the top layer
|
STEP 19
Choose your SELECTION TOOL
Selection Type = Rectangle
Mode = Replace
Feather = 0
Antialias = UNChecked
Select the 2 flames as shown
In your LAYER PALETTE
Right click on Raster 6 and select "Promote Selection to Layer" from the options
ACTIVATE Raster 6
Hit your DELETE KEY
DESELECT
LAYERS >>> MERGE >>> MERGE DOWN
|
STEP 20
ACTIVATE the Promoted Selection layer
SELECTIONS >>> SELECT ALL
Right click on the Title Bar and select COPY from the options
In ANIMATION SHOP
Right click the workspace and select
'Paste As New Animation' from the options
then
click on the Paste After Current icon
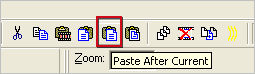
You now have 2 frames |
STEP 21
Effects >> Insert Image Effect >> ShakyCam
Click the CUSTOMIZE button first and enter this setting
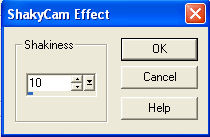
Then enter these settings and click OK
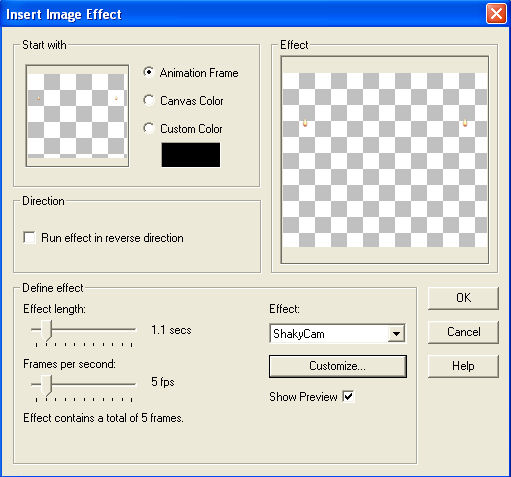
|
STEP 22
You now have 7 frames...
Right click inside frame 3 (F:3) and select DELETE from the options
|
STEP 23
Back to PSP.
DESELECT
CLOSE the Promoted Selection layer
ACTIVATE the Merged layer
Right click on Title Bar and select
Copy from the options
In ANIMATION SHOP
Right click the workspace and select
'Paste As New Animation' from the options.
Click the "Paste After Current" icon 5 times so that you have 6 frames
, |
STEP 24
Activate the 'flames" frames
Edit >> Select All
Edit >> Copy
Edit >> Propagate Paste
Activate the "background" frames
Edit >> Select All
Edit >> Paste into selected frame
ZOOM in on the first frame (F:1)
and place the flames on top of the candle holders. |
STEP 25
View >> Animation
and while it is still running,
File >> Save As
Locate the folder in which you wish to save it.
Name your animation.
With the Gif Optimiser keep pressing NEXT
until you get to the last one... click FINISH
Close the Animation
Close the frames.
Close Animation Shop |
| |
|
| |
|
| |
|