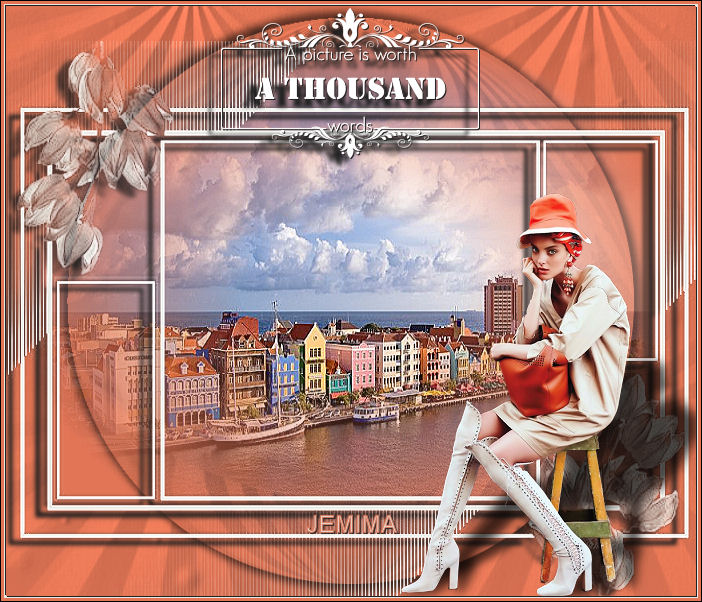
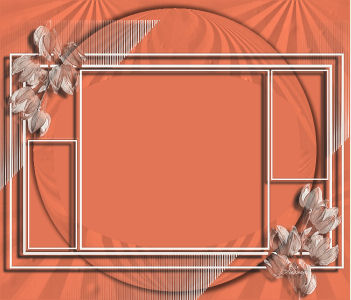
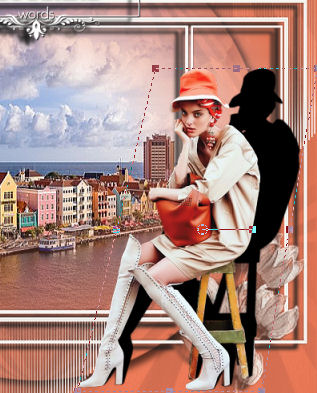
STEP 1
Open a new image 700 x 600
Transparent background
RASTER BACKGROUND
PSP9: Colour Depth = 16 Million Colors (24bit)
PSPX-X6: Colour Depth RGB = 8bits/channel
Flood fill with PEACH #e27555
LAYERS >>> NEW RASTER LAYER
Flood fill with CREAM #e8eae3
VIEW >>> RULERS |
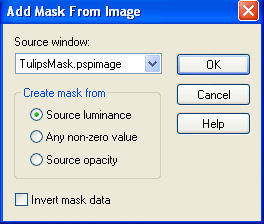
STEP 2
Open up the TulipsMask image in your PSP workspace
and minimize
On your tag image..
LAYERS >>> NEW MASK LAYER >>> FROM IMAGE
SOURCE = TulipsMask.pspimage
|
|
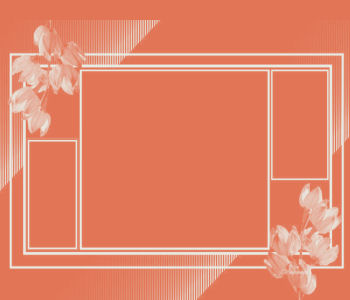
STEP 3
LAYERS >>> MERGE >>> MERGE GROUP
Select your RASTER DEFORM tool
Mode = SCALE
use default settings
PSPX-X6:Select your PICK tool
Drag the centre top node down to
the 40 pixel mark on your left ruler.
Click the RESET RECTANGLE arrow
Select the MOVER tool to disengage the
DEFORMATION tool (PICK tool)
LAYERS >>> DUPLICATE
LAYERS >>> MERGE >>> MERGE DOWN
|
|
STEP 4
EFFECTS >>> EDGE EFFECTS >>> ENHANCE
EFFECTS >>> 3D EFFECTS >>> DROP SHADOW
|
|
STEP 5
ACTIVATE Raster 1
EFFECTS >>> TEXTURE EFFECTS >>> TEXTURE
TEXTURE = purpl168
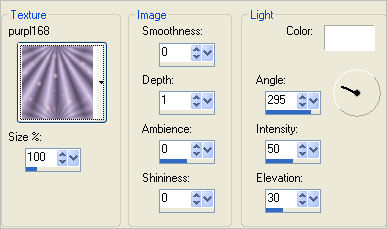 |
STEP 6
EDIT >>> Repeat Texture
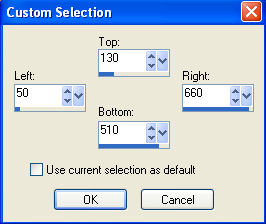
Choose your SELECTION TOOL then click on the
CUSTOM SELECTION symbol
and enter these coordinates.
|
|
STEP 7
Flood fill with PEACH
(Note: In PSPX6 you may have to use your
AIRBRUSH to fill the selected area)
DESELECT
LAYERS >>> DUPLICATE
EFFECTS>>> GEOMETRIC EFFECTS >>> CIRCLE
EDGE MODE = Transparent
IMAGE >>> RESIZE = 95%
Ensure "Resize all layers" is UNCHECKED
Resample using WEIGHTED AVERAGE
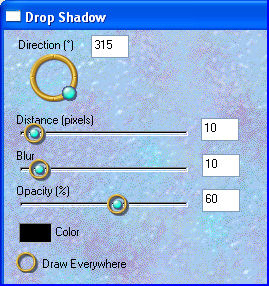
EFFECTS >>> PLUGINS >>> EYE CANDY 3 >>>
DROP SHADOW
|
|
STEP 8
EDIT >>> Repeat Drop Shadow..
change DIRECTION to 135 |
|
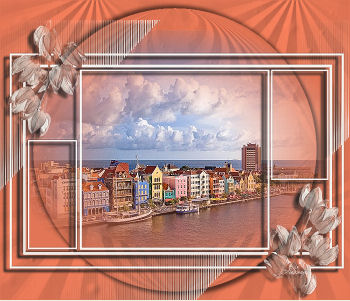
STEP 9
Open up the tubeclaudiaviza-paisaje365 image
in your PSP workspace
Right click on the Title Bar and select
COPY from the options
Right click on the Title Bar of your tag image
and select PASTE AS NEW LAYER from the options.
IMAGE >>> RESIZE = 80%
Ensure "Resize all layers" is UNCHECKED
Resample using WEIGHTED AVERAGE
EFFECTS >>> EDGE EFFECTS >>> ENHANCE |
|
STEP 10
Select your RASTER DEFORM tool
Mode = SCALE
use default settings
PSPX-X6:Select your PICK tool
Drag the centre top node UP to
the 40 pixel mark on your left ruler.
Click the RESET RECTANGLE arrow
Select the MOVER tool to disengage the
DEFORMATION tool (PICK tool) |
|
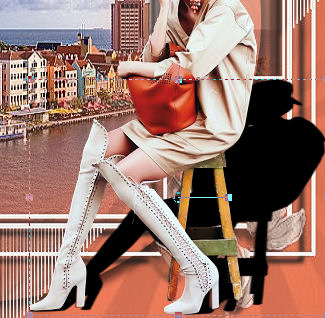
STEP 11
ACTIVATE the top layer
Open up the 006_picturesvol1 image
in your PSP workspace
Right click on the Title Bar and select
COPY from the options
Right click on the Title Bar of your tag image
and select PASTE AS NEW LAYER from the options.
IMAGE >>> RESIZE = 45%
Ensure "Resize all layers" is UNCHECKED
Resample using WEIGHTED AVERAGE
LAYERS >>> DUPLICATE
LAYERS >>> MERGE >>> MERGE DOWN
Reposition with your MOVER tool
|
|
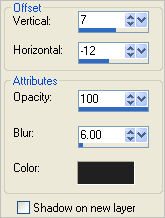
STEP 12
ADJUST >>> COLOUR BALANCE >>> NEGATIVE IMAGE
PSPX - X6: IMAGE >>> NEGATIVE IMAGE
EFFECTS >>> 3D EFFECTS >>> DROP SHADOW
Vertical & Horizontal offsets = 1
Colour = Black
Opacity = 100
Blur = 0
EFFECTS >>> 3D EFFECTS >>> DROP SHADOW
Vertical offsets = 7
Horizontal offsets = (minus) - 12
Colour = Black
Opacity = 100
Blur = 6.00
|
|
STEP 13
Open up the libellulegraphisme_pensive image
in your PSP workspace
Right click on the Title Bar and select
COPY from the options
Right click on the Title Bar of your tag image
and select PASTE AS NEW LAYER from the options.
IMAGE >>> RESIZE = 35%
Ensure "Resize all layers" is UNCHECKED
Resample using WEIGHTED AVERAGE
ADJUST >>> SHARPNESS >>> SHARPEN
Reposition with your MOVER tool
|
|
STEP 14
LAYERS >>> DUPLICATE
CLOSE Copy of Raster 4
ACTIVATE Raster4
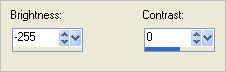
COLOURS >>> ADJUST >>> BRIGHTNESS/CONTRAST
|
|
STEP 15
OPEN Copy of Raster 4
So you can see where the adjusted shadow is placed
Working on Raster 4
Select your RASTER DEFORM tool
Mode = SHEAR
use default settings
PSPX-X6:Select your PICK tool
Drag
the top right node to the 700 pixel mark
on your top ruler.
Drag
the top left node to the 500 pixel mark
on your top ruler.
|
|
STEP 16
Click the RESET RECTANGLE arrow
On your RASTER DEFORM tool
CHANGE the Mode = SCALE
Drag the centre top right node DOWN
to the 360 pixel mark
on your LEFT ruler.
Drag the centre right node RIGHT
to the 700 pixel mark on your TOP ruler.
|
|
STEP 17
Click the RESET RECTANGLE arrow
Select the MOVER tool to disengage the
DEFORMATION tool (PICK tool)
ADJUST >>> BLUR >>> GAUSSIAN BLUR
RADIUS = 5
In your LAYER PALETTE change the OPACITY to 70%
|
|
STEP 18
LAYERS >>> MERGE >>> MERGE VISIBLE
LAYERS >>> NEW RASTER LAYER
Select your TEXT tool
Using a font of your choice
Add your name
|
|
LAYERS >>> MERGE >>> MERGE VISIBLE
LAYERS >>> NEW RASTER LAYER
Flood fill with PEACH
SELECTIONS >>> MODIFY >>> CONTRACT = 3
EDIT >>> CLEAR
Flood fill with CREAM
SELECTIONS >>> MODIFY >>> CONTRACT = 2
EDIT >>> CLEAR
EFFECTS >>> 3D EFFECTS >>> DROP SHADOW
Vertical & Horizontal offsets = 1
Colour = Black
Opacity = 100
Blur = 0
DESELECT
|
|
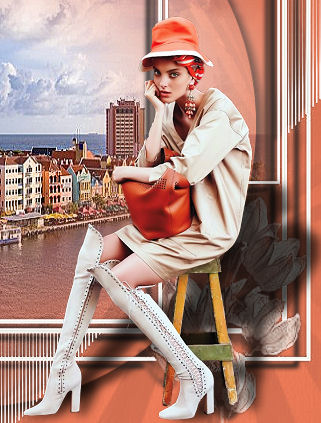
STEP 19
LAYERS >>> MERGE >>> MERGE ALL (Flatten)
IMAGE >>> ADD BORDERS = SYMMETRIC 1
COLOUR = BLACK
Save as .jpg image
|
|
|
|
|
|
|