STEP 1
Open a new image 700 x 500
Transparent background
PSP9: Colour Depth = 16 Million Colors (24bit)
PSPX-X6: Colour Depth RGB = 8bits/channel
Flood fill with BLUE #1c569a
VIEW >>> RULERS
|
STEP 2
Choose your SELECTION TOOL then click on the CUSTOM SELECTION symbol
and enter these coordinates.
|
|
STEP 3
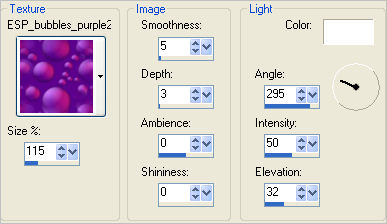
EFFECTS >>> TEXTURE EFFECTS >>> TEXTURE
TEXTURE = ESP_bubbles_purple2.jpg

|
STEP 4
EFFECTS >>> PLUGINS >>> EYE CANDY 3 >>>
DROP SHADOW |
|
STEP 5
EDIT >>> Repeat Drop Shadow..
change DIRECTION to 180
SELECTIONS >>> INVERT
EFFECTS >>> TEXTURE EFFECTS >>> BLINDS
|
|
STEP 6
DESELECT |
|
STEP 7
LAYERS >>> DUPLICATE
IMAGE >>> RESIZE = 85%
Ensure "Resize all layers" is UNCHECKED
Resample using WEIGHTED AVERAGE
EFFECTS >>> REFLECTION EFFECTS >>>
FEEDBACK
|
|
STEP 8
EFFECTS >>> IMAGE EFFECTS >>> OFFSET
Horizontal Offset = - (MINUS) 120
Vertical Offset = 0
Edge Mode = Transparent |
|
STEP 9
LAYERS >>> DUPLICATE
IMAGE >>> MIRROR
Choose your SELECTION TOOL then click on the CUSTOM SELECTION symbol
and enter these coordinates.
|
|
STEP 10
EDIT >>> CLEAR
DESELECT
LAYERS >>> MERGE >>> MERGE DOWN |
|
STEP 11
EFFECTS >>> PLUGINS >>> EYE CANDY 3 >>>
DROP SHADOW
Same settings BUT change DIRECTION to 90
EDIT >>> Repeat Drop Shadow..
change DIRECTION to 270
|
|
STEP 12
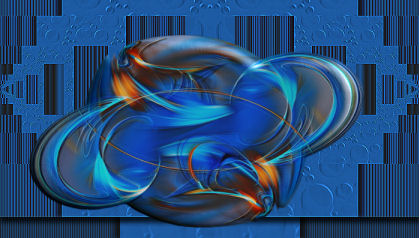
Open up the abstraction.png image in your PSP workspace
Right click on the Title Bar and select
COPY from the options
Right click on the Title Bar of your tag image
and select PASTE AS NEW LAYER from the options.
IMAGE >>> RESIZE = 75%
Ensure "Resize all layers" is UNCHECKED
Resample using WEIGHTED AVERAGE
ADJUST >>> SHARPNESS >>> SHARPEN
EFFECTS >>> 3D EFFECTS >>> INNER BEVEL
|
|
STEP 13
EFFECTS >>> IMAGE EFFECTS >>> OFFSET
Horizontal Offset = 0
Vertical Offset = - (MINUS) 40
Edge Mode = Transparent
LAYERS >>> DUPLICATE
IMAGE >>> MIRROR
CLOSE Raster 2
|
STEP 14
Select your RASTER DEFORM tool
Mode = SCALE
use default settings
PSPX-X6:Select your PICK tool
Drag the centre top node down to the 160 pixel mark
on your left ruler
Drag the centre left node left to the 50 pixel mark
on your top ruler
Drag the centre right node right to the 610 pixel mark
on your top ruler
Click the RESET RECTANGLE arrow
Select the MOVER tool to disengage the DEFORMATION tool (PICK tool)

|
STEP 15
LAYERS >>> ARRANGE >>> MOVE DOWN
EFFECTS >>> PLUGINS >>> EYE CANDY 3 >>>
DROP SHADOW
|
|
STEP 16
OPEN & ACTIVATE Raster 2
EDIT >>> Repeat Drop Shadow..
EDIT >>> Repeat Drop Shadow..
change DIRECTION to 135
ACTIVATE Copy of Raster 2
EDIT >>> Repeat Drop Shadow..
|
STEP 17
ACTIVATE Raster 2
Open up the aujourd'hui je me relaxe-art.pidgin.png image
in your PSP workspace
Right click on the Title Bar and select
COPY from the options
Right click on the Title Bar of your tag image
and select PASTE AS NEW LAYER from the options.
Choose your SELECTION TOOL
Selection Type = Rectangle
Mode = Replace
Feather = 0
Antialias = UNChecked
Select the text |
|
STEP 18
EDIT >>> CLEAR
DESELECT
IMAGE >>> RESIZE = 55%
Ensure "Resize all layers" is UNCHECKED
Resample using WEIGHTED AVERAGE
ADJUST >>> SHARPNESS >>> SHARPEN
EFFECTS >>> IMAGE EFFECTS >>> OFFSET
Horizontal Offset = 0
Vertical Offset = - (MINUS) 30
Edge Mode = Transparent
EFFECTS >>> 3D EFFECTS >>> INNER BEVEL
|
|
STEP 19
EFFECTS >>> PLUGINS >>> EYE CANDY 3 >>>
DROP SHADOW
Same settings |
|
STEP 20
Open up the callouts6.png image
in your PSP workspace
Select the callout in top left corner
Right click on the Title Bar and select
COPY from the options
Right click on the Title Bar of your tag image
and select PASTE AS NEW LAYER from the options.
IMAGE >>> MIRROR
EFFECTS >>> 3D EFFECTS >>> DROP SHADOW
Vertical & Horizontal offsets = 1
Colour = Black
Opacity = 85
Blur = 0
EFFECTS >>> IMAGE EFFECTS >>> OFFSET
Horizontal Offset = - (MINUS) 160
Vertical Offset = 160
Edge Mode = Transparent
|
|
STEP 21
With your MAGIC WAND
Mode = Replace
Match Mode = RGB Value
Tolerance = 0
Feather = 0
Antialias = UNchecked
Sample Merged = UNCHECKED
PSP9 - X6: Check CONTIGUOUS
PSPX - X6: There is no " Sample Merged"
PSPX - X6: Use all layers = UNChecked
Select the centre of the 'callout'
SELECTIONS >>> MODIFY >>> EXPAND = 4 |
|
STEP 22
LAYERS >>> NEW RASTER LAYER
LAYERS >>> ARRANGE >>> MOVE DOWN
Open up the playtime image in your PSP workspace
Right click on the Title Bar and select
COPY from the options
Right click on the Title Bar of your tag image
and select PASTE INTO SELECTION from the options.
(Sharpen if you wish)
DESELECT |
|
STEP 23
ACTIVATE the top layer
LAYERS >>> NEW RASTER LAYER
Flood fill with BLUE #1c569a
SELECTIONS >>> SELECT ALL
SELECTIONS >>> MODIFY >>> CONTRACT = 6
EDIT >>> CLEAR
Flood fill with CREAM #f6e6d5
SELECTIONS >>> MODIFY >>> CONTRACT = 3
EDIT >>> CLEAR
Flood fill with BLUE #1c569a
SELECTIONS >>> MODIFY >>> CONTRACT = 3
EDIT >>> CLEAR
EFFECTS >>> 3D EFFECTS >>> DROP SHADOW
Vertical & Horizontal offsets = 1
Colour = Black
Opacity = 85
Blur = 0
Repeat Drop Shadow effect changing
Vertical & Horizontal Offsets to 1
Click OK
SELECTIONS >>> INVERT
|
|
STEP 24
EFFECTS >>> 3D EFFECTS >>> INNER BEVEL
|
|
STEP 25
EFFECTS >>> PLUGINS >>> EYE CANDY 3 >>>
DROP SHADOW
|
|
STEP 26
EDIT >>> Repeat Drop Shadow..
change DIRECTION to 135
DESELECT
Open up the don't bother i'm thinking.png image
in your PSP workspace
Right click on the Title Bar and select
COPY from the options
Right click on the Title Bar of your tag image
and select PASTE AS NEW LAYER from the options.
IMAGE >>> RESIZE = 45%
Ensure "Resize all layers" is UNCHECKED
Resample using WEIGHTED AVERAGE
EFFECTS >>> TEXTURE EFFECTS >>> SCULPTURE
COLOUR = #c0c0c0
PATTERN = 140t

|
STEP 27
EFFECTS >>> 3D EFFECTS >>> DROP SHADOW
Vertical & Horizontal offsets = 1
Colour = Black
Opacity = 100
Blur = 0
EFFECTS >>> IMAGE EFFECTS >>> OFFSET
Horizontal Offset = 200
Vertical Offset = 190
Edge Mode = Transparent
EFFECTS >>> PLUGINS >>> EYE CANDY 3 >>>
DROP SHADOW
Same settings
|
|
STEP 28
LAYERS >>> MERGE >>> MERGE VISIBLE
Select your TEXT tool
Using a font of your choice
Add your name
|
|
STEP 29
LAYERS >>> MERGE >>> MERGE ALL (Flatten)
Save as .jpg image |
|
|
|
|
|
|