STEP 1
Open a new image 700 x 550
Transparent background
PSP9: Colour Depth = 16 Million Colors (24bit)
PSPX-X6: Colour Depth RGB = 8bits/channel
Flood fill with BLUE #0c567c
VIEW >>> RULERS
Open up the room_by_la_structure_du_ciel-d520fkq image in your PSP workspace
and MIMIMIZE
|
STEP 2
LAYERS >>> NEW RASTER LAYER
Flood fill with WHITE
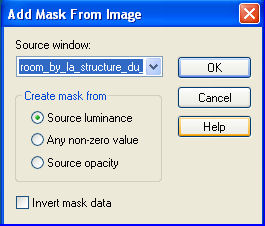
LAYERS >>> NEW MASK LAYER >>> FROM IMAGE
Source:
room_by_la_structure_du_ciel-d520fkq
LAYERS >>> MERGE >>> MERGE GROUP
|
|
STEP 3
Select your RASTER DEFORM tool
Mode = SCALE
use default settings
PSPX-X6:Select your PICK tool
Drag the centre bottom node up to the 350 mark
on your left ruler.
Drag the centre left node across to the 350 mark
on your top ruler.
Click the RESET RECTANGLE arrow
Select the MOVER tool to disengage the
DEFORMATION tool (PICK tool)
|
|
STEP 4
EFFECTS >>> EDGE EFFECTS >>> ENHANCE MORE
In your LAYER PALETTE change the
BLEND MODE to LUMINANCE (L)
ACTIVATE Raster 1
LAYERS >>> NEW RASTER LAYER
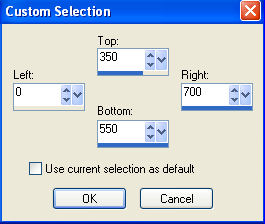
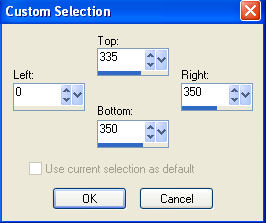
Choose your SELECTION TOOL then click on the
CUSTOM SELECTION symbol
and enter these coordinates.
|
|
STEP 5
Flood fill with BLUE #0c567c
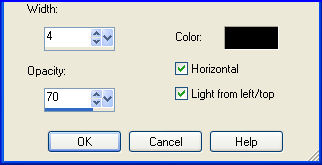
EFFECTS >>> TEXTURE EFFECTS >>> BLINDS
|
|
STEP 6
SELECTIONS >>> INVERT
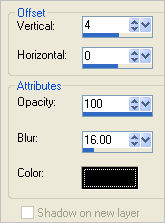
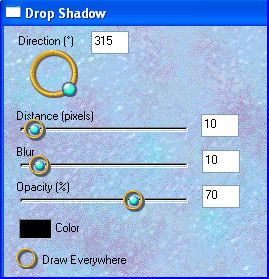
EFFECTS >>> 3D EFFECTS >>> DROP SHADOW
DESELECT
|
|
STEP 7
Choose your SELECTION TOOL then click on the
CUSTOM SELECTION symbol
and enter these coordinates.
Flood fill with BLUE
|
|
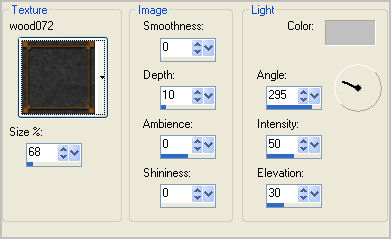
STEP 8
EFFECTS >>> TEXTURE EFFECTS >>> TEXTURE
COLOUR = #c0c0c0
TEXTURE = wood072
|
STEP 9
EFFECTS >>> 3D EFFECTS >>> DROP SHADOW
IMAGE >>> FLIP
(If you have problems with the FLIP in higher versions
of PSP... don't stress about it... give it a miss.)
DESELECT |
|
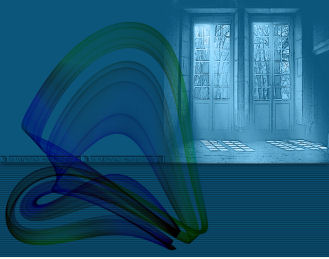
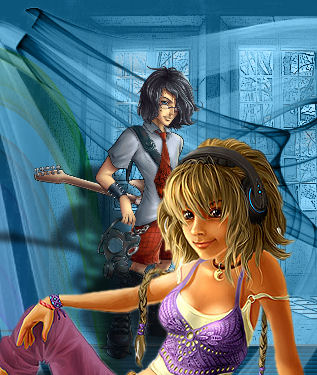
The lower part of your image should look like this
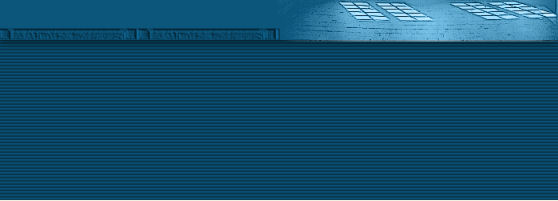
|
STEP 10
Open up the ABS31 image in your PSP workspace
Right click on the Title Bar and select
COPY from the options
Right click on the Title Bar of your tag image
and select PASTE AS NEW LAYER from the options.
IMAGE >>> RESIZE = 85%
Ensure "Resize all layers" is UNCHECKED
Resample using WEIGHTED AVERAGE
In your LAYER PALETTE change the
BLEND MODE to MULTIPLY
IMAGE >>> FLIP
Reposition to the left with your MOVER tool
|
|
STEP 11
LAYERS >>> DUPLICATE
IMAGE >>> FLIP
IMAGE >>> MIRROR
In your LAYER PALETTE change the
BLEND MODE to LUMINANCE (L)
|
|
STEP 12
Open up the MusicScoresDifferent image
in your PSP workspace
Right click on the Title Bar and select COPY from the options
Right click on the Title Bar of your tag image
and select PASTE AS NEW LAYER from the options.
LAYERS >>> ARRANGE >>> MOVE UP
EFFECTS >>> 3D EFFECTS >>> DROP SHADOW
Vertical & Horizontal offsets = 1
Colour = Black
Opacity = 70
Blur = 0
Reposition to the left with your MOVER tool |
|
STEP 13
Open up the KB-danielle_by_liaselina-d36crwn image
in your PSP workspace
Right click on the Title Bar and select COPY from the options
Right click on the Title Bar of your tag image
and select PASTE AS NEW LAYER from the options.
IMAGE >>> RESIZE = 70%
Ensure "Resize all layers" is UNCHECKED
Resample using WEIGHTED AVERAGE
Reposition to the left with your MOVER tool
|
|
STEP 14
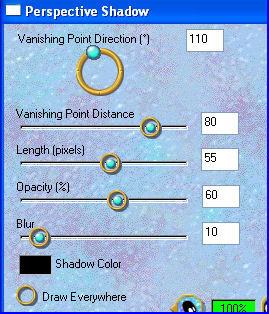
EFFECTS >>> PLUGINS >>> EYE CANDY 3 >>> PERSPECTIVE SHADOW |
|
STEP 15
Open up the Tubes-MusicalBars image
in your PSP workspace
(The selection is already made for you)
Right click on the Title Bar and select COPY from the options
Right click on the Title Bar of your tag image
and select PASTE AS NEW LAYER from the options.
IMAGE >>> RESIZE = 70%
Ensure "Resize all layers" is UNCHECKED
Resample using WEIGHTED AVERAGE
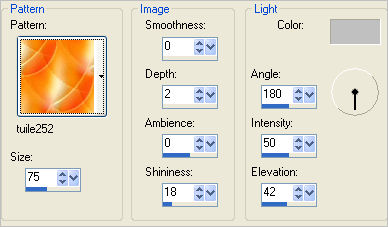
EFFECTS >>> TEXTURE EFFECTS >>> SCULPTURE
COLOUR = #c0c0c0
Pattern = tuile252
EFFECTS >>> 3D EFFECTS >>> DROP SHADOW
Vertical & Horizontal offsets = 1
Colour = Black
Opacity = 70
Blur = 0
|
STEP 16
Reposition to the bottom left with your MOVER tool
|
|
STEP 17
Open up the TRtube2003 image
in your PSP workspace
Right click on the Title Bar and select COPY from the options
Right click on the Title Bar of your tag image
and select PASTE AS NEW LAYER from the options.
EFFECTS >>> PLUGINS >>> EYE CANDY 3 >>> PERSPECTIVE SHADOW
Same settings
Reposition to the right with your MOVER tool
|
|
STEP 18
Open up the darkstage_vivaran image
in your PSP workspace
Right click on the Title Bar and select COPY from the options
Right click on the Title Bar of your tag image
and select PASTE AS NEW LAYER from the options.
IMAGE >>> MIRROR
IMAGE >>> RESIZE = 45%
Ensure "Resize all layers" is UNCHECKED
Resample using WEIGHTED AVERAGE
EFFECTS >>> PLUGINS >>> EYE CANDY 3 >>> PERSPECTIVE SHADOW
Same settings
LAYERS >>> ARRANGE >>> MOVE DOWN
Reposition with your MOVER tool
|
|
STEP 19
In your LAYER PALETTE change the
BLEND MODE to MULTIPLY
on Copy of Raster 3 layer
LAYERS >>> MERGE >>> MERGE VISIBLE
LAYERS >>> NEW RASTER LAYER
|
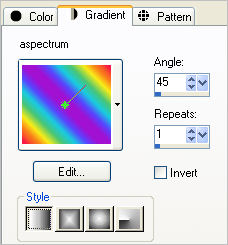
STEP 20
In your MATERIALS PALETTE load
aspectrum pattern in the foreground
using these settings
|
|
STEP 21
LAYERS >>> NEW RASTER LAYER
Flood fill with the pattern
SELECTIONS >>> SELECT ALL
SELECTIONS >>> MODIFY >>> CONTRACT = 2
EDIT >>> CLEAR
SELECTIONS >>> MODIFY >>> CONTRACT = 2
Flood fill with the pattern
IMAGE >>> MIRROR
SELECTIONS >>> DEFLOAT
SELECTIONS >>> MODIFY >>> CONTRACT = 3
EDIT >>> CLEAR
DESELECT
|
|
STEP 22
EFFECTS >>> 3D EFFECTS >>> DROP SHADOW
Vertical & Horizontal offsets = 1
Colour = Black
Opacity = 70
Blur = 0
Repeat Drop Shadow effect changing
Vertical & Horizontal Offsets to - ( minus ) 1
Click OK
EFFECTS >>> PLUGINS >>> EYE CANDY 3 >>>
DROP SHADOW
|
|
STEP 23
LAYERS >>> NEW RASTER LAYER
Select your TEXT tool
Using a font of your choice
Add your name
|
|
STEP 24
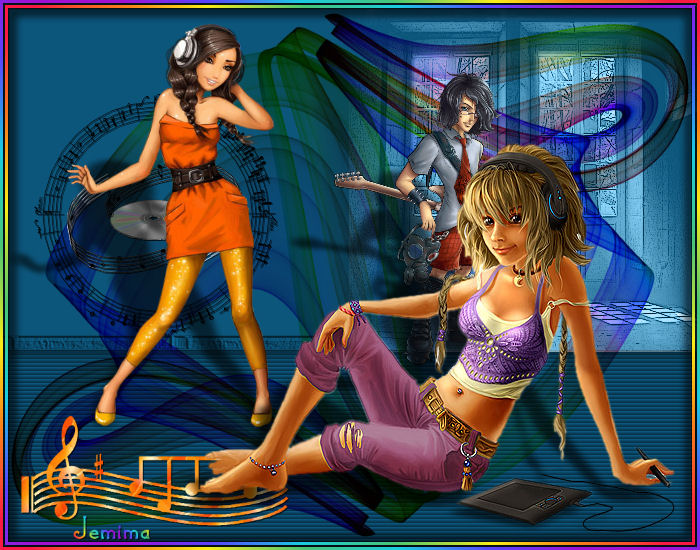
LAYERS >>> MERGE >>> MERGE ALL (Flatten)
Save as .jpg image |
|
|
|
|
|
|


