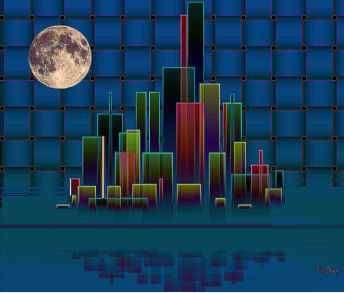
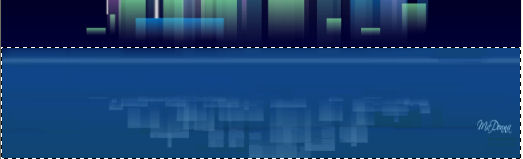
STEP 1
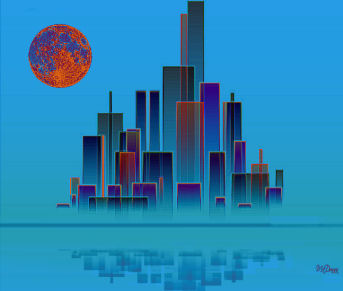
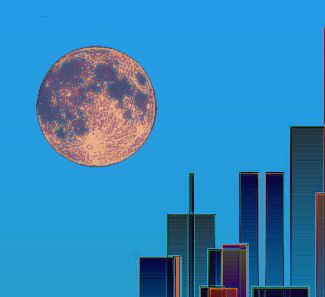
Open up the bluecity_abstract image in your PSP workspace
WINDOW >>> DUPLICATE
Close the original Image
LAYERS >>> Promote background layer
LAYERS >>> NEW RASTER LAYER
Flood fill with Light Blue #259ce7
LAYERS >>> ARRANGE >>> MOVE DOWN
VIEW >>> RULERS
|
STEP 2
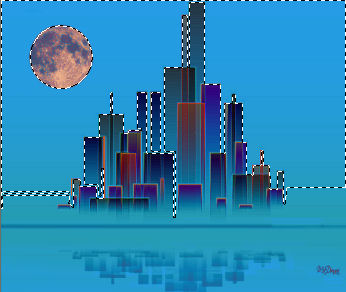
ACTIVATE Raster 1
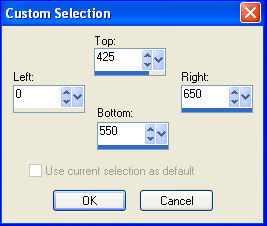
Choose your SELECTION TOOL then click on the CUSTOM SELECTION symbol
and enter these coordinates.
|
|
STEP 3
(PSPX2 and higher versions ... see note below... STEP 3A)
Select your BACKGROUND ERASER TOOL
and using these settings...
PRESET = + Square 50

Erase the selected area
|
STEP 3A
PSPX2 and higher versions ONLY
PROMOTE SELECTION TO LAYER
Activate Raster 1
EDIT >>> CLEAR
Activate Promoted Selection layer
DESELECT
Select your BACKGROUND ERASER TOOL
and using these settings...
PRESET = + Square 50

Erase the selected area
Activate Raster 1
In your LAYER PALETTE change the
BLEND MODE to DIFFERENCE
Activate Promoted Selection layer
LAYERS >>> MERGE >>> MERGE DOWN
EFFECTS >>> EDGE EFFECTS >>> ENHANCE MORE
****** BYPASS STEP 4 AND CONTINUE FROM STEP 5 ******
|
STEP 4
SELECTIONS >>> INVERT
In your LAYER PALETTE change the
BLEND MODE to DIFFERENCE
EFFECTS >>> EDGE EFFECTS >>> ENHANCE MORE
DESELECT
|
|
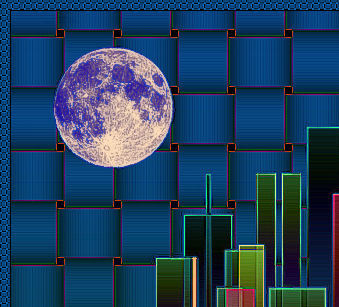
STEP 5
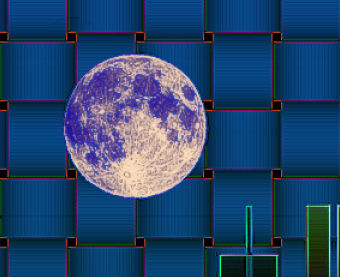
Open up the MOON image in your PSP workspace
Right click on the Title Bar and select
COPY from the options
Right click on the Title Bar of your tag image
and select PASTE AS NEW LAYER from the options.
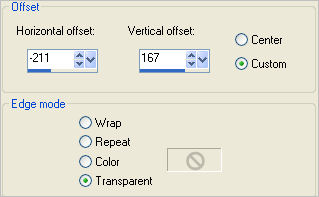
EFFECTS >>> IMAGE EFFECTS >>> OFFSET
|
|
STEP 6
In your LAYER PALETTE change the OPACITY to 50% |
|
STEP 7
ACTIVATE Raster 1
With your MAGIC WAND
Mode = Replace
Match Mode = RGB Value
Tolerance = 21
Feather = 1
Antialias = Checked
Sample Merged = UNCHECKED
PSP9 - X6: Check CONTIGUOUS
PSPX - X6: There is no " Sample Merged"
PSPX - X6: Use all layers = UNChecked
PSP9 - X6: ANTIALIAS = Outside
Place your cursor around the 600 pixels across
and 200 pixels down and
click to
select the top light blue area
(It doesn't have to look exactly like the example)
|
|
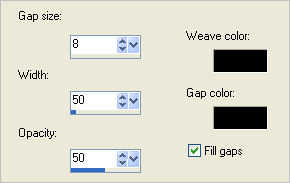
STEP 8
ACTIVATE Raster 2
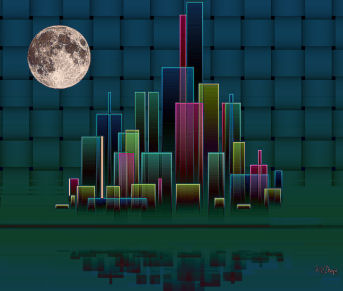
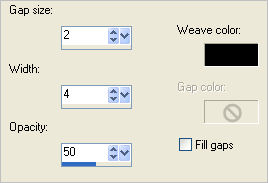
EFFECTS >>> TEXTURE EFFECTS >>> WEAVE |
|
STEP 9
DESELECT
LAYERS >>> DUPLICATE
In your LAYER PALETTE change the
BLEND MODE to DIFFERENCE
change the OPACITY to 60%
|
|
STEP 10
EFFECTS >>> EDGE EFFECTS >>> ENHANCE MORE
EFFECTS >>> EDGE EFFECTS >>> ENHANCE
LAYERS >>> DUPLICATE
In your LAYER PALETTE change the
BLEND MODE to OVERLAY
|
|
STEP 11
ACTIVATE Raster 1
Choose your SELECTION TOOL then click on the
CUSTOM SELECTION symbol
Same settings
EFFECTS >>> TEXTURE EFFECTS >>>
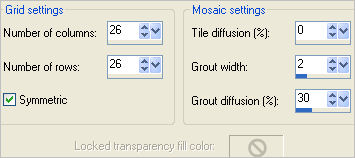
MOSAIC ANTIQUE
|
|
STEP 12
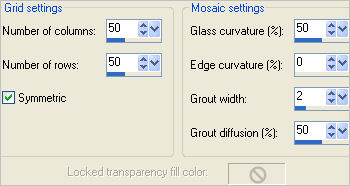
EFFECTS >>> TEXTURE EFFECTS >>>
MOSAIC GLASS |
|
STEP 13
SELECTIONS >>> INVERT
ACTIVATE Raster 2
EFFECTS >>> PLUGINS >>> EYE CANDY 3 >>>
DROP SHADOW
DESELECT |
|
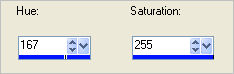
STEP 14
ACTIVATE Raster 3
ADJUST >>> HUE & SATURATION >>> COLORIZE
|
|
STEP 15
LAYERS >>> NEW RASTER LAYER
Flood fill with Dark Blue #074478
EFFECTS >>> TEXTURE EFFECTS >>> WEAVE
|
|
STEP 16
EFFECTS >>> EDGE EFFECTS >>> ENHANCE
PSPX6 NOTE: You may have to "Sharpen" instead
if the "Enhance" makes it too bright.
SELECTIONS >>> SELECT ALL
SELECTIONS >>> MODIFY >>> CONTRACT = 10
EDIT >>> CLEAR
DESELECT
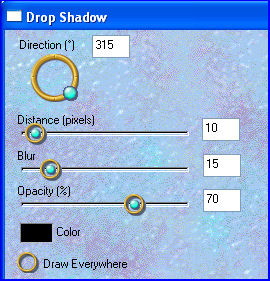
EFFECTS >>> 3D EFFECTS >>> DROP SHADOW
Vertical & Horizontal offsets = 1
Colour = Black
Opacity = 100
Blur = 0
Repeat Drop Shadow effect changing
Vertical & Horizontal Offsets to - ( minus ) 1
Click OK
|
|
STEP 17
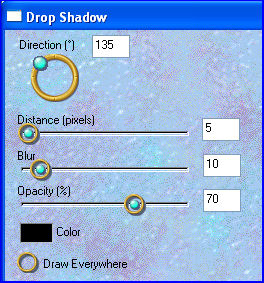
EFFECTS >>> PLUGINS >>> EYE CANDY 3 >>>
DROP SHADOW |
|
STEP 18
EFFECTS >>> PLUGINS >>> EYE CANDY 3 >>>
DROP SHADOW |
|
STEP 19
ACTIVATE Raster 3
Open up the JF_ArturoElena12 image
in your PSP workspace
Right click on the Title Bar and select
COPY from the options
Right click on the Title Bar of your tag image
and select PASTE AS NEW LAYER from the options.
IMAGE >>> RESIZE = 50%
Ensure "Resize all layers" is UNCHECKED
Resample using WEIGHTED AVERAGE
ADJUST >>> SHARPNESS >>> SHARPEN
Reposition with your MOVER tool ...
doesn't have to be exact.
|
|
STEP 20
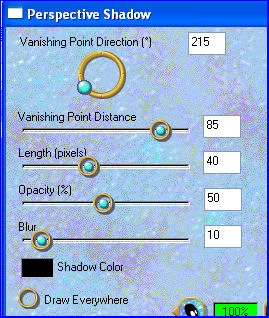
EFFECTS >>> PLUGINS >>> EYE CANDY 3 >>> PERSPECTIVE SHADOW |
|
STEP 21
ACTIVATE Raster 3
Open up the JF_ArturoElena44 image
in your PSP workspace
Right click on the Title Bar and select
COPY from the options
Right click on the Title Bar of your tag image
and select PASTE AS NEW LAYER from the options.
IMAGE >>> RESIZE = 50%
Ensure "Resize all layers" is UNCHECKED
Resample using WEIGHTED AVERAGE
ADJUST >>> SHARPNESS >>> SHARPEN
EFFECTS >>> PLUGINS >>> EYE CANDY 3 >>> PERSPECTIVE SHADOW
Same settings
Reposition with your MOVER tool |
|
STEP 22
Open up the JF_ArturoElena51 image
in your PSP workspace
Right click on the Title Bar and select
COPY from the options
Right click on the Title Bar of your tag image
and select PASTE AS NEW LAYER from the options.
IMAGE >>> RESIZE = 50%
Ensure "Resize all layers" is UNCHECKED
Resample using WEIGHTED AVERAGE
ADJUST >>> SHARPNESS >>> SHARPEN
EFFECTS >>> PLUGINS >>> EYE CANDY 3 >>> PERSPECTIVE SHADOW
Same settings
Reposition with your MOVER tool |
|
STEP 23
Open up the JF_ArturoElena17 image
in your PSP workspace
Right click on the Title Bar and select
COPY from the options
Right click on the Title Bar of your tag image
and select PASTE AS NEW LAYER from the options.
IMAGE >>> RESIZE = 85%
Ensure "Resize all layers" is UNCHECKED
Resample using WEIGHTED AVERAGE
ADJUST >>> SHARPNESS >>> SHARPEN
EFFECTS >>> PLUGINS >>> EYE CANDY 3 >>> PERSPECTIVE SHADOW
Same settings
Reposition with your MOVER tool
|
|
STEP 24
Open up the AE16 image
in your PSP workspace
Right click on the Title Bar and select
COPY from the options
Right click on the Title Bar of your tag image
and select PASTE AS NEW LAYER from the options.
EFFECTS >>> PLUGINS >>> EYE CANDY 3 >>> PERSPECTIVE SHADOW
Same settings
Reposition with your MOVER tool |
|
STEP 25
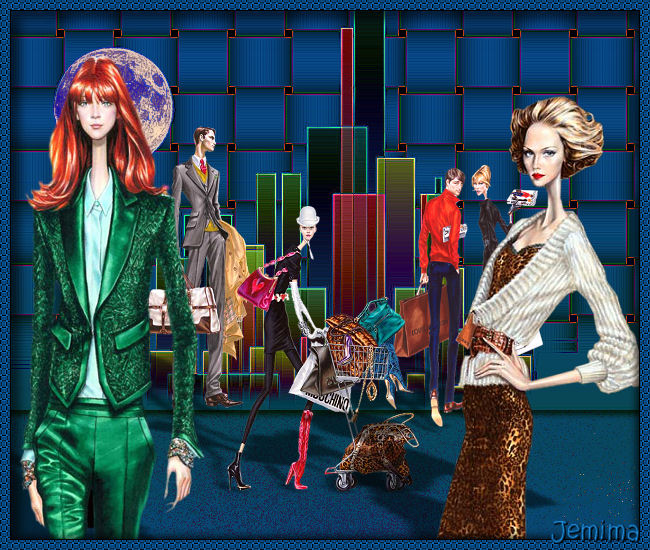
LAYERS >>> MERGE >>> MERGE ALL (Flatten)
LAYERS >>> NEW RASTER LAYER
Add your Name
LAYERS >>> MERGE >>> MERGE ALL (Flatten)
Save as .jpg image
|
|
|
|
|
|
|