STEP 1
Open a new image 700 x 550
Transparent background
PSP9: Colour Depth = 16 Million Colors (24bit)
PSPX-X6: Colour Depth RGB = 8bits/channel
SELECTIONS >>> SELECT ALL
|
STEP 2
Open up the modern-abstract-art image
in your PSP workspace
Right click on the Title Bar and select
COPY from the options
Right click on the Title Bar of your tag image
and select PASTE INTO SELECTION from the options.
DESELECT
|
STEP 3
EFFECTS>>> GEOMETRIC EFFECTS >>> CIRCLE
Edge Mode = Transparent
PSP9: IMAGE >>> ROTATE >>> FREE ROTATE =
RIGHT 90
Ensure "All layers" is UNCHECKED
PSPX - PSPX6: IMAGE >>> FREE ROTATE = RIGHT 90
Ensure "All layers" is UNCHECKED
EFFECTS >>> REFLECTION EFFECTS >>>
ROTATING MIRROR
Horizontal offset = 0
Rotation angle = 0
Edge Mode = Repeat
IMAGE >>> RESIZE = 75%
Ensure "Resize all layers" is UNCHECKED
Resample using WEIGHTED AVERAGE
|
|
STEP 4
With your MAGIC WAND
Mode = Replace
Match Mode = RGB Value
Tolerance = 14
Feather = 0
Antialias = Checked
Sample Merged = UNCHECKED
PSP9 - X6: Check CONTIGUOUS
PSPX - X6: There is no " Sample Merged"
PSPX - X6: Use all layers = UNChecked
PSP9 - X6: ANTIALIAS = Outside
and while depressing your SHIFT KEY...
Select the red areas shown
|
|
STEP 5
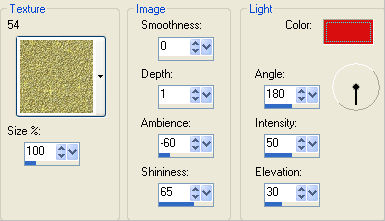
EFFECTS >>> TEXTURE EFFECTS >>> TEXTURE
TEXTURE = 54
COLOUR = #d90d0d

|
STEP 6
SELECTIONS >>> INVERT
EFFECTS >>> PLUGINS >>> EYE CANDY 3 >>>
DROP SHADOW
|
|
STEP 7
EDIT >>> Repeat Drop Shadow..
change DIRECTION to 135
DESELECT
|
|
STEP 8
EFFECTS >>> 3D EFFECTS >>> INNER BEVEL
|
|
STEP 9
EFFECTS >>> IMAGE EFFECTS >>> OFFSET |
|
STEP 10
LAYERS >>> NEW RASTER LAYER
Flood fill with BLACK
LAYERS >>> ARRANGE >>> MOVE DOWN
|
|
STEP 11
EFFECTS >>> ILLUMINATION EFFECTS >>> SUNBURST
COLOUR = #dc1616
|
|
STEP 12
EFFECTS >>> EDGE EFFECTS >>> ENHANCE |
|
STEP 13
Open up the gold-triple-frame image
in your PSP workspace
Right click on the Title Bar and select
COPY from the options
Right click on the Title Bar of your tag image
and select PASTE AS NEW LAYER from the options.
IMAGE >>> RESIZE = 75%
Ensure "Resize all layers" is UNCHECKED
Resample using WEIGHTED AVERAGE
PSP9: IMAGE >>> ROTATE >>> FREE ROTATE =
RIGHT 90
Ensure "All layers" is UNCHECKED
PSPX - PSPX6: IMAGE >>> FREE ROTATE = RIGHT 90
Ensure "All layers" is UNCHECKED
ADJUST >>> SHARPNESS >>> SHARPEN
EFFECTS >>> IMAGE EFFECTS >>> OFFSET
Horizontal = 270
Vertical = 0
Edge Mode = Transparent
|
|
STEP 14
LAYERS >>> ARRANGE >>> MOVE UP
Open up the card-symbols image
in your PSP workspace
Activate the
club layer
Right click on the Title Bar and select
COPY from the options
Right click on the Title Bar of your tag image
and select PASTE AS NEW LAYER from the options.
IMAGE >>> RESIZE = 60%
Ensure "Resize all layers" is UNCHECKED
Resample using WEIGHTED AVERAGE
ADJUST >>> SHARPNESS >>> SHARPEN
Reposition with your MOVER tool
|
|
STEP 15
Back to the card-symbols image in your PSP workspace
Activate the spade layer
Right click on the Title Bar and select
COPY from the options
Right click on the Title Bar of your tag image
and select PASTE AS NEW LAYER from the options.
IMAGE >>> RESIZE = 60%
Ensure "Resize all layers" is UNCHECKED
Resample using WEIGHTED AVERAGE
ADJUST >>> SHARPNESS >>> SHARPEN
Reposition with your MOVER tool |
|
STEP 16
Back to the card-symbols image in your PSP workspace
Activate the diamond layer
Right click on the Title Bar and select
COPY from the options
Right click on the Title Bar of your tag image
and select PASTE AS NEW LAYER from the options.
IMAGE >>> RESIZE = 60%
Ensure "Resize all layers" is UNCHECKED
Resample using WEIGHTED AVERAGE
ADJUST >>> SHARPNESS >>> SHARPEN
Reposition with your MOVER tool |
|
STEP 17
LAYERS >>> MERGE >>> MERGE DOWN
EDIT >>> Repeat Layer Merge Down
Back to the card-symbols image in your PSP workspace
Activate the heart layer
Right click on the Title Bar and select
COPY from the options
Right click on the Title Bar of your tag image
and select PASTE AS NEW LAYER from the options.
IMAGE >>> RESIZE = 60%
Ensure "Resize all layers" is UNCHECKED
Resample using WEIGHTED AVERAGE
ADJUST >>> SHARPNESS >>> SHARPEN
Reposition with your MOVER tool
|
|
STEP 18
EFFECTS >>> PLUGINS >>> EYE CANDY 3 >>> DROP SHADOW
Same settings
EDIT >>> Repeat Drop Shadow.. change DIRECTION to 315

|
STEP 19
Open up the casino_wall_plaques image
in your PSP workspace
Activate the craps layer
Right click on the Title Bar and select
COPY from the options
Right click on the Title Bar of your tag image
and select PASTE AS NEW LAYER from the options.
IMAGE >>> RESIZE = 50%
Ensure "Resize all layers" is UNCHECKED
Resample using WEIGHTED AVERAGE
ADJUST >>> SHARPNESS >>> SHARPEN
|
STEP 20
EFFECTS >>> IMAGE EFFECTS >>> OFFSET
Horizontal = (minus) -190
Vertical = 220
Edge Mode = Transparent |
|
STEP 21
Back to the casino_wall_plaques image in your PSP workspace
Activate the roulette layer
Right click on the Title Bar and select
COPY from the options
Right click on the Title Bar of your tag image
and select PASTE AS NEW LAYER from the options.
IMAGE >>> RESIZE = 50%
Ensure "Resize all layers" is UNCHECKED
Resample using WEIGHTED AVERAGE
ADJUST >>> SHARPNESS >>> SHARPEN
|
STEP 22
EFFECTS >>> IMAGE EFFECTS >>> OFFSET
Horizontal = 140
Vertical = (minus) -185
Edge Mode = Transparent |
|
STEP 23
Back to the casino_wall_plaques image in your PSP workspace
Activate the poker layer
Right click on the Title Bar and select
COPY from the options
Right click on the Title Bar of your tag image
and select PASTE AS NEW LAYER from the options.
IMAGE >>> RESIZE = 50%
Ensure "Resize all layers" is UNCHECKED
Resample using WEIGHTED AVERAGE
ADJUST >>> SHARPNESS >>> SHARPEN
|
STEP 24
EFFECTS >>> IMAGE EFFECTS >>> OFFSET
Horizontal = (minus) -90
Vertical = 95
Edge Mode = Transparent |
|
STEP 25
Back to the casino_wall_plaques image in your PSP workspace
Activate the blackjack layer
Right click on the Title Bar and select
COPY from the options
Right click on the Title Bar of your tag image
and select PASTE AS NEW LAYER from the options.
IMAGE >>> RESIZE = 50%
Ensure "Resize all layers" is UNCHECKED
Resample using WEIGHTED AVERAGE
ADJUST >>> SHARPNESS >>> SHARPEN
|
STEP 26
EFFECTS >>> IMAGE EFFECTS >>> OFFSET
Horizontal = 75
Vertical = (minus) -70
Edge Mode = Transparent |
|
STEP 27
LAYERS >>> MERGE >>> MERGE DOWN
EDIT >>> Repeat Layer Merge Down (Twice)
EFFECTS >>> PLUGINS >>> EYE CANDY 3 >>>
DROP SHADOW
ADJUST >>> SHARPNESS >>> SHARPEN
|
|
STEP 28
Open up the kt_joker2 image in your PSP workspace
Right click on the Title Bar and select COPY from the options
Right click on the Title Bar of your tag image
and select PASTE AS NEW LAYER from the options.
IMAGE >>> RESIZE = 85%
Ensure "Resize all layers" is UNCHECKED
Resample using WEIGHTED AVERAGE
ADJUST >>> SHARPNESS >>> SHARPEN
EFFECTS >>> PLUGINS >>> EYE CANDY 3 >>> PERSPECTIVE SHADOW
|
|
STEP 29
Reposition with your MOVER tool |
|
STEP 30
In your MATERIALS PALETTE load
Arguld10 pattern in the foreground using these settings
|
|
STEP 31
LAYERS >>> NEW RASTER LAYER
Flood fill with BLACK
SELECTIONS >>> SELECT ALL
SELECTIONS >>> MODIFY >>> CONTRACT = 1
EDIT >>> CLEAR
Flood fill with Pattern
SELECTIONS >>> MODIFY >>> CONTRACT = 3
EDIT >>> CLEAR
Flood fill with BLACK
SELECTIONS >>> MODIFY >>> CONTRACT = 1
EDIT >>> CLEAR
DESELECT
|
|
STEP 32
LAYERS >>> DUPLICATE
IMAGE >>> RESIZE = 98%
Ensure "Resize all layers" is UNCHECKED
Resample using WEIGHTED AVERAGE
ADJUST >>> SHARPNESS >>> SHARPEN
LAYERS >>> DUPLICATE
IMAGE >>> RESIZE = 98%
Ensure "Resize all layers" is UNCHECKED
Resample using WEIGHTED AVERAGE
ADJUST >>> SHARPNESS >>> SHARPEN
|
|
STEP 33
ACTIVATE Raster 5
Open up the mr_cards_jazzl_2009_02 image
in your PSP workspace
Right click on the Title Bar and select
COPY from the options
Right click on the Title Bar of your tag image
and select PASTE AS NEW LAYER from the options.
ADJUST >>> SHARPNESS >>> SHARPEN
EFFECTS >>> PLUGINS >>> EYE CANDY 3 >>>
DROP SHADOW
Same settings
Reposition with your MOVER tool
|
|
STEP 34
Open up the dice4 image
in your PSP workspace
Right click on the Title Bar and select
COPY from the options
Right click on the Title Bar of your tag image
and select PASTE AS NEW LAYER from the options.
IMAGE >>> RESIZE = 40%
Ensure "Resize all layers" is UNCHECKED
Resample using WEIGHTED AVERAGE
ADJUST >>> SHARPNESS >>> SHARPEN
EFFECTS >>> PLUGINS >>> EYE CANDY 3 >>>
DROP SHADOW
Same settings
Reposition with your MOVER tool |
|
STEP 35
LAYERS >>> MERGE >>> MERGE VISIBLE
LAYERS >>> NEW RASTER LAYER
ADD your NAME
|
|
STEP 36
LAYERS >>> MERGE >>> MERGE ALL (Flatten)
Save as .jpg image
|
|
|
|
|
|
|