STEP 1
In your MATERIALS PALETTE load
PALE GREEN #88cdb2 in the background
Open a new image 700 x 500
Transparent background
PSP9: Colour Depth = 16 Million Colors (24bit)
PSPX-X6: Colour Depth RGB = 8bits/channel
Flood fill with PALE GREEN
|
STEP 2
In your MATERIALS PALETTE load
JF_dot_template40 pattern in the foreground
using these settings.
|
|
STEP 3
Flood fill with dot pattern |
|
STEP 4
LAYERS >>> NEW RASTER LAYER
Choose your SELECTION TOOL then click on the
CUSTOM SELECTION symbol
and enter these coordinates. |
|
STEP 5
Flood fill with DARK GREEN #2e7155
EFFECTS >>> TEXTURE EFFECTS >>> BLINDS
|
|
STEP 6
Flood fill with dot pattern
DESELECT
PSPX6: You will need to use..
Match Mode >> All Opaque for Flood Fill Tool

or add a new layer for the dots, then...
Layers >> Merge >> Merge Down
|
|
STEP 7
Open up the 2684.png image in your PSP workspace
Right click on the Title Bar and select
COPY from the options
Right click on the Title Bar of your tag image
and select PASTE AS NEW LAYER from the options.
Choose your SELECTION TOOL
Selection Type = Rectangle
Mode = Replace
Feather = 0
Antialias = UNChecked
Select the text and DELETE
DESELECT
IMAGE >>> RESIZE = 72%
Ensure "Resize all layers" is UNCHECKED
Resample using WEIGHTED AVERAGE
ADJUST >>> SHARPNESS >>> SHARPEN
Reposition with your MOVER tool
|
|
STEP 8
Open up the Bouquet--MP.png image
in your PSP workspace
Right click on the Title Bar and select
COPY from the options
Right click on the Title Bar of your tag image
and select PASTE AS NEW LAYER from the options.
LAYERS >>> DUPLICATE
CLOSE Copy of Raster 4
ACTIVATE Raster 4
EFFECTS >>> DISTORTION EFFECTS >>>
POLAR COORDINATES
Rectangular to Polar
Edge mode: Transparent
|
|
STEP 9
ADJUST >>> BLUR >>> GAUSSIAN BLUR
Radius = 30
EFFECTS >>> IMAGE EFFECTS >>> OFFSET
Horizontal Offset = 80
Vertical Offset = - (minus) 50
Edge Mode = Transparent
In your LAYER PALETTE change the
BLEND MODE to LUMINANCE (L)
|
|
STEP 10
LAYERS >>> DUPLICATE
LAYERS >>> MERGE >>> MERGE DOWN
OPEN & ACTIVATE Copy of Raster 4
In your LAYER PALETTE change the
BLEND MODE to LUMINANCE (L)
IMAGE >>> RESIZE = 85%
Ensure "Resize all layers" is UNCHECKED
Resample using WEIGHTED AVERAGE
EFFECTS >>> IMAGE EFFECTS >>> OFFSET
Horizontal Offset = 80
Vertical Offset = - (minus) 75
Edge Mode = Transparent
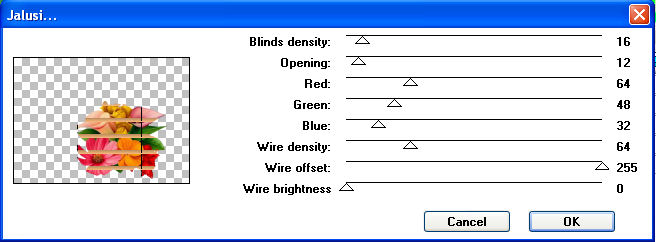
EFFECTS >>> PLUGINS >>> UnPlugged Tools >>> Jalusi

|
STEP 11
ACTIVATE Raster 4
EDIT >>> Repeat Jalusi
|
|
STEP 12
ACTIVATE Copy of Raster 4
Open up the 6117.png image
in your PSP workspace
Right click on the Title Bar and select
COPY from the options
Right click on the Title Bar of your tag image
and select PASTE AS NEW LAYER from the options.
Choose your SELECTION TOOL
Same settings
Select the text and DELETE
DESELECT
IMAGE >>> RESIZE = 70%
Ensure "Resize all layers" is UNCHECKED
Resample using WEIGHTED AVERAGE
ADJUST >>> SHARPNESS >>> SHARPEN
EFFECTS >>> IMAGE EFFECTS >>> OFFSET
Horizontal Offset = 200
Vertical Offset = 120
Edge Mode = Transparent
In your LAYER PALETTE change the
BLEND MODE to LUMINANCE (L)

|
STEP 13
Open up the
mangeuses de pommes-art.Alexander Sulimov
image
in your PSP workspace
Right click on the Title Bar and select
COPY from the options
Right click on the Title Bar of your tag image
and select PASTE AS NEW LAYER from the options.
IMAGE >>> RESIZE = 40%
Ensure "Resize all layers" is UNCHECKED
Resample using WEIGHTED AVERAGE
ADJUST >>> SHARPNESS >>> SHARPEN
EFFECTS >>> IMAGE EFFECTS >>> OFFSET
Horizontal Offset = 180
Vertical Offset = - (minus) 133
Edge Mode = Transparent
Choose your SELECTION TOOL
Same settings
Select the text and DELETE
DESELECT
|
|
STEP 14
Open up the dragonfly.png image in your PSP workspace
Right click on the Title Bar and select
COPY from the options
Right click on the Title Bar of your tag image
and select PASTE AS NEW LAYER from the options.
IMAGE >>> RESIZE = 25%
Ensure "Resize all layers" is UNCHECKED
Resample using WEIGHTED AVERAGE
ADJUST >>> SHARPNESS >>> SHARPEN
Reposition with your MOVER tool
|
|
STEP 15
Open up the RomanzaImages11_AS.png image
in your PSP workspace
Right click on the Title Bar and select
COPY from the options
Right click on the Title Bar of your tag image
and select PASTE AS NEW LAYER from the options.
IMAGE >>> FLIP
IMAGE >>> RESIZE = 80%
Ensure "Resize all layers" is UNCHECKED
Resample using WEIGHTED AVERAGE
ADJUST >>> SHARPNESS >>> SHARPEN
Reposition with your MOVER tool |
|
STEP 16
EFFECTS >>> PLUGINS >>> EYE CANDY 3 >>>
DROP SHADOW |
|
STEP 17
ACTIVATE Raster 7
EDIT >>> Repeat Drop Shadow
ACTIVATE Raster 6
EDIT >>> Repeat Drop Shadow
ACTIVATE Raster 5
EDIT >>> Repeat Drop Shadow
ACTIVATE Raster 3
EDIT >>> Repeat Drop Shadow
ACTIVATE Raster 2
EDIT >>> Repeat Drop Shadow |
|
STEP 18
EDIT >>> Repeat Drop Shadow..
change DIRECTION to 315
ACTIVATE Raster 3
EDIT >>> Repeat Drop Shadow
ACTIVATE Copy of Raster 4
EDIT >>> Repeat Drop Shadow
LAYERS >>> MERGE >>> MERGE VISIBLE |
|
STEP 19
LAYERS >>> NEW RASTER LAYER
Flood fill with PALE GREEN #88cdb2
SELECTIONS >>> SELECT ALL
SELECTIONS >>> MODIFY >>> CONTRACT = 10
EDIT >>> CLEAR
SELECTIONS >>> INVERT
Flood fill with dot pattern
EFFECTS >>> 3D EFFECTS >>> INNER BEVEL
|
|
STEP 20
EFFECTS >>> 3D EFFECTS >>> DROP SHADOW
Vertical & Horizontal offsets = 1
Colour = Black
Opacity = 70
Blur = 0
Repeat Drop Shadow effect changing
Vertical & Horizontal Offsets to - ( minus ) 1
Click OK
EFFECTS >>> EDGE EFFECTS >>> ENHANCE
DESELECT
|
|
STEP 21
LAYERS >>> NEW RASTER LAYER
SELECT your TEXT tool
With a font of your choice add your name |
|
STEP 22
LAYERS >>> MERGE >>> MERGE ALL (Flatten)
Save as .jpg image |
|
|
|
|
|
|