NOTE:
STEPS 17 to 27 are OPTIONAL
If you do not wish to animate you can insert your own image after STEP 16
|
STEP 1
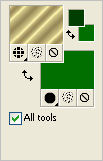
In your MATERIALS PALETTE load
Load DARK GREEN " #013e01" in your foreground
Load LIGHT GREEN " #016f00" in your background
NOW
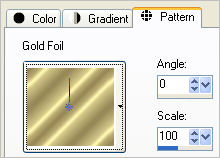
Load Gold Foil pattern in the foreground
using these settings
|
 .  |
STEP 2
Open a new image 700 x 550
Transparent background
PSP9: Colour Depth = 16 Million Colors (24bit)
PSPX-X6: Colour Depth RGB = 8bits/channel
Flood fill with DARK GREEN
VIEW >>> RULERS
LAYERS >>> NEW RASTER LAYER
Choose your SELECTION TOOL
Selection Type = Circle
Mode = Replace
Feather = 2
Antialias = Checked
Starting at 350 pixels across and 275 pixels down
drag your cursor to 500 pixels across and 430 pixels down
and release
Flood fill with the gold gradient
|
|
STEP 3
SELECTIONS >>> MODIFY >>> CONTRACT = 10
EDIT >>> CLEAR
SELECTIONS >>> MODIFY >>> EXPAND = 3
ACTIVATE Raster 1
EDIT >>> CLEAR
DESELECT
|
|
STEP 4
ACTIVATE Raster 2
ADJUST >>> SHARPNESS >>> SHARPEN MORE
LAYERS >>> NEW RASTER LAYER
Select your PAINT BRUSH tool
PRESET SHAPE = 7_1 Scroll
 |
STEP 5
Place your cursor at 540 pixels across on your top ruler
and 275 pixels down on your left ruler
and click once |
|
STEP 6
EFFECTS >>> 3D EFFECTS >>> DROP SHADOW
Vertical & Horizontal offsets = 2
Colour = Black
Opacity = 80
Blur = 0
LAYERS >>> DUPLICATE
IMAGE >>> FLIP
IMAGE >>> MIRROR
LAYERS >>> MERGE DOWN
LAYERS >>> DUPLICATE
PSP9: IMAGE >>> ROTATE >>> FREE ROTATE = RIGHT 45
Ensure "All layers" is UNCHECKED
PSPX - PSPX6: IMAGE >>> FREE ROTATE = RIGHT 45
Ensure "All layers" is UNCHECKED
ADJUST >>> SHARPNESS >>> SHARPEN
|
|
STEP 7
LAYERS >>> DUPLICATE
PSP9: IMAGE >>> ROTATE >>> FREE ROTATE = RIGHT 45
Ensure "All layers" is UNCHECKED
PSPX - PSPX6: IMAGE >>> FREE ROTATE = RIGHT 45
Ensure "All layers" is UNCHECKED
ADJUST >>> SHARPNESS >>> SHARPEN
LAYERS >>> DUPLICATE
PSP9: IMAGE >>> ROTATE >>> FREE ROTATE = RIGHT 45
Ensure "All layers" is UNCHECKED
PSPX - PSPX6: IMAGE >>> FREE ROTATE = RIGHT 45
Ensure "All layers" is UNCHECKED
ADJUST >>> SHARPNESS >>> SHARPEN
|
|
STEP 8
CLOSE Raster 1 and Raster 2
LAYERS >>> MERGE >>> MERGE VISIBLE |
|
STEP 9
OPEN Raster 1 and Raster 2
ACTIVATE the Merged layer
LAYERS >>> NEW RASTER LAYER
Select your PAINT BRUSH tool
Same settings
Place your cursor at 100 pixels across on your top ruler
and 200 pixels down on your left ruler
and click once
EFFECTS >>> 3D EFFECTS >>> DROP SHADOW
Vertical & Horizontal offsets = 2
Colour = Black
Opacity = 80
Blur = 0 |
|
STEP 10
LAYERS >>> DUPLICATE
IMAGE >>> MIRROR
LAYERS >>> MERGE >>> MERGE DOWN
LAYERS >>> DUPLICATE
IMAGE >>> FLIP
LAYERS >>> MERGE >>> MERGE DOWN
LAYERS >>> MERGE >>> MERGE DOWN |
|
STEP 11
LAYERS >>> ARRANGE >>> MOVE DOWN
ACTIVATE Raster 2
With your MAGIC WAND
Mode = Replace
Match Mode = RGB Value
Tolerance = 0
Feather = 0
Antialias = UNchecked
Sample Merged = UNCHECKED
PSP9 - X6: Check CONTIGUOUS
PSPX - X6: There is no " Sample Merged"
PSPX - X6: Use all layers = UNChecked
Select the CENTRE transparent area
SELECTIONS >>> MODIFY >>> EXPAND = 8
ACTIVATE the Merged layer
EDIT >>> CLEAR
DESELECT |
|
STEP 12
ACTIVATE Raster 2
LAYERS >>> NEW RASTER LAYER
Flood fill with the gradient
SELECTIONS >>> SELECT ALL
SELECTIONS >>> MODIFY >>> CONTRACT = 3
EDIT >>> CLEAR
SELECTIONS >>> MODIFY >>> CONTRACT = 3
Flood fill with the gradient
SELECTIONS >>> MODIFY >>> CONTRACT = 3
EDIT >>> CLEAR
DESELECT
EFFECTS >>> 3D EFFECTS >>> DROP SHADOW
Vertical & Horizontal offsets = 1
Colour = Black
Opacity = 80
Blur = 0
Repeat Drop Shadow effect changing
Vertical & Horizontal Offsets to - ( minus ) 1
Click OK
EFFECTS >>> EDGE EFFECTS >>> ENHANCE |
|
STEP 13
In your MATERIALS PALETTE
Change the gradient to
Foreground-background
|
|
STEP 14
ACTIVATE Raster 1
With your MAGIC WAND.... Same settings.
Select the CENTRE transparent area
SELECTIONS >>> MODIFY >>> EXPAND = 8
LAYERS >>> NEW RASTER LAYER
LAYERS >>> ARRANGE >>> MOVE DOWN
Flood fill with the gradient
ACTIVATE Raster 1
SELECTIONS >>> MODIFY >>> CONTRACT = 5
SELECTIONS >>> INVERT |
|
STEP 15
EFFECTS >>> PLUGINS >>> EYE CANDY 3 >>>
DROP SHADOW |
|
STEP 16
DESELECT
CLOSE Raster 4
LAYERS >>> MERGE >>> MERGE VISIBLE
OPEN Raster 4
SAVE YOUR WORK
|
|
NOTE:
If you do not wish to animate you can insert your own image here
then add your name... and....
LAYERS >>> MERGE >>> MERGE ALL (Flatten)
Save as .jpg image |
STEP 17
ACTIVATE
Raster 4
Open up the 12days.png image in your PSP workspace
Choose your SELECTION TOOL
Selection Type = Rectangle
Mode = Replace
Feather = 0
Antialias = UNChecked
Select "1" Partridge
Right click on the Title Bar and select
COPY from the options
|
|
STEP 18
Right click on the Title Bar of your tag image
and select PASTE AS NEW LAYER from the options.
IMAGE >>> RESIZE = 60%
Ensure "Resize all layers" is UNCHECKED
Resample using WEIGHTED AVERAGE
ADJUST >>> SHARPNESS >>> SHARPEN
EFFECTS >>> PLUGINS >>> EYE CANDY 3 >>>
DROP SHADOW
Same settings
Rename this layer day1
|
|
STEP 19
CLOSE layer day1
Back to the 12days.png image in your PSP workspace
Choose your SELECTION TOOL
Select "2" Turtle Doves
Right click on the Title Bar and select
COPY from the options |
|
STEP 20
Right click on the Title Bar of your tag image
and select PASTE AS NEW LAYER from the options.
IMAGE >>> RESIZE = 60%
Ensure "Resize all layers" is UNCHECKED
Resample using WEIGHTED AVERAGE
ADJUST >>> SHARPNESS >>> SHARPEN
EFFECTS >>> PLUGINS >>> EYE CANDY 3 >>>
DROP SHADOW
Same settings
Rename this layer day2 |
|
STEP 21
Continue in this manner until you have all 12 days
copied, pasted, resized, sharpened and
drop shadowed |
STEP 22
ACTIVATE the Merged layer
LAYERS >>> NEW RASTER LAYER
Select your TEXT tool
Using a font of your choice
Add your name
LAYERS >>> MERGE >>> MERGE DOWN
, |
STEP 23
Set up LAYER PALETTE as shown
Right click on Title Bar and select
Copy merged from the options |
|
STEP 24
In ANIMATION SHOP
Right click the workspace and select
'Paste As New Animation' from the options.
Back to PSP.
Set up LAYER PALETTE as shown
Right click on Title Bar and select
Copy merged from the options
, |
|
STEP 25
In ANIMATION SHOP
Select
'Paste After Current' on top menu

Continue in this manner until all 12 days are in Animation Shop |
STEP 26
EDIT >> Select All
ANIMATION >>> Frame Properties
Display time = 60
, |
STEP 27
View >> Animation
and while it is still running,
File >> Save As
Locate the folder in which you wish to save it.
Name your animation.
With the Gif Optimiser keep pressing NEXT
until you get to the last one... click FINISH
Close the Animation
Close the frames.
Close Animation Shop |
| |
|
| |
|
| |
|