In this tutorial we are going to create the TEMPLATE first...
Then we'll save it and use a duplicated image to finish off the frame.
|
STEP 1
Open a new image 650 x 550
Transparent background
PSP9: Colour Depth = 16 Million Colors (24bit)
PSPX-X6: Colour Depth RGB = 8bits/channel
VIEW >>> RULERS
|
STEP 2
Choose your SELECTION TOOL
Selection Type = Rounded Rectangle
Mode = Replace
Feather = 0
Antialias = Checked
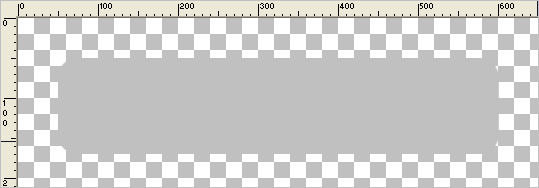
Starting at 50 pixels across and 50 pixels down
drag your cursor to 600 pixels across and 170 pixels down and release
Flood fill with light grey #c0c0c0
DESELECT
|
STEP 3
Right click on the Title Bar and select COPY from the options
Right click on the Title Bar of your frame image
and select PASTE AS NEW LAYER from the options.
DELETE Raster 1
Rename this layer
middle rectangle
|
|
STEP 4
LAYERS >>> DUPLICATE
IMAGE >>> RESIZE = 90%
Ensure "Resize all layers" is UNCHECKED
Resample using WEIGHTED AVERAGE
ADJUST >>> BRIGHTNESS and CONTRAST >>> BRIGHTNESS/CONTRAST
PSPX6 has Linear mode check this
before adding the numbers or they will revert back to 0
|
|
STEP 5
EFFECTS >>> IMAGE EFFECTS >>> OFFSET
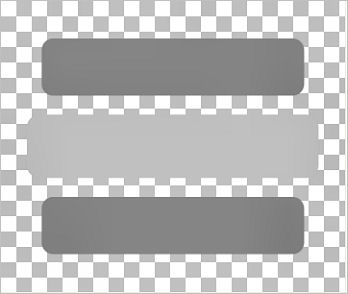
Rename this layer upper rectangle
|
|
STEP 6
LAYERS >>> DUPLICATE
IMAGE >>> FLIP
Rename this layer lower rectangle
|
STEP 7
ACTIVATE middle rectangle layer
LAYERS >>> DUPLICATE
IMAGE >>> RESIZE = 90%
Ensure "Resize all layers" is UNCHECKED
Resample using WEIGHTED AVERAGE
ADJUST >>> BRIGHTNESS and CONTRAST >>> BRIGHTNESS/CONTRAST
PSPX6 has Linear mode check this
before adding the numbers or they will revert back to 0
|
|
STEP 8
PSP9: IMAGE >>> ROTATE >>> FREE ROTATE = RIGHT 90
Ensure "All layers" is UNCHECKED
PSPX - PSPX6: IMAGE >>> FREE ROTATE = RIGHT 90
Ensure "All layers" is UNCHECKED
Rename this layer vertical rectangle
|
|
STEP 9
ACTIVATE lower rectangle layer
LAYERS >>> NEW RASTER LAYER
Choose your SELECTION TOOL then click on the
CUSTOM SELECTION
symbol
and enter these coordinates.
|
|
STEP 10
Flood fill with BLACK
SELECTIONS >>> MODIFY >>> CONTRACT = 1
EDIT >>> CLEAR
DESELECT
|
|
STEP 11
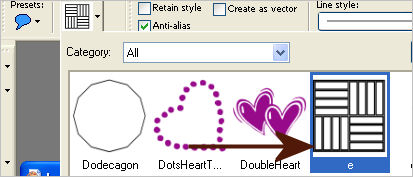
Select your PRESET SHAPES tool

PRESET = e
|
STEP 12
Starting at at the top left corner of your black frame
draw your pointer down to the bottom right corner
and click
to set the preset.
|
|
STEP 13
EFFECTS >>> PLUGINS >>> SIMPLE >>> TOP LEFT MIRROR
Rename this layer patt squares
|
|
STEP 14
LAYERS >>> NEW RASTER LAYER
Choose your SELECTION TOOL then click on the
CUSTOM SELECTION symbol
and enter these coordinates. |
|
STEP 15
Flood fill with WHITE
SELECTIONS >>> MODIFY >>> CONTRACT = 7
EDIT >>> CLEAR
Flood fill with BLACK
SELECTIONS >>> MODIFY >>> CONTRACT = 5
EDIT >>> CLEAR
Flood fill with WHITE
SELECTIONS >>> MODIFY >>> CONTRACT = 3
EDIT >>> CLEAR
Flood fill with BLACK
SELECTIONS >>> MODIFY >>> CONTRACT = 2
EDIT >>> CLEAR
|
|
STEP 16
DESELECT
With your MAGIC WAND
Mode = Replace
Match Mode = RGB Value
Tolerance = 0
Feather = 0
Antialias = UNchecked
Sample Merged = UNCHECKED
PSP9 - X6: Check CONTIGUOUS
PSPX - X6: There is no " Sample Merged"
PSPX - X6: Use all layers = UNChecked
Click outside this frame
SELECTIONS >>> INVERT
SELECTIONS >>> MODIFY >>> CONTRACT = 4
ACTIVATE the patt squares layer
Hit your DELETE key
|
|
STEP 17
ACTIVATE lower rectangle layer
Hit your DELETE key
ACTIVATE upper rectangle layer
Hit your DELETE key
ACTIVATE vertical rectangle layer
Hit your DELETE key
ACTIVATE middle rectangle layer
Hit your DELETE key
DESELECT
|
|
STEP 18
ACTIVATE Raster 1
Rename this layer centre square
LAYERS >>> NEW RASTER LAYER
Flood fill with BLACK
SELECTIONS >>> SELECT ALL
SELECTIONS >>> MODIFY >>> CONTRACT = 8
EDIT >>> CLEAR
Flood fill with WHITE
SELECTIONS >>> MODIFY >>> CONTRACT = 6
EDIT >>> CLEAR
Flood fill with BLACK
SELECTIONS >>> MODIFY >>> CONTRACT = 4
EDIT >>> CLEAR
Flood fill with WHITE
SELECTIONS >>> MODIFY >>> CONTRACT = 4
EDIT >>> CLEAR
Flood fill with BLACK
SELECTIONS >>> MODIFY >>> CONTRACT = 2
EDIT >>> CLEAR
DESELECT
|
|
STEP 19
Rename this layer outer frame
Save your Template as a .pspimage
|
|
|
|
Now you have created a Template... let's put it to use. |
STEP 20
LAYERS >>> NEW RASTER LAYER
Flood fill with Maroon #511907
LAYERS >>> ARRANGE >>> SEND TO BOTTOM
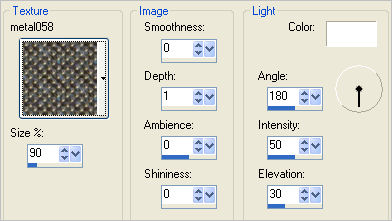
EFFECTS >>> TEXTURE EFFECTS >>> TEXTURE
TEXTURE = metal08
|
STEP 21
ACTIVATE the middle rectangle layer
ADJUST >>> HUE & SATURATION >>> COLORIZE

EFFECTS >>> TEXTURE EFFECTS >>> BLINDS
|
|
STEP 22
ACTIVATE the upper rectangle layer
ADJUST >>> HUE & SATURATION >>> COLORIZE
same settings
EFFECTS >>> TEXTURE EFFECTS >>> BLINDS
Same settings
BUT
UNCHECK Horizontal
|
|
STEP 23
ACTIVATE the lower rectangle layer
ADJUST >>> HUE & SATURATION >>> COLORIZE
same settings
EFFECTS >>> TEXTURE EFFECTS >>> BLINDS
Same settings |
STEP 24
EFFECTS >>> PLUGINS >>> EYE CANDY 3 >>>
DROP SHADOW |
|
STEP 25
EDIT >>> Repeat Drop Shadow.. change DIRECTION to 135
|
|
STEP 26
ACTIVATE the upper rectangle layer
EFFECTS >>> PLUGINS >>> EYE CANDY 3 >>>
DROP SHADOW
Same settings
EDIT >>> Repeat Drop Shadow.. change DIRECTION to 315
ACTIVATE the middle rectangle layer
EFFECTS >>> PLUGINS >>> EYE CANDY 3 >>>
DROP SHADOW
Same settings
EDIT >>> Repeat Drop Shadow.. change DIRECTION to 135
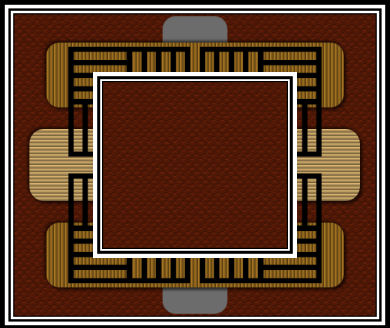
|
STEP 27
ACTIVATE the vertical rectangle layer
EFFECTS >>> TEXTURE EFFECTS >>> SCULPTURE
COLOUR = #c0c0c0
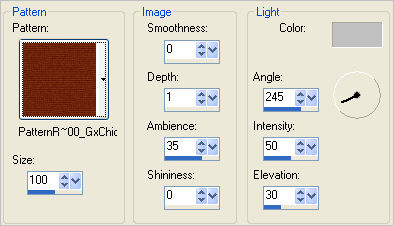
|
STEP 28
EFFECTS >>> PLUGINS >>> EYE CANDY 3 >>>
DROP SHADOW
Same settings
EDIT >>> Repeat Drop Shadow.. change DIRECTION to 315 |
|
STEP 29
ACTIVATE the patt squares layer
EFFECTS >>> TEXTURE EFFECTS >>> SCULPTURE
Same settings
BUT
Change AMBIENCE to 0
EFFECTS >>> 3D EFFECTS >>> DROP SHADOW
Vertical & Horizontal offsets = 1
Colour = Black
Opacity = 70
Blur = 0
Repeat Drop Shadow effect changing
Vertical & Horizontal Offsets to - ( minus ) 1
Click OK
EFFECTS >>> PLUGINS >>> EYE CANDY 3 >>>
DROP SHADOW
Same settings BUT change DISTANCE to 3
EDIT >>> Repeat Drop Shadow.. change DIRECTION to 135
|
|
STEP 30
ACTIVATE the centre square layer
With your MAGIC WAND
Mode = Replace
Match Mode = RGB Value
Tolerance = 0
Feather = 0
Antialias = UNchecked
Sample Merged = UNCHECKED
PSP9 - X6: Check CONTIGUOUS
PSPX - X6: There is no " Sample Merged"
PSPX - X6: Use all layers = UNChecked
and while depressing your SHIFT KEY...
Select the 2 white sections of the border |
|
STEP 31
Flood fill with Maroon
EFFECTS >>> 3D EFFECTS >>> INNER BEVEL |
|
STEP 32
DESELECT
With your MAGIC WAND.... Same settings.
Select the CENTRE of your image
ACTIVATE Raster 1
Hit your DELETE key
|
|
STEP 33
SELECTIONS >>> INVERT
EFFECTS >>> PLUGINS >>> EYE CANDY 3 >>>
DROP SHADOW
|
|
STEP 34
EDIT >>> Repeat Drop Shadow.. change DIRECTION to 135
DESELECT
LAYERS >>> NEW RASTER LAYER
Flood fill with #fcfaed
LAYERS >>> ARRANGE >>> MOVE DOWN
|
|
STEP 35
ACTIVATE the outer frame layer
With your MAGIC WAND.... Same settings.
and while depressing your SHIFT KEY...
Select the 2 white sections of the frame
Flood fill with Maroon
EFFECTS >>> 3D EFFECTS >>> INNER BEVEL
Same settings
DESELECT
With your MAGIC WAND.... Same settings.
Select the area inside the frame
|
|
STEP 36
SELECTIONS >>> INVERT
EFFECTS >>> PLUGINS >>> EYE CANDY 3 >>>
DROP SHADOW
|
|
STEP 37
EDIT >>> Repeat Drop Shadow.. change DIRECTION to 135
DESELECT
This is your frame
Save as .pspimage image
|
|
|
|
STEP 38
ACTIVATE the centre square layer
With your MAGIC WAND ... same settings
Select the area outside the frame
SELECTIONS >>> INVERT
SELECTIONS >>> MODIFY >>> CONTRACT = 10
ACTIVATE Raster 2
LAYERS >>> NEW RASTER LAYER
|
|
STEP 39
Open up the Sept Series Meow 2 - 2 image
in your PSP workspace
Right click on the Title Bar and select COPY from the options
Right click on the Title Bar of your frame image
and select PASTE INTO SELECTION from the options.
In your LAYER PALETTE change the BLEND MODE to MULTIPLY
ADJUST >>> SHARPNESS >>> SHARPEN
DESELECT |
|
STEP 40
ACTIVATE the outer frame layer
Open up the JER_kb_ivory-07 image
in your PSP workspace
Right click on the Title Bar and select COPY from the options
Right click on the Title Bar of your frame image
and select PASTE AS NEW LAYER from the options.
IMAGE >>> RESIZE = 30%
Ensure "Resize all layers" is UNCHECKED
Resample using WEIGHTED AVERAGE
ADJUST >>> SHARPNESS >>> SHARPEN
EFFECTS >>> PLUGINS >>> EYE CANDY 3 >>>
DROP SHADOW
Same settings BUT change OPACITY to 50
Reposition with your MOVER tool
|
|
STEP 41
Open up the 056_Bird image
in your PSP workspace
Right click on the Title Bar and select COPY from the options
Right click on the Title Bar of your frame image
and select PASTE AS NEW LAYER from the options.
IMAGE >>> RESIZE = 30%
Ensure "Resize all layers" is UNCHECKED
Resample using WEIGHTED AVERAGE
ADJUST >>> SHARPNESS >>> SHARPEN
EFFECTS >>> PLUGINS >>> EYE CANDY 3 >>>
DROP SHADOW
Same settings BUT change DIRECTION to 315
Reposition with your MOVER tool |
|
STEP 42
ADD your NAME
LAYERS >>> MERGE >>> MERGE ALL (Flatten)
Save as .jpg image
|
|
|
|
|
|
|