STEP 1
Open a new image 700 x 500
Transparent background
PSP9: Colour Depth = 16 Million Colors (24bit)
PSPX-X6: Colour Depth RGB = 8bits/channel
.
|
STEP 2
Open up the Script shapes image in your PSP workspace
Activate the Z Large layer
Right click on the Title Bar and select COPY from the options
Right click on the Title Bar of your frame image
and select PASTE AS NEW LAYER from the options.
IMAGE >>> RESIZE = 85%
Ensure "Resize all layers" is UNCHECKED
Resample using WEIGHTED AVERAGE
EFFECTS >>> IMAGE EFFECTS >>> OFFSET
Horizontal Offset = - (minus) 228
Vertical Offset = - (minus) 20
Edge Mode = Transparent
, |
STEP 3
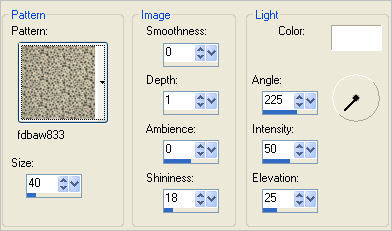
EFFECTS >>> TEXTURE EFFECTS >>> SCULPTURE
PATTERN = fdbaw833

Click OK
|
STEP 4
EFFECTS >>> 3D EFFECTS >>> INNER BEVEL |
|
STEP 5
LAYERS >>> DUPLICATE
IMAGE >>> MIRROR
IMAGE >>> FLIP |
|
STEP 6
LAYERS >>> DUPLICATE
PSP9: IMAGE >>> ROTATE >>> FREE ROTATE = LEFT 90
Ensure "All layers" is UNCHECKED
PSPX - PSPX6: IMAGE >>> FREE ROTATE = LEFT 90
Ensure "All layers" is UNCHECKED
EFFECTS >>> IMAGE EFFECTS >>> OFFSET
Horizontal Offset = - (minus) 227
Vertical Offset =136
Edge Mode = Transparent
LAYERS >>> DUPLICATE
IMAGE >>> MIRROR
IMAGE >>> FLIP
|
|
STEP 7
CLOSE Raster 1
LAYERS >>> MERGE >>> MERGE VISIBLE
ADJUST >>> SHARPNESS >>> SHARPEN MORE
|
STEP 8
With your MAGIC WAND
Mode = Replace
Match Mode = RGB Value
Tolerance = 0
Feather = 0
Antialias = UNchecked
Sample Merged = UNCHECKED
PSP9 - X6: Check CONTIGUOUS
PSPX - X6: There is no " Sample Merged"
Select the OUTER transparent area
SELECTIONS >>> INVERT
SELECTIONS >>> MODIFY >>> CONTRACT = 3
SELECTIONS >>> INVERT
|
|
STEP 9
LAYERS >>> NEW RASTER LAYER
LAYERS >>> ARRANGE >>> MOVE DOWN
Flood fill with CREAM #f2f2e4
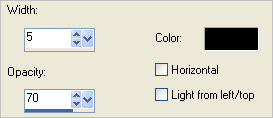
EFFECTS >>> TEXTURE EFFECTS >>> BLINDS

Click OK
DESELECT
|
|
STEP 10
SELECTIONS >>> SELECT ALL
SELECTIONS >>> MODIFY >>> CONTRACT = 10
SELECTIONS >>> INVERT
EDIT >>> CLEAR
EFFECTS >>> PLUGINS >>> EYE CANDY 3 >>>
DROP SHADOW
|
|
STEP 11
EDIT >>> Repeat Drop Shadow.. change DIRECTION to 135
DESELECT |
|
STEP 12
CLOSE Raster 2
ACTIVATE the Merged layer
With your MAGIC WAND.... Same settings.
Select the OUTER transparent area
SELECTIONS >>> INVERT
SELECTIONS >>> MODIFY >>> CONTRACT = 1
LAYERS >>> NEW RASTER LAYER
LAYERS >>> ARRANGE >>> MOVE DOWN
EFFECTS >>> PLUGINS >>> EYE CANDY 3 >>>
DROP SHADOW |
|
STEP 13
EDIT >>> Repeat Drop Shadow.. change DIRECTION to 135
DESELECT
OPEN Raster 2 |
|
STEP 14
ACTIVATE the Merged layer
Open up the Script shapes image in your PSP workspace
Activate the dot layer
Right click on the Title Bar and select COPY from the options
Right click on the Title Bar of your frame image
and select PASTE AS NEW LAYER from the options.
EFFECTS >>> TEXTURE EFFECTS >>> SCULPTURE
Same settings
EFFECTS >>> 3D EFFECTS >>> INNER BEVEL
Same settings
ADJUST >>> SHARPNESS >>> SHARPEN MORE
EFFECTS >>> PLUGINS >>> EYE CANDY 3 >>>
DROP SHADOW
Same settings
EDIT >>> Repeat Drop Shadow.. change DIRECTION to 315 |
|
STEP 15
IMAGE >>> RESIZE = 85%
Ensure "Resize all layers" is UNCHECKED
Resample using WEIGHTED AVERAGE
ADJUST >>> SHARPNESS >>> SHARPEN
Reposition with your MOVER tool |
|
STEP 16
Right click on the Title Bar and select
COPY from the options
Right click on the Title Bar of your frame image
and select PASTE AS NEW SELECTION from the options.
Position as shown |
|
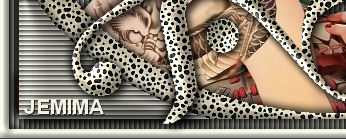
Your image top should look like this

|
STEP 17
Right click on the Title Bar of your frame image
and select PASTE AS NEW SELECTION from the options.
Position as shown
|
|
STEP 18
Right click on the Title Bar of your frame image
and select PASTE AS NEW SELECTION from the options.
Position as shown
DESELECT |
|
STEP 19
LAYERS >>> DUPLICATE
IMAGE >>> FLIP
IMAGE >>> MIRROR
LAYERS >>> MERGE >>> MERGE DOWN
|
|
STEP 20
OPEN & ACTIVATE Raster 1
Flood fill with CREAM #f2f2e4,
ACTIVATE Raster 2
With your MAGIC WAND.... Same settings.
Select the OUTER transparent area
|
|
STEP 21
ACTIVATE Raster 1
EFFECTS >>> 3D EFFECTS >>> INNER BEVEL
Same settings
DESELECT
|
|
STEP 22
SELECTIONS >>> SELECT ALL
SELECTIONS >>> MODIFY >>> CONTRACT = 1
SELECTIONS >>> INVERT
ZOOM IN on selection and FLOOD FILL with #404040
DESELECT
|
STEP 23
ACTIVATE Raster 2
LAYERS >>> NEW RASTER LAYER
Flood fill with CREAM
SELECTIONS >>> SELECT ALL
SELECTIONS >>> MODIFY >>> CONTRACT = 20
SELECTIONS >>> INVERT
EDIT >>> CLEAR
DESELECT
EFFECTS >>> TEXTURE EFFECTS >>> BLINDS
Same settings BUT this time
check HORIZONTAL
|
|
STEP 24
Open up the ellipse27 image in your PSP workspace
Right click on the Title Bar and select COPY from the options
Right click on the Title Bar of your frame image
and select PASTE AS NEW LAYER from the options.
With your MAGIC WAND.... Same settings.
Select the ellipse
ACTIVATE Raster 5
EDIT >>> CLEAR
DESELECT
CLOSE Raster 6
Still on Raster 5
EFFECTS >>> 3D EFFECTS >>> INNER BEVEL
Same settings
|
|
STEP 25
EFFECTS >>> PLUGINS >>> EYE CANDY 3 >>>
DROP SHADOW
Same settings
EDIT >>> Repeat Drop Shadow..
change DIRECTION to 135
|
STEP 26
ACTIVATE Raster 4
Open up the Script shapes image in your PSP workspace
Activate the dot layer
Right click on the Title Bar and select COPY from the options
Right click on the Title Bar of your frame image
and select PASTE AS NEW LAYER from the options.
IMAGE >>> RESIZE = 75%
Ensure "Resize all layers" is UNCHECKED
Resample using WEIGHTED AVERAGE
EFFECTS >>> TEXTURE EFFECTS >>> SCULPTURE
Same settings
EFFECTS >>> 3D EFFECTS >>> INNER BEVEL
Same settings
ADJUST >>> SHARPNESS >>> SHARPEN MORE
|
STEP 27
EFFECTS >>> PLUGINS >>> EYE CANDY 3 >>> DROP SHADOW
Same settings
EDIT >>> Repeat Drop Shadow.. change DIRECTION to 315
Reposition with your MOVER tool |
|
STEP 28
LAYERS >>> DUPLICATE
IMAGE >>> FLIP
IMAGE >>> MIRROR
LAYERS >>> MERGE >>> MERGE DOWN
EDIT >>> Repeat Layer Merge Down
SAVE YOUR WORK |
|
STEP 29
ACTIVATE Raster 2
LAYERS >>> NEW RASTER LAYER
SELECTIONS >>> SELECT ALL
SELECTIONS >>> MODIFY >>> CONTRACT = 20
Flood fill with CREAM
EFFECTS >>> TEXTURE EFFECTS >>> SCULPTURE
Same settings
ADJUST >>> SHARPNESS >>> SHARPEN MORE
DESELECT
|
|
STEP 30
OPEN & ACTIVATE Raster 6
IMAGE >>> RESIZE = 90%
Ensure "Resize all layers" is UNCHECKED
Resample using WEIGHTED AVERAGE
With your MAGIC WAND.... Same settings.
Select the ellipse
|
|
STEP 31
ACTIVATE Raster 7
EDIT >>> CLEAR
DESELECT
DELETE Raster 6
ACTIVATE Raster 7
EFFECTS >>> 3D EFFECTS >>> INNER BEVEL
Same settings
EFFECTS >>> PLUGINS >>> EYE CANDY 3 >>>
DROP SHADOW
Same settings
EDIT >>> Repeat Drop Shadow.. change DIRECTION to 135
|
|
STEP 32
CLOSE Raster 1 and Raster 2 layers
With Raster 7 active
LAYERS >>> MERGE >>> MERGE VISIBLE
OPEN Raster 1 and Raster 2 layers
SAVE YOUR WORK
|
|
|
|
|
STEP 33
ACTIVATE Raster 1
Open up the Chinese_Landscape_15 image
in your PSP workspace
Right click on the Title Bar and select COPY from the options
Right click on the Title Bar of your frame image
and select PASTE AS NEW LAYER from the options. |
|
STEP 34
ACTIVATE Raster 2
Open up the femmes_0097_lisat image
in your PSP workspace
Right click on the Title Bar and select COPY from the options
Right click on the Title Bar of your frame image
and select PASTE AS NEW LAYER from the options.
IMAGE >>> RESIZE = 50%
Ensure "Resize all layers" is UNCHECKED
Resample using WEIGHTED AVERAGE
Choose your SELECTION TOOL
Select the text and delete
DESELECT
Reposition with your MOVER tool
|
|
STEP 35
EFFECTS >>> PLUGINS >>> EYE CANDY 3 >>>
DROP SHADOW
Same settings
ACTIVATE the Merged layer
LAYERS >>> NEW RASTER LAYER
Select your TEXT tool
and with a font of your choice add your name

|
STEP 36
LAYERS >>> MERGE >>> MERGE ALL (Flatten)
Save as .jpg image |
|
|
|
|
|
|