STEP 1
Open a new image 700 x 500
Transparent background
PSP9: Colour Depth = 16 Million Colors (24bit)
PSPX-X6: Colour Depth RGB = 8bits/channel
,
|
STEP 2
SELECTIONS >>> SELECT ALL
SELECTIONS >>> MODIFY >>> CONTRACT = 35
SELECTIONS >>> INVERT
Flood fill with BROWN #3f3525
SELECTIONS >>> INVERT
SELECTIONS >>> MODIFY >>> EXPAND = 9
SELECTIONS >>> INVERT
Flood fill with TAN #87644e |
|
STEP 3
SELECTIONS >>> INVERT
SELECTIONS >>> MODIFY >>> EXPAND = 9
SELECTIONS >>> INVERT
Flood fill with BROWN #3f3525
|
|
STEP 4
SELECTIONS >>> INVERT
SELECTIONS >>> MODIFY >>> EXPAND = 9
SELECTIONS >>> INVERT
Flood fill with TAN #87644e |
|
STEP 5
SELECTIONS >>> INVERT
SELECTIONS >>> MODIFY >>> EXPAND = 3
SELECTIONS >>> INVERT
Flood fill with BROWN #3f3525
DESELECT |
|
STEP 6
EFFECTS >>> 3D EFFECTS >>> INNER BEVEL
, |
|
STEP 7
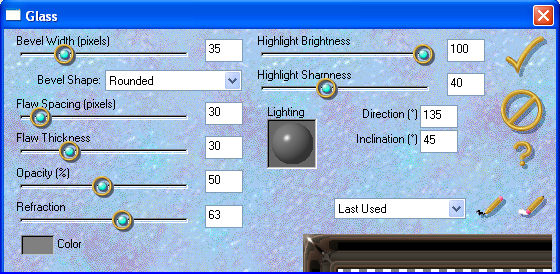
EFFECTS >>> PLUGINS >>> EYE CANDY 3 >>> GLASS
COLOUR =
#808080

, |
STEP 8
LAYERS >>> DUPLICATE
IMAGE >>> RESIZE = 80%
Ensure "Resize all layers" is UNCHECKED
Resample using WEIGHTED AVERAGE
ADJUST >>> SHARPNESS >>> SHARPEN
With your MAGIC WAND
Mode = Replace
Match Mode = RGB Value
Tolerance = 0
Feather = 0
Antialias = UNchecked
Sample Merged = UNCHECKED
PSP9 - X6: Check CONTIGUOUS
PSPX - X6: There is no " Sample Merged"
Select the OUTER transparent area |
|
STEP 9
LAYERS >>> NEW RASTER LAYER
LAYERS >>> ARRANGE >>> SEND TO BOTTOM
Flood fill with BROWN
EFFECTS >>> TEXTURE EFFECTS >>> BLINDS
DESELECT
|
|
STEP 10
ACTIVATE Raster 1
EFFECTS >>> PLUGINS >>> EYE CANDY 3 >>>
DROP SHADOW
, |
|
STEP 11
EDIT >>> Repeat Drop Shadow..
change DIRECTION to 180 |
|
STEP 12
Open up the round frames image in your PSP workspace
Activate lge frame layer
Right click on the Title Bar and select COPY from the options
Right click on the Title Bar of your frame image
and select PASTE AS NEW LAYER from the options.
EFFECTS >>> IMAGE EFFECTS >>> OFFSET
Horizontal Offset = 113
Vertical Offset = - (minus) 40
Edge Mode = Transparent |
|
STEP 13
Back to the round frames image in your PSP workspace
Activate small frame layer
Right click on the Title Bar and select COPY from the options
Right click on the Title Bar of your frame image
and select PASTE AS NEW LAYER from the options.
EFFECTS >>> IMAGE EFFECTS >>> OFFSET
Horizontal Offset = - (minus) 129
Vertical Offset = 50
Edge Mode = Transparent
LAYERS >>> MERGE >>> MERGE DOWN
|
|
STEP 14
LAYERS >>> NEW RASTER LAYER
LAYERS >>> ARRANGE >>> SEND TO BOTTOM
Flood fill with TAN
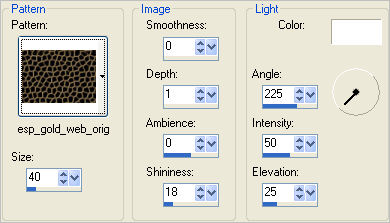
EFFECTS >>> TEXTURE EFFECTS >>> SCULPTURE
PATTERN = esp_gold_web_orig
, |
STEP 15
ACTIVATE Raster 3
With your MAGIC WAND
Mode = Replace
Match Mode = RGB Value
Tolerance = 0
Feather = 0
Antialias = UNchecked
Sample Merged = UNCHECKED
PSP9 - X6: Check CONTIGUOUS
PSPX - X6: There is no " Sample Merged"
and while depressing your SHIFT KEY...
Select the centres of both round frames
SELECTIONS >>> MODIFY >>> EXPAND = 5 |
|
STEP 16
ACTIVATE Raster 4
EDIT >>> CLEAR
DESELECT
LAYERS >>> NEW RASTER LAYER
LAYERS >>> ARRANGE >>> MOVE DOWN
Flood fill with TAN
|
|
STEP 17
ACTIVATE Copy of Raster 1
Open up the JFElements47 image in your PSP workspace
Activate Raster 1
Right click on the Title Bar and select COPY from the options
Right click on the Title Bar of your frame image
and select PASTE AS NEW LAYER from the options.
EFFECTS >>> IMAGE EFFECTS >>> OFFSET
Horizontal Offset = - (minus) 205
Vertical Offset = 125
Edge Mode = Transparent |
|
STEP 18
LAYERS >>> DUPLICATE
IMAGE >>> FLIP
IMAGE >>> MIRROR
LAYERS >>> MERGE >>> MERGE DOWN |
|
STEP 19
Back to the JFElements47 image in your PSP workspace
Activate Raster 2
Right click on the Title Bar and select COPY from the options
Right click on the Title Bar of your frame image
and select PASTE AS NEW LAYER from the options.
Reposition with your MOVER tool |
|
STEP 20
LAYERS >>> DUPLICATE
IMAGE >>> FLIP
IMAGE >>> MIRROR
LAYERS >>> MERGE >>> MERGE DOWN
ACTIVATE Raster 6
EFFECTS >>> PLUGINS >>> EYE CANDY 3 >>>
DROP SHADOW
|
|
STEP 21
ACTIVATE Raster 4
EFFECTS >>> PLUGINS >>> EYE CANDY 3 >>>
DROP SHADOW |
|
STEP 22
EDIT >>> Repeat Drop Shadow..
change DIRECTION to 315
CLOSE Raster 5
LAYERS >>> MERGE >>> MERGE VISIBLE
Back to the JFElements47 image in your PSP workspace
Activate Raster 3
Right click on the Title Bar and select COPY from the options
Right click on the Title Bar of your frame image
and select PASTE AS NEW LAYER from the options.
Reposition with your MOVER tool, |
|
STEP 23
EFFECTS >>> PLUGINS >>> SIMPLE >>> TOP LEFT MIRROR
EFFECTS >>> PLUGINS >>> EYE CANDY 3 >>>
DROP SHADOW
Same settings
LAYERS >>> MERGE >>> MERGE VISIBLE
Save as .pspimage image
|
STEP 24
NOTE: The next instructions...
STEP 24 to STEP 34 are optional.
Open up the Antique-Clock02 image in your PSP workspace
DESELECT
Choose your SELECTION TOOL
Selection Type = Rectangle
Mode = Replace
Feather = 0
Antialias = UNChecked
Select the clock indicated
|
|
STEP 25
Right click on the Title Bar and select COPY from the options
Right click on the Title Bar of your frame image
and select PASTE AS NEW LAYER from the options.
IMAGE >>> RESIZE = 25%
Ensure "Resize all layers" is UNCHECKED
Resample using WEIGHTED AVERAGE
ADJUST >>> SHARPNESS >>> SHARPEN MORE
Reposition with your MOVER tool |
|
STEP 26
Back to the Antique-Clock02 image in your PSP workspace
With your SELECTION TOOL
Select the clock indicated |
|
STEP 27
Right click on the Title Bar and select COPY from the options
Right click on the Title Bar of your frame image
and select PASTE AS NEW SELECTION from the options.
IMAGE >>> RESIZE = 25%
Ensure "Resize all layers" is UNCHECKED
Resample using WEIGHTED AVERAGE
ADJUST >>> SHARPNESS >>> SHARPEN MORE
Reposition with your MOVER tool
, |
|
STEP 28
Back to the Antique-Clock02 image in your PSP workspace
With your SELECTION TOOL
Select the clock indicated
|
|
STEP 29
Right click on the Title Bar and select COPY from the options
Right click on the Title Bar of your frame image
and select PASTE AS NEW SELECTION from the options.
IMAGE >>> RESIZE = 30%
Ensure "Resize all layers" is UNCHECKED
Resample using WEIGHTED AVERAGE
ADJUST >>> SHARPNESS >>> SHARPEN MORE
Reposition with your MOVER tool
, |
|
STEP 30
Back to the Antique-Clock02 image in your PSP workspace
With your SELECTION TOOL
Select the clock indicated
|
|
STEP 31
Right click on the Title Bar and select COPY from the options
Right click on the Title Bar of your frame image
and select PASTE AS NEW SELECTION from the options.
IMAGE >>> RESIZE = 25%
Ensure "Resize all layers" is UNCHECKED
Resample using WEIGHTED AVERAGE
ADJUST >>> SHARPNESS >>> SHARPEN MORE
Reposition with your MOVER tool
, |
|
STEP 32
Back to the Antique-Clock02 image in your PSP workspace
With your SELECTION TOOL
Select the clock indicated |
|
STEP 33
Right click on the Title Bar and select COPY from the options
Right click on the Title Bar of your frame image
and select PASTE AS NEW SELECTION from the options.
IMAGE >>> RESIZE = 25%
Ensure "Resize all layers" is UNCHECKED
Resample using WEIGHTED AVERAGE
ADJUST >>> SHARPNESS >>> SHARPEN MORE
Reposition with your MOVER tool
DESELECT
|
|
STEP 34
CLOSE the Merged layer
LAYERS >>> MERGE >>> MERGE VISIBLE
EFFECTS >>> PLUGINS >>> EYE CANDY 3 >>> DROP SHADOW
Same settings
OPEN the Merged layer
LAYERS >>> MERGE >>> MERGE VISIBLE
Save as .pspimage image
|
STEP 34
OPEN & ACTIVATE Raster 5
Open up the LF-GirlHat-31082014 image
in your PSP workspace
WINDOW >>> DUPLICATE
Close the original Image
Choose your SELECTION TOOL
Selection Type = Rectangle
Mode = Replace
Feather = 0
Antialias =UNChecked
Select the text and delete
Wit your SELECTION TOOL
Change the Selection Type = CIRCLE
Select the girl as shown
It doesn't have to be exact. |
|
STEP 35
Right click on the Title Bar and select COPY from the options
Right click on the Title Bar of your frame image
and select PASTE AS NEW LAYER from the options.
Reposition with your MOVER tool
Resize to fit... I resized 90%
|
|
STEP 36
Open up the 1228506580_enfants image
in your PSP workspace
The selection has been made for you
|
|
STEP 37
Right click on the Title Bar and select COPY from the options
Right click on the Title Bar of your frame image
and select PASTE AS NEW LAYER from the options.
Reposition with your MOVER tool
|
|
STEP 38
ACTIVATE the Merged layer
LAYERS >>> NEW RASTER LAYER
Select your TEXT tool
and with a font of your choice add your name
|
|
STEP 39
LAYERS >>> MERGE >>> MERGE ALL (Flatten)
Save as .jpg image
|
|
|
|
|
|
|