STEP 1
Open a new image 550 x 650
Transparent background
PSP9: Colour Depth = 16 Million Colors (24bit)
PSPX-X6: Colour Depth RGB = 8bits/channel
Flood fill with DARK GREEN #162913
CLOSE Raster 1
|
STEP 2
Open up the rectangle image in your PSP workspace
Right click on the Title Bar and select COPY from the options
Right click on the Title Bar of your frame image
and select PASTE AS NEW LAYER from the options.
EFFECTS >>> TEXTURE EFFECTS >>> SCULPTURE
COLOUR = #c0c0c0

|
STEP 3
EFFECTS >>> 3D EFFECTS >>> INNER BEVEL
COLOUR = #c0c0c0
|
|
STEP 4
EFFECTS >>> 3D EFFECTS >>> DROP SHADOW
Vertical & Horizontal offsets = 1
Colour = Black
Opacity = 70
Blur = 0
EFFECTS >>> PLUGINS >>> EYE CANDY 3 >>>
DROP SHADOW
|
|
STEP 5
Open up the ellipse image in your PSP workspace
Right click on the Title Bar and select COPY from the options
Right click on the Title Bar of your frame image
and select PASTE AS NEW LAYER from the options.
EFFECTS >>> TEXTURE EFFECTS >>> SCULPTURE
Same settings
EFFECTS >>> 3D EFFECTS >>> INNER BEVEL
Same settings
EFFECTS >>> 3D EFFECTS >>> DROP SHADOW
Vertical & Horizontal offsets = 1
Colour = Black
Opacity = 70
Blur = 0
EFFECTS >>> PLUGINS >>> EYE CANDY 3 >>>
DROP SHADOW
Same settings
|
|
STEP 6
LAYERS >>> DUPLICATE
IMAGE >>> RESIZE =80%
Ensure "Resize all layers" is UNCHECKED
Resample using WEIGHTED AVERAGE
ADJUST >>> SHARPNESS >>> SHARPEN
|
|
STEP 7
LAYERS >>> MERGE >>> MERGE VISIBLE
OPEN Raster 1
With the Merged layer active
Open up the jf-accent37 image in your PSP workspace
Activate Raster 1
Right click on the Title Bar and select COPY from the options
Right click on the Title Bar of your frame image
and select PASTE AS NEW LAYER from the options.
IMAGE >>> RESIZE =70%
Ensure "Resize all layers" is UNCHECKED
Resample using WEIGHTED AVERAGE
LAYERS >>> DUPLICATE
LAYERS >>> MERGE >>> MERGE DOWN
EFFECTS >>> 3D EFFECTS >>> DROP SHADOW
Vertical & Horizontal offsets = 1
Colour = Black
Opacity = 70
Blur = 0
Reposition with your MOVER tool
|
|
STEP 8
LAYERS >>> DUPLICATE
IMAGE >>> FLIP
LAYERS >>> MERGE >>> MERGE DOWN
EFFECTS >>> PLUGINS >>> EYE CANDY 3 >>>
DROP SHADOW
Same settings
|
|
STEP 9
Back to the jf-accent37 image in your PSP workspace
Activate Raster 2
Right click on the Title Bar and select COPY from the options
Right click on the Title Bar of your frame image
and select PASTE AS NEW LAYER from the options.
IMAGE >>> RESIZE =40%
Ensure "Resize all layers" is UNCHECKED
Resample using WEIGHTED AVERAGE
LAYERS >>> DUPLICATE
LAYERS >>> MERGE >>> MERGE DOWN
EFFECTS >>> 3D EFFECTS >>> DROP SHADOW
Vertical & Horizontal offsets = 1
Colour = Black
Opacity = 70
Blur = 0
Reposition with your MOVER tool
|
|
STEP 10
EFFECTS >>> PLUGINS >>> SIMPLE >>> TOP LEFT MIRROR
EFFECTS >>> PLUGINS >>> EYE CANDY 3 >>>
DROP SHADOW
Same settings
|
|
STEP 11
Back to the jf-accent37 image in your PSP workspace
Activate Raster 1
Right click on the Title Bar and select COPY from the options
Right click on the Title Bar of your frame image
and select PASTE AS NEW LAYER from the options.
PSP9: IMAGE >>> ROTATE >>> FREE ROTATE = LEFT 90
Ensure "All layers" is UNCHECKED
PSPX - PSPX6: IMAGE >>> FREE ROTATE = LEFT 90
Ensure "All layers" is UNCHECKED
IMAGE >>> RESIZE =55%
Ensure "Resize all layers" is UNCHECKED
Resample using WEIGHTED AVERAGE
LAYERS >>> DUPLICATE
LAYERS >>> MERGE >>> MERGE DOWN
EFFECTS >>> 3D EFFECTS >>> DROP SHADOW
Vertical & Horizontal offsets = 1
Colour = Black
Opacity = 70
Blur = 0
Reposition with your MOVER tool
|
|
STEP 12
LAYERS >>> DUPLICATE
IMAGE >>> MIRROR
LAYERS >>> MERGE >>> MERGE DOWN
EFFECTS >>> PLUGINS >>> EYE CANDY 3 >>>
DROP SHADOW
Same settings |
|
STEP 13
Open up the jf-single-pearls image in your PSP workspace
Activate Raster 3
Right click on the Title Bar and select COPY from the options
Right click on the Title Bar of your frame image
and select PASTE AS NEW LAYER from the options.
Reposition with your MOVER tool
|
|
STEP 14
EFFECTS >>> PLUGINS >>> SIMPLE >>> TOP LEFT MIRROR
EFFECTS >>> PLUGINS >>> EYE CANDY 3 >>>
DROP SHADOW
Same settings
|
STEP 15
Back to the jf-single-pearls image in your PSP workspace
Activate Raster 2
Right click on the Title Bar and select COPY from the options
Right click on the Title Bar of your frame image
and select PASTE AS NEW LAYER from the options.
Reposition with your MOVER tool
|
|
STEP 16
LAYERS >>> DUPLICATE
IMAGE >>> FLIP
LAYERS >>> MERGE >>> MERGE DOWN
EFFECTS >>> PLUGINS >>> EYE CANDY 3 >>>
DROP SHADOW
Same settings |
STEP 17
ACTIVATE The Merged layer
With your MAGIC WAND
Mode = Replace
Match Mode = RGB Value
Tolerance = 6
Feather = 0
Antialias = Checked
Sample Merged = UNCHECKED
PSP9 - X6: Check CONTIGUOUS
PSPX - X6: There is no " Sample Merged"
PSP9 - X6: ANTIALIAS = Outside
Select the area outside the large oval
Depress your SHIFT key to also select the shadowed
area on the right
|
|
STEP 18
SELECTIONS >>> INVERT
SELECTIONS >>> MODIFY >>> CONTRACT = 3
ACIVATE Raster 1
EDIT >>> CLEAR
DESELECT
|
STEP 19
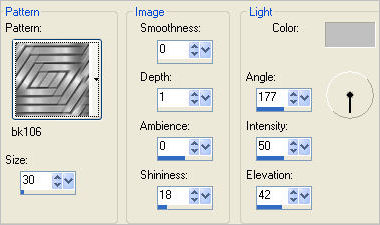
In your MATERIALS PALETTE load
zilverpatroon pattern in the foreground
using these settings |
|
STEP 20
LAYERS >>> NEW RASTER LAYER
SELECTIONS >>> SELECT ALL
SELECTIONS >>> MODIFY >>> CONTRACT = 15
Flood fill with pattern
SELECTIONS >>> MODIFY >>> CONTRACT = 30
EDIT >>> CLEAR
DESELECT
|
|
STEP 21
EFFECTS >>> 3D EFFECTS >>> INNER BEVEL
COLOUR = #c0c0c0
|
|
STEP 22
EFFECTS >>> EDGE EFFECTS >>> ENHANCE
LAYERS >>> NEW RASTER LAYER
SELECTIONS >>> SELECT ALL
SELECTIONS >>> MODIFY >>> CONTRACT = 4
Flood fill with pattern
SELECTIONS >>> MODIFY >>> CONTRACT = 3
EDIT >>> CLEAR
DESELECT
EFFECTS >>> EDGE EFFECTS >>> ENHANCE
LAYERS >>> MERGE >>> MERGE VISIBLE
Save as .pspimage image |
|
STEP 23
Open up the daughter-bill-gekas image
in your PSP workspace
Right click on the Title Bar and select COPY from the options
Right click on the Title Bar of your frame image
and select PASTE AS NEW LAYER from the options.
LAYERS >>> ARRANGE >>> MOVE DOWN
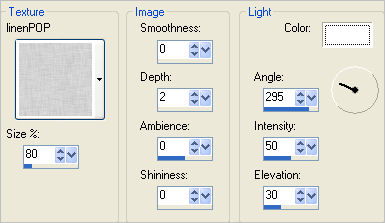
EFFECTS >>> TEXTURE EFFECTS >>> TEXTURE

|
STEP 24
ACTIVATE the Merged layer
EFFECTS >>> PLUGINS >>> EYE CANDY 3 >>>
DROP SHADOW |
|
STEP 25
LAYERS >>> NEW RASTER LAYER
Select your TEXT tool
and with a font of your choice add your name
|
|
STEP 26
LAYERS >>> MERGE >>> MERGE ALL (Flatten)
Save as .jpg image
|
|
|
|
|
|
|