STEP 1
In your MATERIALS PALETTE
Load PINK " #c87a7a " in your foreground
Load DARK PINK " #905059 " in your background
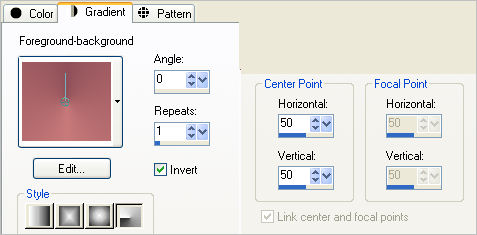
Then click on the GRADIENT option in your foreground palette
Locate the Foreground-background gradient
and use these settings

|
STEP 2
Open a new image 700 x 550
Transparent background
PSP9: Colour Depth = 16 Million Colors (24bit)
PSPX-X6: Colour Depth RGB = 8bits/channel
Flood fill with DARK PINK
LAYERS >>> NEW RASTER LAYER
Flood fill with the gradient
|
STEP 3
Open up the LF-Mask6-16102013.psp image
in your PSP workspace
and minimize
LAYERS >>> NEW MASK LAYER >>> FROM IMAGE |
|
STEP 4
LAYERS >>> MERGE >>> MERGE GROUP
In your LAYER PALETTE change
the BLEND MODE to DIFFERENCE
IMAGE >>> RESIZE = 85%
Ensure "Resize all layers" is UNCHECKED
Resample using WEIGHTED AVERAGE
ADJUST >>> SHARPNESS >>> SHARPEN
|
STEP 5
With your MAGIC WAND
Mode = Replace
Match Mode = RGB Value
Tolerance = 0
Feather = 0
Antialias = UNchecked
Sample Merged = UNCHECKED
PSP9 - X6: Check CONTIGUOUS
PSPX - X6: There is no " Sample Merged"
Select the area outside the mask
ACTIVATE Raster 1
EFFECTS >>> TEXTURE EFFECTS >>> WEAVE
|
|
STEP 6
DESELECT
SELECTIONS >>> SELECT ALL
SELECTIONS >>> MODIFY >>> CONTRACT = 10
SELECTIONS >>> INVERT
EFFECTS >>> 3D EFFECTS >>> INNER BEVEL
|
|
STEP 7
EFFECTS >>> 3D EFFECTS >>> DROP SHADOW
Vertical & Horizontal offsets = 2
Colour = Black
Opacity = 70
Blur = 2.00
Repeat Drop Shadow effect changing
Vertical & Horizontal Offsets to - ( minus ) 2
Click OK
Right click on the Title Bar and select COPY from the options
DESELECT
|
|
STEP 8
Right click on the Title Bar of your frame image
and select PASTE AS NEW LAYER from the options.
IMAGE >>> RESIZE = 92%
Ensure "Resize all layers" is UNCHECKED
Resample using WEIGHTED AVERAGE
ADJUST >>> SHARPNESS >>> SHARPEN
EFFECTS >>> 3D EFFECTS >>> DROP SHADOW
Vertical & Horizontal offsets = 1
Colour = Black
Opacity = 100
Blur = 0.00
Repeat Drop Shadow effect changing
Vertical & Horizontal Offsets to - ( minus ) 1
Click OK
|
|
STEP 9
ACTIVATE Group - Raster 2
LAYERS >>> DUPLICATE
In your LAYER PALETTE
change the BLEND MODE to BURN |
|
STEP 10
With your MAGIC WAND
Same settings
Select the area outside the mask
SELECTIONS >>> INVERT
EFFECTS >>> 3D EFFECTS >>> DROP SHADOW
Vertical & Horizontal offsets = 1
Colour = Black
Opacity = 100
Blur = 0.00
Repeat Drop Shadow effect changing
Vertical & Horizontal Offsets to - ( minus ) 1
Click OK
DESELECT
|
|
STEP 11
LAYERS >>> DUPLICATE
In your LAYER PALETTE change
the BLEND MODE to DODGE
IMAGE >>> RESIZE = 90%
Ensure "Resize all layers" is UNCHECKED
Resample using WEIGHTED AVERAGE
|
|
STEP 12
LAYERS >>> MERGE >>> MERGE VISIBLE
Choose your SELECTION TOOL then click on the
CUSTOM SELECTION symbol
and enter these coordinates. |
|
STEP 13
EDIT >>> CLEAR
SELECTIONS >>> INVERT
EFFECTS >>> 3D EFFECTS >>> DROP SHADOW
Vertical & Horizontal offsets = 6
Colour = Black
Opacity = 70
Blur = 10.00
Repeat Drop Shadow effect changing
Vertical & Horizontal Offsets to - ( minus ) 3
Click OK
DESELECT |
|
STEP 14
Open up the 1c14115352bc.psp image in your PSP workspace
Right click on the Title Bar and select COPY from the options
Right click on the Title Bar of your frame image
and select PASTE AS NEW LAYER from the options.
IMAGE >>> RESIZE = 40%
Ensure "Resize all layers" is UNCHECKED
Resample using WEIGHTED AVERAGE
In your LAYER PALETTE change the
BLEND MODE to LUMINANCE (L)
Reposition with your MOVER tool
|
|
STEP 15
LAYERS >>> MERGE >>> MERGE VISIBLE
SELECTIONS >>> SELECT ALL
SELECTIONS >>> MODIFY >>> Select Selections Border
Use these settings
|
|
STEP 16
Flood fill selected border with BLACK
DESELECT
Save as .pspimage image
|
|
STEP 17
LAYERS >>> NEW RASTER LAYER
Flood fill with PINK #cda9a9
LAYERS >>> ARRANGE >>> MOVE DOWN
Open up the night fog new york city image
in your PSP workspace
Right click on the Title Bar and select COPY from the options
Right click on the Title Bar of your frame image
and select PASTE AS NEW LAYER from the options.
In your LAYER PALETTE change the
BLEND MODE to MULTIPLY
|
STEP 18
Select your RASTER DEFORM tool
Mode = SCALE
use default settings
PSPX - X6:Select your PICK tool
Adjust to fit as shown
THEN
Click the RESET RECTANGLE arrow
Select another tool to disengage the
DEFORMATION / PICK TOOL |
|
STEP 19
Open up the SHIORI MATSUMOTTO (5) image
in your PSP workspace
Right click on the Title Bar and select COPY from the options
Right click on the Title Bar of your frame image
and select PASTE AS NEW LAYER from the options.
IMAGE >>> RESIZE = 40%
Ensure "Resize all layers" is UNCHECKED
Resample using WEIGHTED AVERAGE
Reposition with your MOVER tool
|
|
STEP 20
LAYERS >>> NEW RASTER LAYER
Select your TEXT tool
and with a font of your choice add your name
LAYERS >>> MERGE >>> MERGE ALL (Flatten)
Save as .jpg image
|
|
|
|
|
|
|