STEP 1
In your MATERIALS PALETTE
Load the ' JSC Gold Side ' gradient in your foreground
using these settings. |
|
STEP 2
Open a new image700 x 600
Transparent background
PSP9: Colour Depth = 16 Million Colors (24bit)
PSPX-X6: Colour Depth RGB = 8bits/channel
VIEW >>> RULERS
Flood fill with Gradient
With your MAGIC WAND
Mode = ADD (Shift)
Match Mode = RGB Value
Tolerance = 45
Feather = 0
Antialias = Checked
Sample Merged = UNCHECKED
PSP9 - X6: Check CONTIGUOUS
PSPX - X6: There is no " Sample Merged"
PSP9 - X6: ANTIALIAS = Outside
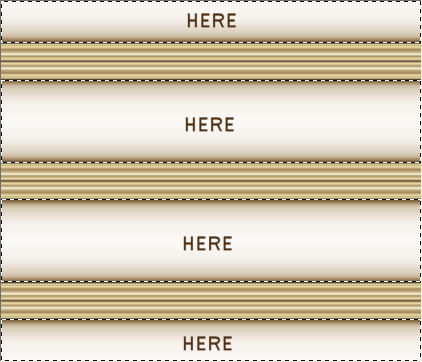
Select the areas shown

|
STEP 3
EDIT >>> CLEAR
DESELECT
Choose your SELECTION TOOL then click on the
CUSTOM SELECTION
symbol
and enter these coordinates.
|
|
STEP 4
SELECTIONS >>> INVERT
EDIT >>> CLEAR
DESELECT
LAYERS >>> DUPLICATE
CLOSE Raster 1
Choose your SELECTION TOOL then click on the
CUSTOM SELECTION symbol
and enter these coordinates.
|
|
STEP 5
EDIT >>> CUT
SELECTIONS >>> SELECT NONE
Right click on the Title Bar of your frame image
and select PASTE AS NEW LAYER from the options.
EFFECTS >>> IMAGE EFFECTS >>> OFFSET
|
|
STEP 6
Activate Copy of Raster 1
EFFECTS >>> IMAGE EFFECTS >>> OFFSET
|
|
STEP 7
Choose your SELECTION TOOL then click on the
CUSTOM SELECTION symbol
and enter these coordinates.
|
|
STEP 8
Right click on the Title Bar and select COPY from the options
DESELECT
Right click on the Title Bar of your frame image
and select PASTE AS NEW LAYER from the options. |
|
STEP 9
LAYERS >>> ARRANGE >>> MOVE UP
PSP9: IMAGE >>> ROTATE >>> FREE ROTATE = LEFT 90
Ensure "All layers" is UNCHECKED
PSPX - PSPX6: IMAGE >>> FREE ROTATE = LEFT 90
Ensure "All layers" is UNCHECKED
EFFECTS >>> IMAGE EFFECTS >>> OFFSET
|
|
STEP 10
LAYERS >>> DUPLICATE
IMAGE >>> MIRROR
LAYERS >>> MERGE >>> MERGE DOWN
ACTIVATE Raster 2
LAYERS >>> MERGE >>> MERGE DOWN
|
|
STEP 11
ACTIVATE Raster 3
Choose your FREEHAND SELECTION TOOL
Selection Type = Point to Point
Mode = Replace
Feather = 0
Smoothing = 2
Antialias = Checked
Select the top left corner as shown
|
|
STEP 12
Hit your DELETE key
DESELECT |
|
STEP 13
REPEAT the last 2 instructions with the 3 other corners
LAYERS >>> MERGE >>> MERGE DOWN

Rename this layer 'outer frame'
|
STEP 14
OPEN & ACTIVATE Raster 1
LAYERS >>> DUPLICATE
CLOSE Raster 1
Choose your SELECTION TOOL then click on the
CUSTOM SELECTION symbol
and enter these coordinates.
|
|
STEP 15
SELECTIONS >>> INVERT
EDIT >>> CLEAR
DESELECT
|
|
STEP 16
PSP9: IMAGE >>> ROTATE >>> FREE ROTATE = LEFT 90
Ensure "All layers" is UNCHECKED
PSPX - PSPX6: IMAGE >>> FREE ROTATE = LEFT 90
Ensure "All layers" is UNCHECKED
EFFECTS >>> IMAGE EFFECTS >>> OFFSET
Horizontal offset = - (minus) 50
Vertical offset = 0
Edge mode = Transparent
LAYERS >>> DUPLICATE
IMAGE >>> MIRROR
LAYERS >>> MERGE >>> MERGE DOWN
Rename this layer 'inner frame' |
|
STEP 17
OPEN & ACTIVATE Raster 1
LAYERS >>> ARRANGE >>> MOVE UP
EFFECTS >>> IMAGE EFFECTS >>> OFFSET
Horizontal offset = 0
Vertical offset = - (minus) 200
Edge mode = Transparent
LAYERS >>> DUPLICATE
IMAGE >>> FLIP
LAYERS >>> MERGE >>> MERGE DOWN
|
|
STEP 18
ACTIVATE outer frame layer
LAYERS >>> MERGE >>> MERGE DOWN
With your MAGIC WAND
Mode = ADD (Shift)
Match Mode = RGB Value
Tolerance = 0
Feather = 0
Antialias = UNChecked
Sample Merged = UNCHECKED
PSP9 - X6: Check CONTIGUOUS
PSPX - X6: There is no " Sample Merged"
Select the area shown
SELECTIONS >>> MODIFY >>> EXPAND = 6
|
|
STEP 19
LAYERS >>> NEW RASTER LAYER
LAYERS >>> ARRANGE >>> MOVE DOWN
Flood fill with #c2ac80
EFFECTS >>> TEXTURE EFFECTS >>> WEAVE
|
|
STEP 20
DESELECT
LAYERS >>> DUPLICATE
IMAGE >>> FLIP
IMAGE >>> MIRROR
LAYERS >>> MERGE >>> MERGE DOWN
|
|
STEP 21
ACTIVATE inner frame layer
LAYERS >>> NEW RASTER LAYER
LAYERS >>> ARRANGE >>> MOVE DOWN
Choose your SELECTION TOOL then click on the
CUSTOM SELECTION
symbol
and enter these coordinates.
|
|
STEP 22
Flood fill with #c2ac80
EFFECTS >>> TEXTURE EFFECTS >>> BLINDS
|
|
STEP 23
EFFECTS >>> TEXTURE EFFECTS >>> BLINDS
Same settings BUT this time check HORIZONTAL
EFFECTS >>> EDGE EFFECTS >>> ENHANCE MORE
DESELECT
LAYERS >>> DUPLICATE
IMAGE >>> MIRROR
LAYERS >>> MERGE >>> MERGE DOWN
|
|
STEP 24
ACTIVATE Raster l
EFFECTS >>> PLUGINS >>> EYE CANDY 3 >>>
DROP SHADOW
EDIT >>> Repeat Drop Shadow..
change DIRECTION to 135
|
|
STEP 25
ACTIVATE inner frame layer
EDIT >>> Repeat Drop Shadow..
change DIRECTION to 180
EDIT >>> Repeat Drop Shadow..
change DIRECTION to 0
|
STEP 26
VIEW >>> GUIDES |
|
STEP 27
Place your cursor on your top ruler
and drag guide down level with the 55 pixel mark
on left ruler |
|
STEP 28
Right click on the 'Guide handle'
to check the position
and select a bright colour
|
|
STEP 29
Open up the gold11ball image in your PSP workspace
Right click on the Title Bar and select COPY from the options
Right click on the Title Bar of your frame image
and select PASTE AS NEW LAYER from the options.
EFFECTS >>> PLUGINS >>> EYE CANDY 3 >>>
DROP SHADOW
change DIRECTION to 315
LAYERS >>> ARRANGE >>> BRING TO TOP
Reposition with your MOVER tool
Right click on the Title Bar and select COPY from the options
|
|
STEP 30
Right click on the Title Bar of your frame image
and select PASTE AS NEW SELECTION from the options.
|
|
STEP 31
Right click on the Title Bar of your frame image
and select PASTE AS NEW SELECTION from the options.
Continue in this manner until your image looks like this

DESELECT
Click on
VIEW >>> GUIDES to disengage.
|
STEP 32
LAYERS >>> DUPLICATE
IMAGE >>> FLIP
IMAGE >>> MIRROR
LAYERS >>> MERGE >>> MERGE DOWN
|
STEP 33
Open up the gold-balls image in your PSP workspace
Right click on the Title Bar and select COPY from the options
Right click on the Title Bar of your frame image
and select PASTE AS NEW LAYER from the options.
Reposition with your MOVER tool
|
|
STEP 34
LAYERS >>> DUPLICATE
IMAGE >>> MIRROR
LAYERS >>> MERGE >>> MERGE DOWN
EFFECTS >>> PLUGINS >>> EYE CANDY 3 >>>
DROP SHADOW
Same settings
LAYERS >>> MERGE >>> MERGE VISIBLE
Save as .pspimage image
|
|
|
STEP 35
LAYERS >>> NEW RASTER LAYER
Flood fill with #c2ac80
LAYERS >>> ARRANGE >>> MOVE DOWN
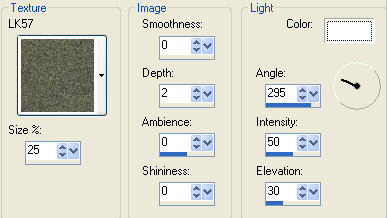
EFFECTS >>> TEXTURE EFFECTS >>> TEXTURE
Texture = L&K57

|
STEP 36
Open up the AfternoonShadows-Wicksted image
in your PSP workspace
Right click on the Title Bar and select COPY from the options
Right click on the Title Bar of your frame image
and select PASTE AS NEW LAYER from the options.
|
STEP 37
Select your RASTER DEFORM tool
Mode = SCALE
use default settings
PSPX - X6:Select your PICK tool
Drag the centre top node down to the 120 Pixel mark
on your left ruler
Drag the centre bottom node up to the 410 Pixel mark
on your left ruler
Drag the centre left node right to the 170 Pixel mark
on your top ruler
Drag the centre right node left to the 535 Pixel mark
on your top ruler
Click the RESET RECTANGLE arrow
Select another tool to disengage the
DEFORMATION / PICK TOOL
|
|
STEP 38
Open up the dwarfmusic-sm~moon image
in your PSP workspace
Right click on the Title Bar and select
COPY from the options
Right click on the Title Bar of your frame image
and select PASTE AS NEW LAYER from the options.
IMAGE >>> RESIZE = 50%
Ensure "Resize all layers" is UNCHECKED
Resample using WEIGHTED AVERAGE
ADJUST >>> SHARPNESS >>> SHARPEN
EFFECTS >>> PLUGINS >>> EYE CANDY 3 >>>
DROP SHADOW
Same settings BUT change DIRECTION to 180
Reposition down with your MOVER tool
LAYERS >>> MERGE >>> MERGE VISIBLE
|
|
STEP 39
LAYERS >>> NEW RASTER LAYER
Select your TEXT tool
and with a font of your choice add your name
LAYERS >>> MERGE >>> MERGE ALL (Flatten)
Save as .jpg image
|
|
|
|
|
|
|