STEP 1
Open up the LF~BDRLeaves2Shea image in your PSP workspace
Right click on the Title Bar and select COPY from the options
Right click in your PSP workspace
and select PASTE AS NEW IMAGE from the options.
NOTE: I turned this image on it's side to save space on this page..
I don't want you to do that.
Choose your FREEHAND SELECTION TOOL
Selection Type = Point to Point
Mode = Replace
Feather = 0
Smoothing = 5
Antialias = UNChecked
Select the area shown to exclude the 2 outer leaves

SELECTIONS >>> INVERT
EDIT >>> CLEAR
DESELECT

Right click on the Title Bar and select COPY from the options
|
STEP 2
Open a new image 700 x 600
Transparent background
PSP9: Colour Depth = 16 Million Colors (24bit)
PSPX-X6: Colour Depth RGB = 8bits/channel
Right click on the Title Bar of your frame image
and select PASTE AS NEW LAYER from the options.
EFFECTS >>> IMAGE EFFECTS >>> OFFSET
Horizontal Offset = 275
Vertical Offset = 10
Edge Mode = Transparent |
|
STEP 3
LAYERS >>> DUPLICATE
PSP9: IMAGE >>> ROTATE >>> FREE ROTATE = LEFT 90
Ensure "All layers" is UNCHECKED
PSPX - PSPX6: IMAGE >>> FREE ROTATE = LEFT 90
Ensure "All layers" is UNCHECKED
EFFECTS >>> IMAGE EFFECTS >>> OFFSET
Horizontal Offset = - (MINUS) 262
Vertical Offset = 212
Edge Mode = Transparent
LAYERS >>> MERGE >>> MERGE DOWN
|
|
STEP 4
LAYERS >>> DUPLICATE
IMAGE >>> FLIP
IMAGE >>> MIRROR
LAYERS >>> MERGE >>> MERGE DOWN |
|
STEP 5
IMAGE >>> RESIZE = 85%
Ensure "Resize all layers" is UNCHECKED
Resample using WEIGHTED AVERAGE
ADJUST >>> SHARPNESS >>> SHARPEN
ACTIVATE Raster 1
Open up the RoundedRectangle image in your PSP workspace
Right click on the Title Bar and select COPY from the options
Right click on the Title Bar of your frame image
and select PASTE AS NEW LAYER from the options.
|
|
STEP 6
SELECTIONS >>> SELECT ALL
SELECTIONS >>> FLOAT
SELECTIONS >>> DEFLOAT
SELECTIONS >>> MODIFY >>> CONTRACT = 15
EDIT >>> CLEAR
DESELECT
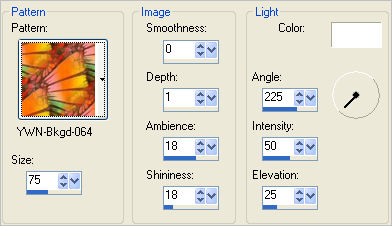
EFFECTS >>> TEXTURE EFFECTS >>> SCULPTURE
PATTERN = YWN-Bkgd-064

|
STEP 7
EFFECTS >>> 3D EFFECTS >>> DROP SHADOW
Vertical & Horizontal offsets = 1
Colour = Black
Opacity = 70
Blur = 0
Repeat Drop Shadow effect changing
Vertical & Horizontal Offsets to - ( minus ) 1
Click OK |
|
STEP 8
ACTIVATE Raster 2
LAYERS >>> NEW RASTER LAYER
Flood fill with WHITE
SELECTIONS >>> SELECT ALL
SELECTIONS >>> MODIFY >>> CONTRACT = 15
EDIT >>> CLEAR
DESELECT
EFFECTS >>> TEXTURE EFFECTS >>> SCULPTURE
Same settings
EFFECTS >>> 3D EFFECTS >>> DROP SHADOW
Vertical & Horizontal offsets = 1
Colour = Black
Opacity = 70
Blur = 0
Repeat Drop Shadow effect changing
Vertical & Horizontal Offsets to - ( minus ) 1
Click OK |
|
STEP 9
LAYERS >>> DUPLICATE
IMAGE >>> RESIZE = 85%
Ensure "Resize all layers" is UNCHECKED
Resample using WEIGHTED AVERAGE
ADJUST >>> SHARPNESS >>> SHARPEN
LAYERS >>> MERGE >>> MERGE DOWN
EFFECTS >>> 3D EFFECTS >>> INNER BEVEL
|
|
STEP 10
ADJUST >>> SHARPNESS >>> SHARPEN
With your MAGIC WAND
Mode = Replace
Match Mode = RGB Value
Tolerance = 0
Feather = 0
Antialias = UNchecked
Sample Merged = UNCHECKED
PSP9 - X6: Check CONTIGUOUS
PSPX - X6: There is no " Sample Merged"
Select the transparent area shown
SELECTIONS >>> MODIFY >>> EXPAND = 3
, |
|
STEP 11
LAYERS >>> NEW RASTER LAYER
LAYERS >>> ARRANGE >>> MOVE DOWN
Flood fill with ORANGE #b5351e
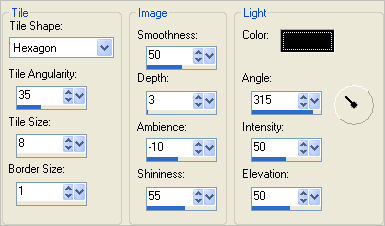
EFFECTS >>> TEXTURE EFFECTS >>> TILES

DESELECT |
STEP 12
ACTIVATE Raster 3
With your MAGIC WAND
Same settings
Select the transparent area shown
|
|
STEP 13
SELECTIONS >>> MODIFY >>> EXPAND = 3
LAYERS >>> NEW RASTER LAYER
LAYERS >>> ARRANGE >>> MOVE DOWN
Flood fill with GREEN #475911
DESELECT
|
|
STEP 14
ACTIVATE Raster 4
EFFECTS >>> PLUGINS >>> EYE CANDY 3 >>>
DROP SHADOW
|
|
STEP 15
ACTIVATE Raster 2
EDIT >>> Repeat Drop Shadow.
ACTIVATE Raster 3
EDIT >>> Repeat Drop Shadow.
|
|
STEP 16
ACTIVATE Raster 2
EDIT >>> Repeat Drop Shadow.. change DIRECTION to 135
|
|
STEP 17
LAYERS >>> MERGE >>> MERGE VISIBLE
SAVE YOUR WORK
|
|
|
|
|
STEP 18
LAYERS >>> NEW RASTER LAYER
Flood fill with CREAM #ece9d8
LAYERS >>> ARRANGE >>> MOVE DOWN
, |
STEP 19
Open up the Mist corinne.vicaire - paysage 01 27.02.11 image
in your PSP workspace
Right click on the Title Bar and select COPY from the options
Right click on the Title Bar of your frame image
and select PASTE AS NEW LAYER from the options.
IMAGE >>> RESIZE = 85%
Ensure "Resize all layers" is UNCHECKED
Resample using WEIGHTED AVERAGE |
STEP 20
Select your RASTER DEFORM tool
Mode = SCALE
use default settings
PSPX - X6:Select your PICK tool
Drag the centre left and centre right nodes
in towards the centre as shown |
|
STEP 21
Click the RESET RECTANGLE arrow
Select another tool to disengage the
DEFORMATION / PICK TOOL
ADJUST >>> SHARPNESS >>> SHARPEN |
STEP 22
Open up the People25_AB image in your PSP workspace
Right click on the Title Bar and select COPY from the options
Right click on the Title Bar of your frame image
and select PASTE AS NEW LAYER from the options.
IMAGE >>> RESIZE = 30%
Ensure "Resize all layers" is UNCHECKED
Resample using WEIGHTED AVERAGE
ADJUST >>> SHARPNESS >>> SHARPEN
EFFECTS >>> 3D EFFECTS >>> DROP SHADOW
Vertical & Horizontal offsets = 1
Colour = Black
Opacity = 100
Blur = 8.00
Reposition with your MOVER tool
|
|
STEP 23
LAYERS >>> MERGE >>> MERGE VISIBLE
LAYERS >>> NEW RASTER LAYER
Select your TEXT tool
and with a font of your choice add your name |
|
STEP 24
LAYERS >>> MERGE >>> MERGE ALL (Flatten)
Save as .jpg image, |
| |
|
| |
|
| |
|