|
|
STEP 1
Open a new image 650 x 550
Transparent background
PSP9: Colour Depth = 16 Million Colors (24bit)
PSPX-X6: Colour Depth RGB = 8bits/channel |
STEP 2
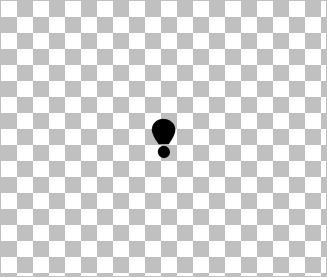
Open up the exclamation image in your PSP workspace
Right click on the Title Bar and select COPY from the options
Right click on the Title Bar of your frame image
and select PASTE AS NEW LAYER from the options.
Delete Raster 1
|
|
STEP 3
PSP9: IMAGE >>> ROTATE >>> FREE ROTATE = RIGHT 90
Ensure "All layers" is UNCHECKED
PSPX - PSPX6: IMAGE >>> FREE ROTATE = RIGHT 90
Ensure "All layers" is UNCHECKED
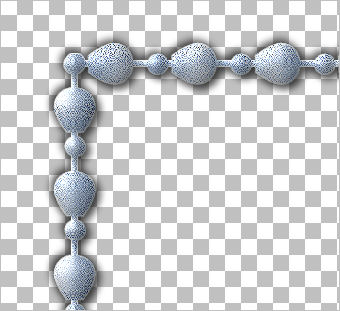
EFFECTS >>> PLUGINS >>> MuRa's Meister >>> Copies
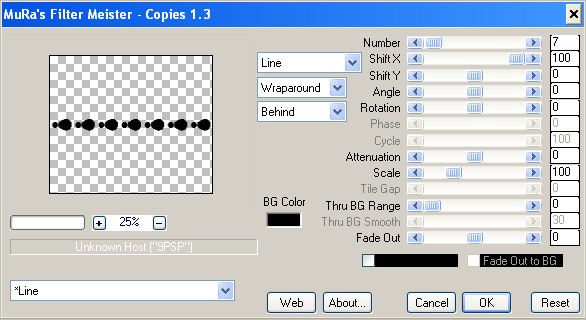
Click OK
|
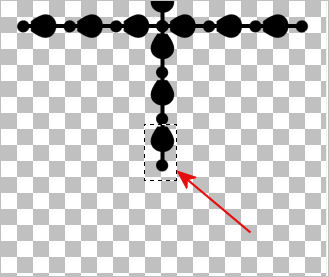
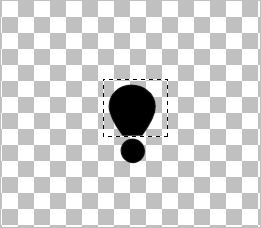
STEP 4
Choose your SELECTION TOOL
Selection Type = Rectangle
Mode = Replace
Feather = 0
Antialias = UNChecked
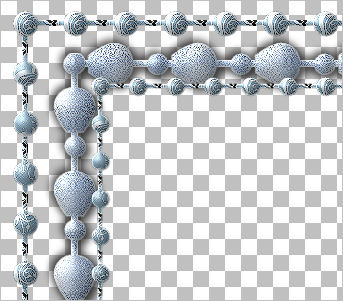
Select the part of the shape shown
|
|
STEP 5
EDIT >>> CLEAR
DESELECT
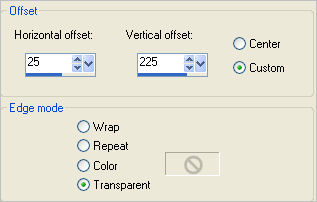
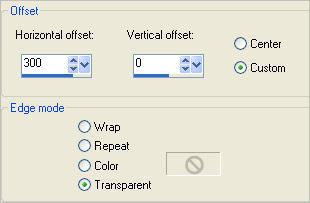
EFFECTS >>> IMAGE EFFECTS >>> OFFSET |
|
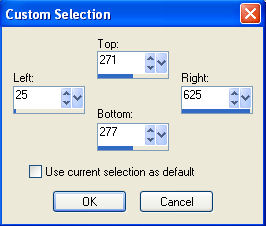
STEP 6
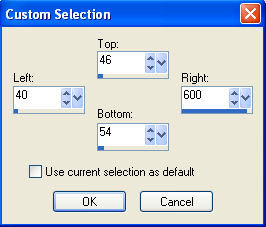
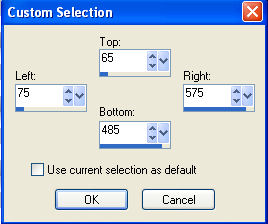
Choose your SELECTION TOOL then click on the
CUSTOM SELECTION symbol
and enter these coordinates.
|
|
STEP 7
Flood fill with BLACK
NOTE: In higher versions of PSP place your
"paint pot" over an area that is black.
Attempting to flood fill
in any of the transparent sections
won't work
DESELECT
|
|
STEP 8
LAYERS >>> DUPLICATE
PSP9: IMAGE >>> ROTATE >>> FREE ROTATE = RIGHT 90
Ensure "All layers" is UNCHECKED
PSPX - PSPX6: IMAGE >>> FREE ROTATE = RIGHT 90
Ensure "All layers" is UNCHECKED
Choose your SELECTION TOOL
Selection Type = Rectangle
Mode = Replace
Feather = 0
Antialias = UNChecked
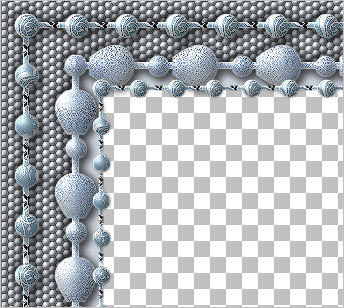
Select the part of the shape shown
|
|
STEP 9
EDIT >>> CLEAR
DESELECT
Reposition with your MOVER tool
|
|
STEP 10
LAYERS >>> DUPLICATE
IMAGE >>> FLIP
IMAGE >>> MIRROR
Reposition with your MOVER tool
|
|
STEP 11
ACTIVATE Raster 2
LAYERS >>> DUPLICATE
IMAGE >>> FLIP
IMAGE >>> MIRROR
Reposition with your MOVER tool
|
|
STEP 12
LAYERS >>> MERGE >>> MERGE VISIBLE
We now need to centre this so...
Right click on the Title Bar and select COPY from the options
Right click on the Title Bar of your frame image
and select PASTE AS NEW LAYER from the options.
Delete the Merged
layer
IMAGE >>> RESIZE = 90%
Ensure "Resize all layers" is UNCHECKED
Resample using WEIGHTED AVERAGE
|
|
STEP 13
CLOSE Raster 1
Open up the exclamation image in your PSP workspace
Right click on the Title Bar and select COPY from the options
Right click on the Title Bar of your frame image
and select PASTE AS NEW LAYER from the options.
Choose your SELECTION TOOL ...
same settings
Select the top part of the shape as shown |
|
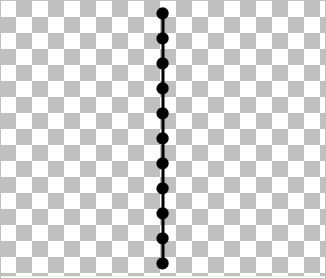
STEP 14
EDIT >>> CLEAR
DESELECT
We need to centre this...
Right click on the Title Bar and select COPY from the options
Right click on the Title Bar of your frame image
and select PASTE AS NEW LAYER from the options.
DELETE Raster 2
ACTIVATE Raster 3
EFFECTS >>> PLUGINS >>> MuRa's Meister >>> Copies
Same settings BUT...
Change the "Number" to 13
Click OK
LAYERS >>> DUPLICATE
CLOSE Raster 3
Choose your SELECTION TOOL ... same settings
Select the 2 end dots as shown
|
|
STEP 15
EDIT >>> CLEAR
DESELECT
We now need to centre this so...
Right click on the Title Bar and select COPY from the options
Right click on the Title Bar of your frame image
and select PASTE AS NEW LAYER from the options.
Delete the Copy of Raster 3 layer
|
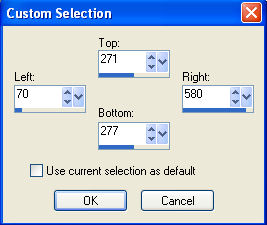
STEP 16
CLOSE Raster 2
and
With Raster 3 active
Choose your SELECTION TOOL then click on the
CUSTOM SELECTION symbol
and enter these coordinates.
|
|
STEP 17
Flood fill with BLACK
DESELECT
CLOSE Raster 3
and
OPEN & ACTIVATE Raster 2
Choose your SELECTION TOOL then click on the
CUSTOM SELECTION symbol
and enter these coordinates.
|
|
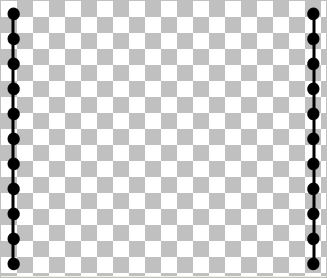
STEP 18
Flood fill with BLACK
DESELECT
PSP9: IMAGE >>> ROTATE >>> FREE ROTATE = RIGHT 90
Ensure "All layers" is UNCHECKED
PSPX - PSPX6: IMAGE >>> FREE ROTATE = RIGHT 90
Ensure "All layers" is UNCHECKED
|
|
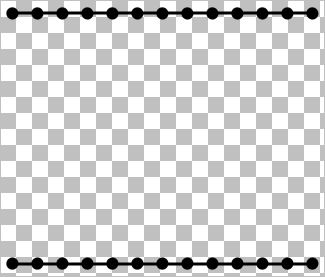
STEP 19
EFFECTS >>> IMAGE EFFECTS >>> OFFSET
|
|
STEP 20
LAYERS >>> DUPLICATE
IMAGE >>> MIRROR
LAYERS >>> MERGE >>> MERGE DOWN
|
|
STEP 21
CLOSE Raster 2
OPEN & ACTIVATE Raster 3
EFFECTS >>> IMAGE EFFECTS >>> OFFSET
|
|
STEP 22
LAYERS >>> DUPLICATE
IMAGE >>> FLIP
|
|
STEP 23
OPEN & ACTIVATE Raster 2
LAYERS >>> MERGE >>> MERGE DOWN
EDIT >>> Repeat Layer Merge Down
OPEN Raster 1
Save your work
|
|
STEP 24
CLOSE Raster 3
Activate Raster 1
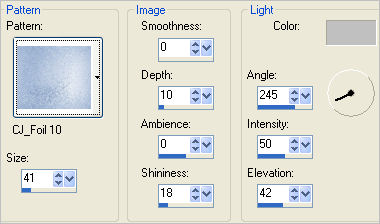
EFFECTS >>> TEXTURE EFFECTS >>> SCULPTURE
PATTERN = CJ_Foil 10
COLOUR = #c0c0c0
|
STEP 25
EFFECTS >>> EDGE EFFECTS >>> ENHANCE
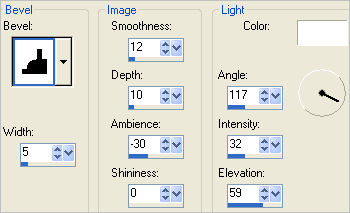
EFFECTS >>> 3D EFFECTS >>> INNER BEVEL
|
|
STEP 26
EFFECTS >>> PLUGINS >>> EYE CANDY 3 >>>
DROP SHADOW |
|
STEP 27
EDIT >>> Repeat Drop Shadow.. change DIRECTION to 135
|
|
STEP 28
OPEN &
Activate Raster 3
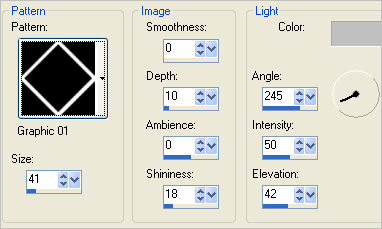
EFFECTS >>> TEXTURE EFFECTS >>> SCULPTURE
PATTERN = Graphic 01
COLOUR = #c0c0c0
|
STEP 29
EFFECTS >>> TEXTURE EFFECTS >>> SCULPTURE
PATTERN = ivy_bk005
COLOUR = #c0c0c0

|
STEP 30
EFFECTS >>> EDGE EFFECTS >>> ENHANCE
EFFECTS >>> 3D EFFECTS >>> INNER BEVEL
Same settings
|
|
STEP 31
LAYERS >>> DUPLICATE
IMAGE >>> RESIZE = 75%
Ensure "Resize all layers" is UNCHECKED
Resample using WEIGHTED AVERAGE
ADJUST >>> SHARPNESS >>> SHARPEN
|
|
STEP 32
ACTIVATE Raster 3
EFFECTS >>> PLUGINS >>> EYE CANDY 3 >>>
DROP SHADOW
Same settings
EDIT >>> Repeat Drop Shadow.. change DIRECTION to 315
LAYERS >>> NEW RASTER LAYER
LAYERS >>> ARRANGE >>> SEND TO BOTTOM
Choose your SELECTION TOOL then click on the
CUSTOM SELECTION symbol
and enter these coordinates.
|
|
STEP 33
SELECTIONS >>> INVERT
Flood fill with #cbd1da
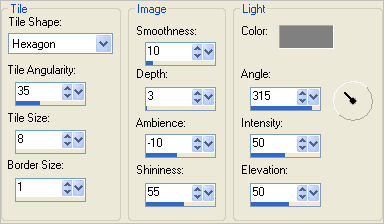
EFFECTS >>> TEXTURE EFFECTS >>> TILES
COLOUR = #808080
|
STEP 34
SELECTIONS >>> INVERT
LAYERS >>> NEW RASTER LAYER
Flood fill with #cbd1da
SELECTIONS >>> MODIFY >>> CONTRACT = 23
EDIT >>> CLEAR
DESELECT
|
|
STEP 35
EFFECTS >>> TEXTURE EFFECTS >>> BLINDS |
|
STEP 36
ACTIVATE Copy of Raster 3
EFFECTS >>> PLUGINS >>> EYE CANDY 3 >>>
DROP SHADOW
Same settings
EDIT >>> Repeat Drop Shadow.. change DIRECTION to 135
LAYERS >>> MERGE >>> MERGE VISIBLE
|
STEP 37
LAYERS >>> NEW RASTER LAYER
Flood fill with #798fb1
SELECTIONS >>> SELECT ALL
SELECTIONS >>> MODIFY >>> CONTRACT = 5
EDIT >>> CLEAR
SELECTIONS >>> INVERT
EFFECTS >>> 3D EFFECTS >>> INNER BEVEL
DESELECT
|
|
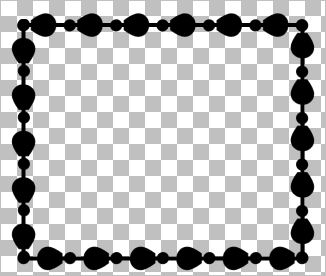
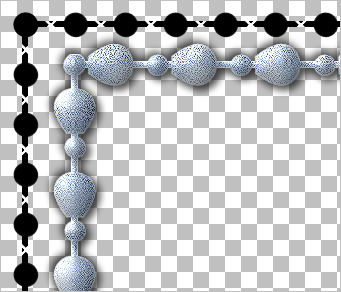
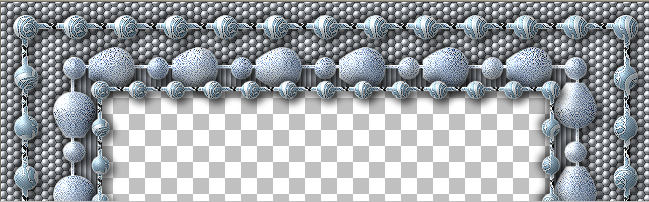
STEP 38
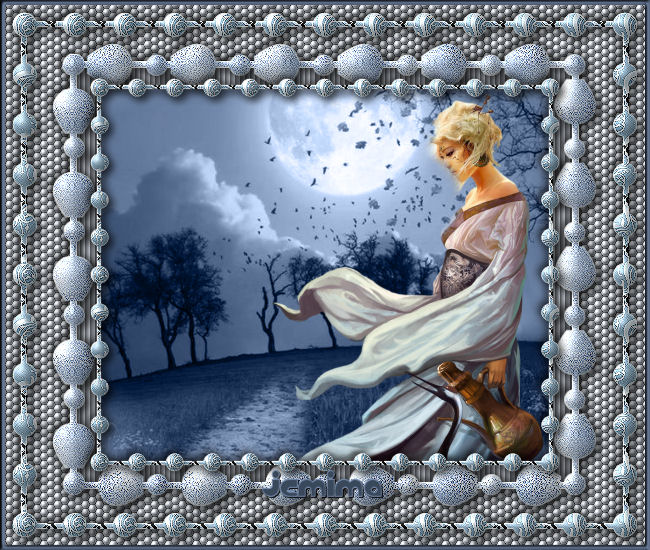
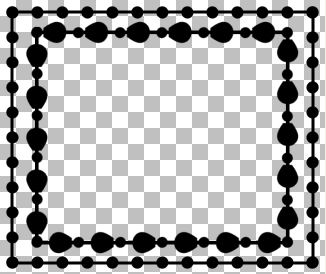
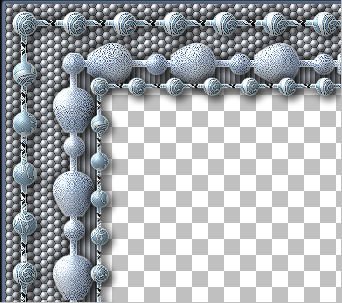
This is your frame...
LAYERS >>> MERGE >>> MERGE VISIBLE
Save as .pspimage image
|
|
STEP 39
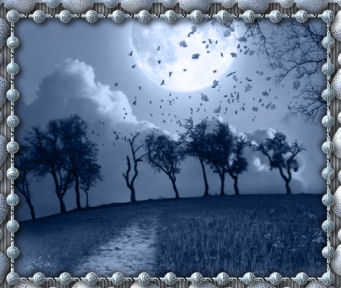
If you wish to finish off the tutorial as I did...
LAYERS >>> NEW RASTER LAYER
LAYERS >>> ARRANGE >>> MOVE DOWN
Flood fill with #798fb1
Open up the ob_b99e3c_16 image in your PSP workspace
Right click on the Title Bar and select COPY from the options
Right click on the Title Bar of your frame image
and select PASTE AS NEW LAYER from the options.
IMAGE >>> RESIZE = 85%
Ensure "Resize all layers" is UNCHECKED
Resample using WEIGHTED AVERAGE
In your LAYER PALETTE change the
BLEND MODE to LUMINANCE (L)
|
|
STEP 40
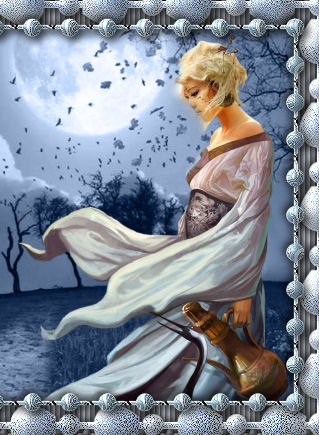
Open up the ob_043 image in your PSP workspace
Right click on the Title Bar and select COPY from the options
Right click on the Title Bar of your frame image
and select PASTE AS NEW LAYER from the options.
IMAGE >>> RESIZE = 35%
Ensure "Resize all layers" is UNCHECKED
Reposition with your MOVER tool
|
|
STEP 41
ADD your NAME
LAYERS >>> MERGE >>> MERGE ALL (Flatten)
Save as .jpg image
|
|
|
|
|
|
|