|
|
STEP 1
Open a new image 700 x 600
Transparent background
PSP9: Colour Depth = 16 Million Colors (24bit)
PSPX-X6: Colour Depth RGB = 8bits/channel
In your MATERIALS PALETTE
Load WHITE in your foreground
Load GREEN ' #06493e ' in your background
Flood fill with GREEN |
STEP 2
Open up the EasterFrameShape image in your PSP workspace
Right click on the Title Bar and select COPY from the options
Right click on the Title Bar of your frame image
and select PASTE AS NEW LAYER from the options.
IMAGE >>> RESIZE = 95 %
Ensure "Resize all layers" is UNCHECKED
Resample using WEIGHTED AVERAGE
ADJUST >>> COLOUR BALANCE >>> NEGATIVE IMAGE
PSPX - X6: IMAGE >>> NEGATIVE IMAGE
|
|
STEP 3
EFFECTS >>> IMAGE EFFECTS >>> OFFSET
Horizontal Offset = 0
Vertical Offset = 50
Edge Mode = Transparent
With your MAGIC WAND
Mode = Replace
Match Mode = RGB Value
Tolerance = 0
Feather = 0
Antialias = UNchecked
Sample Merged = UNCHECKED
PSP9 - X6: Check CONTIGUOUS
PSPX - X6: There is no " Sample Merged"
Select the area outside the frame
LAYERS >>> NEW RASTER LAYER
SELECTIONS >>> INVERT
SELECTIONS >>> MODIFY >>> CONTRACT = 6
Flood fill with WHITE
DO NOT DESELECT
CLOSE Raster 2
|
|
STEP 4
SELECTIONS >>> MODIFY >>> CONTRACT = 2
EDIT >>> CLEAR
DESELECT
|
|
STEP 5
LAYERS >>> NEW RASTER LAYER
Select your AIR BRUSH tool

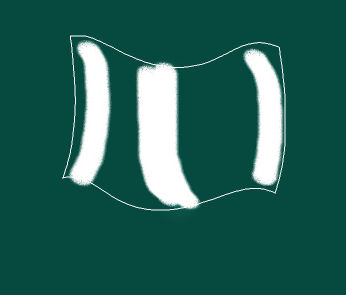
Air brush 3 areas as shown below

|
STEP 6
ADJUST >>> BLUR >>> GAUSSIAN BLUR
RADIUS = 21.00
In your LAYER PALETTE change the OPACITY to 50%
Change the BLEND MODE to SOFT LIGHT
ACTIVATE Raster 3
With your MAGIC WAND ... same settings
Select the area outside the frame
|
|
STEP 7
ACTIVATE Raster 4
Hit your DELETE key
DESELECT
LAYERS >>> MERGE >>> MERGE DOWN
In your LAYER PALETTE change the OPACITY to 50%
LAYERS >>> ARRANGE >>> MOVE DOWN
OPEN & ACTIVATE Raster 2
|
|
STEP 8
With your MAGIC WAND ... same settings
Select the area outside the frame
ACTIVATE Raster 1
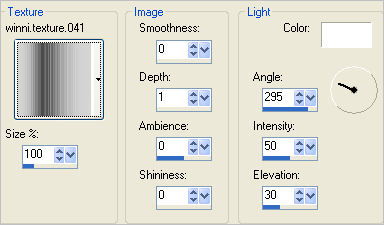
EFFECTS >>> TEXTURE EFFECTS >>> TEXTURE
TEXTURE = winni.texture.041

DESELECT
|
STEP 9
SELECTIONS >>> SELECT ALL
SELECTIONS >>> MODIFY >>> CONTRACT = 6
SELECTIONS >>> INVERT
EFFECTS >>> 3D EFFECTS >>> INNER BEVEL
|
|
STEP 10
SELECTIONS >>> INVERT
SELECTIONS >>> MODIFY >>> CONTRACT = 8
EFFECTS >>> 3D EFFECTS >>> OUTER BEVEL
|
|
STEP 11
EFFECTS >>> 3D EFFECTS >>> DROP SHADOW
Vertical & Horizontal offsets = 1
Colour = Black
Opacity = 70
Blur = 0
Repeat Drop Shadow effect changing
Vertical & Horizontal Offsets to - ( minus ) 1
Click OK
DESELECT |
|
STEP 12
ACTIVATE Raster 2
EFFECTS >>> 3D EFFECTS >>> DROP SHADOW |
|
STEP 13
ACTIVATE Raster 2
With your MAGIC WAND ... same settings
Select the area inside the frame
SELECTIONS >>> MODIFY >>> EXPAND = 6
ACTIVATE Raster 2 Shadow 1
Hit your DELETE key
DESELECT
ACTIVATE Raster 2
LAYERS >>> MERGE >>> MERGE DOWN
|
|
STEP 14
Open up the bleuesblanches image in your PSP workspace
Right click on the Title Bar and select COPY from the options
Right click on the Title Bar of your frame image
and select PASTE AS NEW LAYER from the options.
IMAGE >>> FLIP
IMAGE >>> RESIZE = 65%
Ensure "Resize all layers" is UNCHECKED
Resample using WEIGHTED AVERAGE
EFFECTS >>> IMAGE EFFECTS >>> OFFSET
|
|
STEP 15
LAYERS >>> DUPLICATE
IMAGE >>> MIRROR
LAYERS >>> MERGE >>> MERGE DOWN
ADJUST >>> SHARPNESS >>> SHARPEN
EFFECTS >>> 3D EFFECTS >>> DROP SHADOW
Use the same settings
EXCEPT
UNCHECK "Shadow on new layer"
|
|
STEP 16
Open up the 7e2009 image in your PSP workspace
Right click on the Title Bar and select COPY from the options
Right click on the Title Bar of your frame image
and select PASTE AS NEW LAYER from the options.
IMAGE >>> RESIZE = 50%
Ensure "Resize all layers" is UNCHECKED
Resample using WEIGHTED AVERAGE
EFFECTS >>> IMAGE EFFECTS >>> OFFSET |
|
STEP 17
LAYERS >>> ARRANGE >>> MOVE DOWN
EFFECTS >>> 3D EFFECTS >>> DROP SHADOW
Use the same settings
|
|
STEP 18
ACTIVATE Raster 2
Open up the Daisy22 image in your PSP workspace
Right click on the Title Bar and select COPY from the options
Right click on the Title Bar of your frame image
and select PASTE AS NEW LAYER from the options.
EFFECTS >>> IMAGE EFFECTS >>> OFFSET |
|
STEP 19
LAYERS >>> DUPLICATE
IMAGE >>> MIRROR
LAYERS >>> DUPLICATE
EFFECTS >>> IMAGE EFFECTS >>> OFFSET
|
|
STEP 20
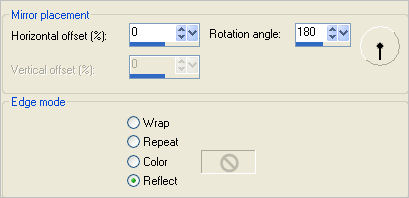
EFFECTS >>> REFLECTION EFFECTS >>> ROTATING MIRROR


|
STEP 21
LAYERS >>> MERGE >>> MERGE DOWN
EDIT >>> Repeat Layer Merge Down
EFFECTS >>> 3D EFFECTS >>> DROP SHADOW
Use the same settings
LAYERS >>> MERGE >>> MERGE DOWN
EDIT >>> Repeat Layer Merge Down
Save as .pspimage image |
|
STEP 22
Open up the Swindle_LetTheChildrenCome~AKMental_mist.psp image in your PSP workspace
Right click on the Title Bar and select COPY from the options
Right click on the Title Bar of your frame image
and select PASTE AS NEW LAYER from the options.
IMAGE >>> RESIZE = 85%
Ensure "Resize all layers" is UNCHECKED
Resample using WEIGHTED AVERAGE
ADJUST >>> SHARPNESS >>> SHARPEN
EFFECTS >>> DISTORTION EFFECTS >>> WAVE

NOTE: YOU WILL HAVE TO USE THE ABOVE "WAVE" SETTING ON ANY IMAGE
YOU WISH TO USE IN THE FRAME
|
STEP 23
EFFECTS >>> IMAGE EFFECTS >>> OFFSET |
|
STEP 24
CLOSE Raster 4
ACTIVATE Raster 2 Shadow 1
With your MAGIC WAND ... same settings
Select the inner part of the frame
SELECTIONS >>> MODIFY >>> EXPAND = 6
SELECTIONS >>> INVERT
ACTIVATE Raster 5
EDIT >>> CLEAR
DESELECT
PSP9 - PSPX2:ADJUST >>> BRIGHTNESS and CONTRAST >>> CLARIFY
Strength of effect = 5
PSPX3- PSPX6: ADJUST >>> BRIGHTNESS and CONTRAST >>> LOCAL TONE MAPPING
Mapping strength = 3
PSPX6: Block size = 8
|
STEP 25
LAYERS >>> ARRANGE >>> SEND TO BOTTOM
LAYERS >>> ARRANGE >>> MOVE UP
OPEN & ACTIVATE Raster 4
LAYERS >>> MERGE >>> MERGE VISIBLE
|
|
STEP 26
LAYERS >>> NEW RASTER LAYER
Select your TEXT tool
and with a font of your choice add your name |
|
STEP 27
LAYERS >>> MERGE >>> MERGE ALL (Flatten)
Save as .jpg image
|
|
|
|
|
|
|