STEP 1
In your MATERIALS PALETTE
Load LIGHT GREEN ' #61781a ' in your foreground
Load DARK GREEN ' #4c5530 ' in your background
Open a new image 500 x 500
Transparent background
PSP9: Colour Depth = 16 Million Colors (24bit)
PSPX-X6: Colour Depth RGB = 8bits/channel
VIEW >>> RULERS
|
STEP 2
Select your PRESET SHAPES tool
Locate Ding123

|
STEP 3
Starting at 100 pixels across and 200 pixels down
drag your cursor to 280 pixels across and 270 pixels down
and release |
|
STEP 4
PSP9: IMAGE >>> ROTATE >>> FREE ROTATE = RIGHT 90
Ensure "All layers" is UNCHECKED
PSPX - PSPX6: IMAGE >>> FREE ROTATE = RIGHT 90
Ensure "All layers" is UNCHECKED
Right click on the Title Bar and select COPY from the options
Right click on the Title Bar of your frame image
and select PASTE AS NEW LAYER from the options.
DELETE Raster 1
|
STEP 5
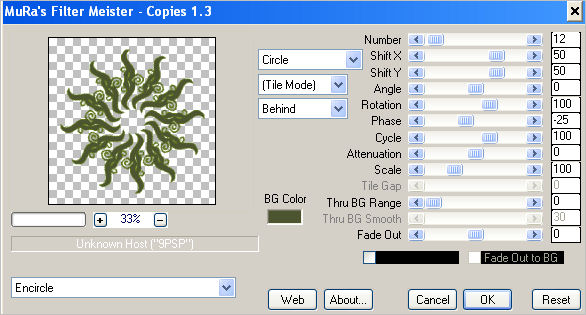
EFFECTS >>> PLUGINS >>> MuRa's Meister >>> Copies
PRESET = Encircle

|
STEP 6
Choose your SELECTION TOOL
Selection Type = Circle
Mode = Replace
Feather = 1
Antialias = Checked
Starting at 250 pixels across and 250 pixels down
drag your cursor to 375 pixels down
and release
EDIT >>> CLEAR
|
|
STEP 7
Flood fill with DARK GREEN
SELECTIONS >>> MODIFY >>> CONTRACT = 4
EDIT >>> CLEAR
Flood fill with LIGHT GREEN
SELECTIONS >>> MODIFY >>> CONTRACT = 4
EDIT >>> CLEAR
Flood fill with DARK GREEN
SELECTIONS >>> MODIFY >>> CONTRACT = 2
EDIT >>> CLEAR
DESELECT
|
|
STEP 8
EFFECTS >>> 3D EFFECTS >>> INNER BEVEL
|
|
STEP 9
EFFECTS >>> EDGE EFFECTS >>> ENHANCE
With your MAGIC WAND
Mode = Replace
Match Mode = RGB Value
Tolerance = 0
Feather = 0
Antialias = Checked
Sample Merged = UNCHECKED
PSP9 - X6: Check CONTIGUOUS
PSPX - X6: There is no " Sample Merged"
PSP9 - X6: ANTIALIAS = Outside
Select the OUTER transparent area
SELECTIONS >>> INVERT
SELECTIONS >>> MODIFY >>> CONTRACT = 4
SELECTIONS >>> INVERT
LAYERS >>> NEW RASTER LAYER
LAYERS >>> ARRANGE >>> MOVE DOWN
Flood fill with LIGHT GREEN
DESELECT
|
|
STEP 10
ACTIVATE Raster 2
With your MAGIC WAND
Same settings
Select the CENTRE transparent area
SELECTIONS >>> MODIFY >>> EXPAND = 50
LAYERS >>> NEW RASTER LAYER
LAYERS >>> ARRANGE >>> SEND TO BOTTOM
Flood fill with DARK GREEN
SELECTIONS >>> MODIFY >>> CONTRACT = 50
EDIT >>> CLEAR
DESELECT |
|
STEP 11
ACTIVATE Raster 2
EFFECTS >>> 3D EFFECTS >>> DROP SHADOW
Vertical & Horizontal offsets = 2
Colour = Black
Opacity = 70
Blur = 5.00
|
STEP 12
LAYERS >>> DUPLICATE
PSP9: IMAGE >>> ROTATE >>> FREE ROTATE = RIGHT 45
Ensure "All layers" is UNCHECKED
PSPX - PSPX6: IMAGE >>> FREE ROTATE = RIGHT 45
Ensure "All layers" is UNCHECKED
IMAGE >>> MIRROR
LAYERS >>> MERGE >>> MERGE DOWN
|
|
STEP 13
IMAGE >>> CANVAS SIZE |
|
STEP 14
ACTIVATE Raster 1
With your MAGIC WAND
Same settings
and while depressing your SHIFT key
Select the 2 OUTER transparent areas
Flood fill with LIGHT GREEN
DESELECT
|
STEP 15
ACTIVATE Raster 2
LAYERS >>> NEW RASTER LAYER
Select your PRESET SHAPES tool
Same shape and settings
Starting at 50 pixels across and 50 pixels down
drag your cursor to 200 pixels across and 150 pixels down
and release
EFFECTS >>> EDGE EFFECTS >>> ENHANCE
PSP9: IMAGE >>> ROTATE >>> FREE ROTATE = RIGHT 90
Ensure "All layers" is UNCHECKED
PSPX - PSPX6: IMAGE >>> FREE ROTATE = RIGHT 90
Ensure "All layers" is UNCHECKED
EFFECTS >>> 3D EFFECTS >>> INNER BEVEL
Same settings
Reposition with your MOVER tool |
|
STEP 16
EFFECTS >>> 3D EFFECTS >>> DROP SHADOW
Vertical & Horizontal offsets = 2
Colour = Black
Opacity = 70
Blur = 5.00
EFFECTS >>> PLUGINS >>> SIMPLE >>> TOP LEFT MIRROR
|
|
STEP 17
LAYERS >>> MERGE >>> MERGE DOWN
EFFECTS >>> PLUGINS >>> EYE CANDY 3 >>>
DROP SHADOW |
|
STEP 18
ACTIVATE Raster 1
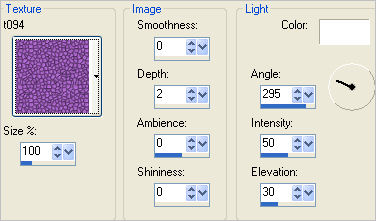
EFFECTS >>> TEXTURE EFFECTS >>> TEXTURE
TEXTURE = t094
 |
STEP 19
EFFECTS >>> TEXTURE EFFECTS >>> BLINDS |
|
STEP 20
SELECTIONS >>> SELECT ALL
SELECTIONS >>> MODIFY >>> CONTRACT = 25
SELECTIONS >>> INVERT
EFFECTS >>> 3D EFFECTS >>> INNER BEVEL
|
|
STEP 21
EFFECTS >>> ARTISTIC EFFECTS >>> HALF TONE
Color Scheme Ink =
LIGHT GREEN #61781a
Color Scheme Background = DARK GREEN #4c5530
|
|
STEP 22
ADJUST >>> SHARPNESS >>> SHARPEN MORE
EFFECTS >>> 3D EFFECTS >>> DROP SHADOW
Vertical & Horizontal offsets = 1
Colour = Black
Opacity = 100
Blur = 0
Repeat Drop Shadow effect changing
Vertical & Horizontal Offsets to - ( minus ) 1
Click OK
DESELECT
|
STEP 23
Open up the LorieM_DoodleC9_d1.png image
in your PSP workspace
Right click on the Title Bar and select COPY from the options
Right click on the Title Bar of your frame image
and select PASTE AS NEW LAYER from the options.
IMAGE >>> RESIZE = 50%
Ensure "Resize all layers" is UNCHECKED
Resample using WEIGHTED AVERAGE
EFFECTS >>> IMAGE EFFECTS >>> OFFSET
|
|
STEP 24
EFFECTS >>> 3D EFFECTS >>> DROP SHADOW
Vertical & Horizontal offsets = 2
Colour = Black
Opacity = 100
Blur = 0
LAYERS >>> DUPLICATE
IMAGE >>> MIRROR
LAYERS >>> MERGE >>> MERGE DOWN
LAYERS >>> DUPLICATE
IMAGE >>> RESIZE = 99%
Ensure "Resize all layers" is UNCHECKED
Resample using WEIGHTED AVERAGE
LAYERS >>> MERGE >>> MERGE DOWN
|
|
STEP 25
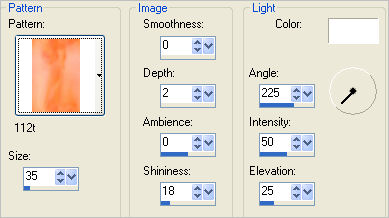
EFFECTS >>> TEXTURE EFFECTS >>> SCULPTURE
PATTERN = 112t
 |
STEP 26
EFFECTS >>> 3D EFFECTS >>> DROP SHADOW
Vertical & Horizontal offsets = 2
Colour = Black
Opacity = 100
Blur = 0
LAYERS >>> MERGE >>> MERGE VISIBLE
Save as .pspimage image
|
|
STEP 27
LAYERS >>> NEW RASTER LAYER
Flood fill with #d18c59
LAYERS >>> ARRANGE >>> MOVE DOWN
Open up the 1pippin_eloisewilkin_kid1 image
in your PSP workspace
Right click on the Title Bar and select COPY from the options
Right click on the Title Bar of your frame image
and select PASTE AS NEW LAYER from the options.
IMAGE >>> RESIZE = 50%
Ensure "Resize all layers" is UNCHECKED
Resample using WEIGHTED AVERAGE
ADJUST >>> SHARPNESS >>> SHARPEN
EFFECTS >>> PLUGINS >>> EYE CANDY 3 >>>
DROP SHADOW
Same settings
Reposition with your MOVER tool
|
|
STEP 28
LAYERS >>> MERGE >>> MERGE VISIBLE
LAYERS >>> NEW RASTER LAYER
Select your TEXT tool
and with a font of your choice add your name
LAYERS >>> MERGE >>> MERGE ALL (Flatten)
Save as .jpg image
|
|
|
|
|