STEP 1
In your MATERIALS PALETTE
Load DARK BLUE ' #0e3b55 ' in your foreground
Load LIGHT BLUE ' #3ab1f6 ' in your background
Select the 'gradient' option on your foreground,
locate the 'Foreground-background' gradient
and use these settings. |
|
STEP 2
Open a new image 700 x 500
Transparent background
PSP9: Colour Depth = 16 Million Colors (24bit)
PSPX-X6: Colour Depth RGB = 8bits/channel
VIEW >>> RULERS
Flood fill with Gradient
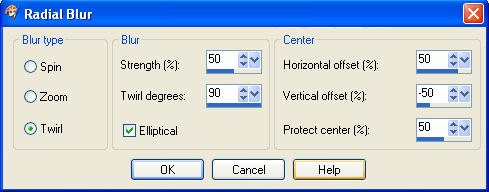
ADJUST >>> BLUR >>> RADIAL BLUR

|
STEP 3
EFFECTS >>> TEXTURE EFFECTS >>> BLINDS |
|
STEP 4
SELECTIONS >>> SELECT ALL
SELECTIONS >>> MODIFY >>> CONTRACT = 20
EFFECTS >>> 3D EFFECTS >>> OUTER BEVEL
|
|
STEP 5
EDIT >>> Repeat Outer Bevel
DESELECT
SELECTIONS >>> SELECT ALL
SELECTIONS >>> MODIFY >>> CONTRACT = 3
SELECTIONS >>> INVERT
Flood fill with DARK BLUE
DESELECT
|
|
STEP 6
Open up the abstractwallpaper image in your PSP workspace
Right click on the Title Bar and select COPY from the options
Right click on the Title Bar of your frame image
and select PASTE AS NEW LAYER from the options.
IMAGE >>> RESIZE = 85%
Ensure "Resize all layers" is UNCHECKED
Resample using WEIGHTED AVERAGE
SELECTIONS >>> SELECT ALL
SELECTIONS >>> FLOAT
SELECTIONS >>> DEFLOAT
EFFECTS >>> TEXTURE EFFECTS >>> FUR
|
|
STEP 7
LAYERS >>> NEW RASTER LAYER
Flood fill with Gradient
SELECTIONS >>> MODIFY >>> CONTRACT = 3
EDIT >>> CLEAR
DESELECT
LAYERS >>> MERGE >>> MERGE DOWN
|
|
STEP 8
LAYERS >>> DUPLICATE
IMAGE >>> RESIZE = 75%
Ensure "Resize all layers" is UNCHECKED
Resample using WEIGHTED AVERAGE
SELECTIONS >>> SELECT ALL
SELECTIONS >>> FLOAT
SELECTIONS >>> DEFLOAT
SELECTIONS >>> MODIFY >>> CONTRACT = 20
EFFECTS >>> 3D EFFECTS >>> OUTER BEVEL
Same settings
EDIT >>> Repeat Outer Bevel
EDIT >>> CLEAR
DESELECT
|
|
STEP 9
LAYERS >>> DUPLICATE
PSP9: IMAGE >>> ROTATE >>> FREE ROTATE = RIGHT 90
Ensure "All layers" is UNCHECKED
PSPX - PSPX6: IMAGE >>> FREE ROTATE = RIGHT 90
Ensure "All layers" is UNCHECKED
Select your RASTER DEFORM tool
Mode = SCALE
use default settings
PSPX - X6:Select your PICK tool
Drag the centre top node down
on your left ruler
so that the light blue border is still showing
|
|
STEP 10
Drag the centre bottom node up
on your left ruler
so that the light blue border is still showing
Click the RESET RECTANGLE arrow
Select another tool to disengage the
DEFORMATION / PICK TOOL
|
|
STEP 11
With your MAGIC WAND
Mode = Replace
Match Mode = RGB Value
Tolerance = 0
Feather = 0
Antialias = UNchecked
Sample Merged = UNCHECKED
PSP9 - X6: Check CONTIGUOUS
PSPX - X6: There is no " Sample Merged"
Select the CENTRE area of your image
ACTIVATE Raster 2
EDIT >>> CLEAR
ACTIVATE Raster 1
EDIT >>> CLEAR
DESELECT
(ADJUST Copy (2) of Raster 2 with your
DEFORMATION / PICK TOOL
if necessary)
|
|
STEP 12
ACTIVATE Copy (2) of Raster 2
EFFECTS >>> PLUGINS >>> EYE CANDY 3 >>>
DROP SHADOW
|
|
STEP 13
ACTIVATE Copy of Raster 2
EDIT >>> Repeat Drop Shadow..
ACTIVATE Raster 2
EDIT >>> Repeat Drop Shadow..
EDIT >>> Repeat Drop Shadow.. change DIRECTION to 135
ACTIVATE Copy of Raster 2
EDIT >>> Repeat Drop Shadow..
ACTIVATE Copy (2) of Raster 2
EDIT >>> Repeat Drop Shadow
|
|
STEP 14
Choose your SELECTION TOOL then click on the
CUSTOM SELECTION symbol
and enter these coordinates. |
|
STEP 15
Still on Copy (2) of Raster 2
EDIT >>> CLEAR
ACTIVATE Copy of Raster 2
EDIT >>> CLEAR
ACTIVATE Raster 2
EDIT >>> CLEAR
DESELECT
LAYERS >>> MERGE >>> MERGE VISIBLE
|
|
STEP 16
Open up the Columbines-mull image in your PSP workspace
Right click on the Title Bar and select COPY from the options
Right click on the Title Bar of your frame image
and select PASTE AS NEW LAYER from the options.
Reposition to the left with your MOVER tool
|
|
STEP 17
LAYERS >>> DUPLICATE
IMAGE >>> MIRROR
LAYERS >>> MERGE >>> MERGE DOWN
EFFECTS >>> PLUGINS >>> EYE CANDY 3 >>>
DROP SHADOW
Same settings
EDIT >>> Repeat Drop Shadow.. change DIRECTION to 315
LAYERS >>> MERGE >>> MERGE VISIBLE
Save as .pspimage image
|
|
|
|
STEP 18
LAYERS >>> NEW RASTER LAYER
Flood fill with TEAL #69b7b4
LAYERS >>> ARRANGE >>> MOVE DOWN
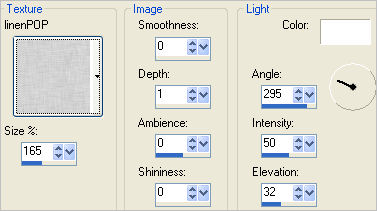
EFFECTS >>> TEXTURE EFFECTS >>> TEXTURE
TEXTURE = linenPOP

|
STEP 19
Open up the libellulegraphisme_antiquated image
in your PSP workspace
Right click on the Title Bar and select COPY from the options
Right click on the Title Bar of your frame image
and select PASTE AS NEW LAYER from the options.
IMAGE >>> RESIZE = 40%
Ensure "Resize all layers" is UNCHECKED
Resample using WEIGHTED AVERAGE
LAYERS >>> DUPLICATE
LAYERS >>> MERGE >>> MERGE VISIBLE
|
|
STEP 20
LAYERS >>> NEW RASTER LAYER
Select your TEXT tool
and with a font of your choice add your name
LAYERS >>> MERGE >>> MERGE ALL (Flatten)
Save as .jpg image
|
|
|
|
|
|
|