STEP 1
In your MATERIALS PALETTE
Load DARK RED ' #6e0808 ' in your foreground
Load PINK ' #f68c8c ' in your background
Select the 'gradient' option on your foreground,
locate the 'Foreground-background' gradient
and use these settings. |
|
STEP 2
Open a new image 700 x 600
Transparent background
PSP9: Colour Depth = 16 Million Colors (24bit)
PSPX-X6: Colour Depth RGB = 8bits/channel
Flood fill with PINK
LAYERS >>> NEW RASTER LAYER
Flood fill with the gradient
VIEW >>> RULERS
|
STEP 3
LAYERS >>> NEW MASK LAYER >>> FROM IMAGE |
|
STEP 4
LAYERS >>> MERGE >>> MERGE GROUP
In your LAYER PALETTE change the
BLEND MODE to DIFFERENCE
Choose your SELECTION TOOL
Selection Type = Circle
Mode = Replace
Feather = 2
Antialias = Checked
Place your cursor on the black dot and
drag down to the 430 mark on your left ruler,
then release.
|
|
STEP 5
EDIT >>> CLEAR
DESELECT
IMAGE >>> RESIZE = 85%
Ensure "Resize all layers" is UNCHECKED
Resample using WEIGHTED AVERAGE
LAYERS >>> DUPLICATE
Choose your SELECTION TOOL then click on the
CUSTOM SELECTION
symbol
and enter these coordinates.
|
|
STEP 6
LAYERS >>> NEW RASTER LAYER
EFFECTS >>> PLUGINS >>> EYE CANDY 3 >>>
DROP SHADOW |
|
STEP 7
EDIT >>> Repeat Drop Shadow..
change DIRECTION to 135
DESELECT
|
|
STEP 8
ACTIVATE Raster 1
SELECTIONS >>> SELECT ALL
SELECTIONS >>> MODIFY >>> CONTRACT = 12
EFFECTS >>> 3D EFFECTS >>> OUTER BEVEL
|
|
STEP 9
SELECTIONS >>> MODIFY >>> CONTRACT = 12
EFFECTS >>> 3D EFFECTS >>> OUTER BEVEL
Same settings
SELECTIONS >>> MODIFY >>> CONTRACT = 12
EFFECTS >>> 3D EFFECTS >>> OUTER BEVEL
Same settings
BUT
Change AMBIENCE to 0
|
STEP 10
SELECTIONS >>> INVERT
EFFECTS >>> 3D EFFECTS >>> DROP SHADOW
Vertical & Horizontal offsets = 2
Colour = Black
Opacity = 70
Blur = 0
Repeat Drop Shadow effect changing
Vertical & Horizontal Offsets to - (minus)2
Click OK
ADJUST >>> SHARPNESS >>> SHARPEN MORE
SELECTIONS >>> INVERT |
|
STEP 11
SELECTIONS >>> MODIFY >>> CONTRACT = 10
EFFECTS >>> TEXTURE EFFECTS >>> BLINDS
COLOUR = #202020
DESELECT
|
|
STEP 12
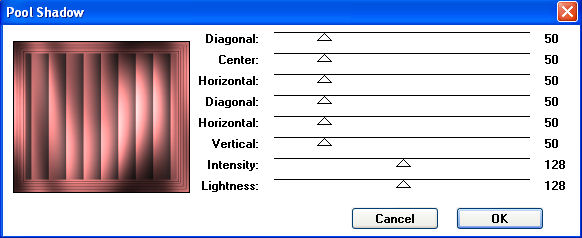
EFFECTS >>> PLUGINS >>> Greg's Factory Output Vol II >>> Pool Shadow
 |
STEP 13
ACTIVATE Group - Raster 2
EFFECTS >>> 3D EFFECTS >>> DROP SHADOW
Vertical & Horizontal offsets = 2
Colour = Black
Opacity = 70
Blur = 0
In your LAYER PALETTE change the BLEND MODE to DODGE
ACTIVATE Copy of Group - Raster 2
EFFECTS >>> 3D EFFECTS >>> DROP SHADOW
Vertical & Horizontal offsets = 2
Colour = WHITE
Opacity = 70
Blur = 0
ADJUST >>> SHARPNESS >>> SHARPEN
|
|
STEP 14
With your MAGIC WAND
Mode = Replace
Match Mode = RGB Value
Tolerance = 0
Feather = 2
Antialias = UNchecked
Sample Merged = UNCHECKED
PSP9 - X6: Check CONTIGUOUS
PSPX - X6: There is no " Sample Merged"
PSP9 - X6: ANTIALIAS = Outside
PSP9 - X6: ANTIALIAS = Inside
Select the circle
|
|
STEP 15
ACTIVATE Raster 1
LAYERS >>> NEW RASTER LAYER
SELECTIONS >>> MODIFY >>> EXPAND = 4
SELECTIONS >>> INVERT
EFFECTS >>> PLUGINS >>> EYE CANDY 3 >>>
DROP SHADOW
|
|
STEP 16
SELECTIONS >>> INVERT
SELECTIONS >>> MODIFY >>> CONTRACT = 4
ACTIVATE Raster 1
EDIT >>> CLEAR
DESELECT |
|
STEP 17
ACTIVATE Raster 2
LAYERS >>> ARRANGE >>> MOVE DOWN (Twice)
LAYERS >>> MERGE >>> MERGE DOWN
ACTIVATE Copy of Group - Raster 2
LAYERS >>> NEW RASTER LAYER
Choose your SELECTION TOOL
Selection Type = Circle
Mode = Replace
Feather = 1
Antialias = Checked
Starting at 460 pixels across and 240 pixels down
drag your cursor to 420 pixels down and release
Flood fill with the gradient
|
|
STEP 18
SELECTIONS >>> MODIFY >>> CONTRACT = 15
EDIT >>> CLEAR
DESELECT |
|
STEP 19
EFFECTS >>> 3D EFFECTS >>> INNER BEVEL
LAYERS >>> MERGE >>> MERGE VISIBLE
Save as .pspimage image
|
|
|
|
|
|
STEP 20
Open up the Liv-tyler-painting-by-shorra image
in your PSP workspace
Right click on the Title Bar and select COPY from the options
Right click on the Title Bar of your frame image
and select PASTE AS NEW LAYER from the options.
LAYERS >>> ARRANGE >>> MOVE DOWN
Reposition with your MOVER tool
|
|
STEP 21
LAYERS >>> MERGE >>> MERGE VISIBLE
LAYERS >>> NEW RASTER LAYER
Select your TEXT tool
and with a font of your choice add your name
LAYERS >>> MERGE >>> MERGE ALL (Flatten)
Save as .jpg image
|
|
|
|
|
|
|