STEP 1
Open up the template2013 image in your PSP workspace
WINDOW >>> DUPLICATE
Close the original Image
LAYERS >>> NEW RASTER LAYER
Flood fill with BLUE #1092f6
LAYERS >>> ARRANGE >>> SEND TO BOTTOM |
STEP 2
ACTIVATE the Outer layer
With your MAGIC WAND
Mode = Replace
Match Mode = RGB Value
Tolerance = 0
Feather = 0
Antialias = UNchecked
Sample Merged = UNCHECKED
PSP9 - X3: Check CONTIGUOUS
PSPX - X6: There is no " Sample Merged"
PSPX - X6: Use all layers = UNChecked
Click in the CENTRE of your image |
|
STEP 3
ACTIVATE Raster 1
LAYERS >>> NEW RASTER LAYER
Flood fill with BLUE #1092f6
LAYERS >>> ARRANGE >>> MOVE DOWN
EFFECTS >>> TEXTURE EFFECTS >>> SCULPTURE
COLOUR = #1092f6
PATTERN = snowflake00
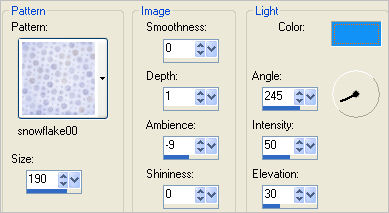
ADJUST >>> SHARPNESS >>> SHARPEN
DESELECT

|
STEP 4
Open up the rudolph-the-rednosed-reindeer image
in your PSP workspace
WINDOW >>> DUPLICATE
Close the original Image
IMAGE >>> RESIZE = 234 X 185 pixels
Ensure "Resize all layers" is CHECKED
"Lock aspect ratio" = UNCHECKED
Resample using WEIGHTED AVERAGE
ADJUST >>> SHARPNESS >>> SHARPEN
Minimize for now |
|
STEP 5
Open up the DavidWenzel-Rudolph image
in your PSP workspace
WINDOW >>> DUPLICATE
Close the original Image
IMAGE >>> RESIZE
Same settings
ADJUST >>> SHARPNESS >>> SHARPEN
Minimize for now |
|
STEP 6
Open up the DavidWenzel-Rudolph0 image
in your PSP workspace
WINDOW >>> DUPLICATE
Close the original Image
IMAGE >>> RESIZE
Same settings
ADJUST >>> SHARPNESS >>> SHARPEN
Right click on the Title Bar and select COPY from the options |
|
STEP 7
Back to your tag image
ACTIVATE the bottom right layer
With your MAGIC WAND.... Same settings.
Click in the CENTRE of the bottom right 'box' to select |
|
STEP 8
LAYERS >>> NEW RASTER LAYER
Right click on the Title Bar of your tag image
and select PASTE INTO SELECTION from the options.
LAYERS >>> ARRANGE >>> MOVE DOWN
|
|
STEP 9
SELECTIONS >>> INVERT
EFFECTS >>> PLUGINS >>> EYE CANDY 3 >>>
DROP SHADOW |
|
STEP 10
EDIT >>> Repeat Drop Shadow..
change DIRECTION to 135
DESELECT
Save you tag image as a .pspimage
so you don't lose your work |
|
STEP 11
Maximize the copy of the DavidWenzel-Rudolph image
(The one with Santa)
Right click on the Title Bar and select COPY from the options
Back to your tag image
ACTIVATE the Centre layer
With your MAGIC WAND.... Same settings.
Click in the CENTRE of the centre 'box' to select
|
|
STEP 12
LAYERS >>> NEW RASTER LAYER
Right click on the Title Bar of your tag image
and select PASTE INTO SELECTION from the options.
LAYERS >>> ARRANGE >>> MOVE DOWN
SELECTIONS >>> INVERT
EFFECTS >>> PLUGINS >>> EYE CANDY 3 >>>
DROP SHADOW
Same settings
EDIT >>> Repeat Drop Shadow..
change DIRECTION to 315
DESELECT |
|
STEP 13
Maximize the copy of the DavidWenzel-Rudolph0 image
(The one with the reindeer sitting on the 'snowy rock'(?))
Right click on the Title Bar and select COPY from the options
Back to your tag image
ACTIVATE the Top left layer
With your MAGIC WAND.... Same settings.
Click in the CENTRE of the Top left 'box' to select |
|
STEP 14
LAYERS >>> NEW RASTER LAYER
Right click on the Title Bar of your tag image
and select PASTE INTO SELECTION from the options.
LAYERS >>> ARRANGE >>> MOVE DOWN
SELECTIONS >>> INVERT
EFFECTS >>> PLUGINS >>> EYE CANDY 3 >>>
DROP SHADOW
Same settings
EDIT >>> Repeat Drop Shadow..
change DIRECTION to 135
DESELECT |
|
STEP 15
ACTIVATE the Outer layer
EFFECTS >>> TEXTURE EFFECTS >>> SCULPTURE
COLOUR = WHITE
PATTERN = goldfold2
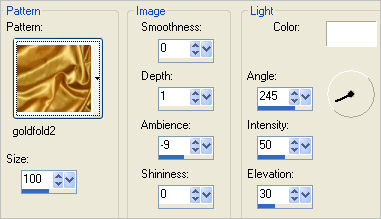
|
STEP 16
ACTIVATE the Top left layer
EDIT >>> Repeat Sculpture
ACTIVATE the Bottom right layer
EDIT >>> Repeat Sculpture
ACTIVATE the Centre layer
EDIT >>> Repeat Sculpture |
|
STEP 17
Still on the Centre layer
With your MAGIC WAND.... Same settings.
Select the area outside the gold frame
SELECTIONS >>> INVERT |
|
STEP 18
EFFECTS >>> PLUGINS >>> EYE CANDY 3 >>>
DROP SHADOW
Same settings
EDIT >>> Repeat Drop Shadow.. change DIRECTION to 315
DESELECT |
|
STEP 19
ACTIVATE the Bottom right layer
Repeat Step 17
THEN
EFFECTS >>> PLUGINS >>> EYE CANDY 3 >>> DROP SHADOW
Same settings
CHANGE DIRECTION to 135
DESELECT
ACTIVATE the Top left layer
Repeat Step 17
THEN
EFFECTS >>> PLUGINS >>> EYE CANDY 3 >>> DROP SHADOW
Same settings
CHANGE DIRECTION to 315
DESELECT |
STEP 20
ACTIVATE the Outer layer
With your MAGIC WAND.... Same settings.
Select the area inside the gold frames |
|
STEP 21
SELECTIONS >>> INVERT
EFFECTS >>> PLUGINS >>> EYE CANDY 3 >>>
DROP SHADOW
Same settings
EDIT >>> Repeat Drop Shadow
CHANGE DIRECTION to 135
DESELECT |
|
STEP 22
ACTIVATE the Centre layer
Open up the CGS~3D_2008Christmas07-mac image
in your PSP workspace
Right click on the Title Bar and select COPY from the options
Right click on the Title Bar of your tag image
and select PASTE AS NEW LAYER from the options.
IMAGE >>> RESIZE = 35%
Ensure "Resize all layers" is UNCHECKED
Resample using WEIGHTED AVERAGE
ADJUST >>> SHARPNESS >>> SHARPEN
EFFECTS >>> PLUGINS >>> EYE CANDY 3 >>>
DROP SHADOW
Same settings
Reposition with your MOVER tool |
|
STEP 23
Open up the believe.png image in your PSP workspace
Right click on the Title Bar and select COPY from the options
Right click on the Title Bar of your tag image
and select PASTE AS NEW LAYER from the options.
IMAGE >>> RESIZE = 30%
Ensure "Resize all layers" is UNCHECKED
Resample using WEIGHTED AVERAGE
ADJUST >>> COLOUR BALANCE >>> NEGATIVE IMAGE
PSPX - X6: IMAGE >>> NEGATIVE IMAGE
EFFECTS >>> 3D EFFECTS >>> DROP SHADOW
Vertical & Horizontal offsets = 1
Colour = Black
Opacity = 100
Blur = 0
LAYERS >>> DUPLICATE
LAYERS >>> MERGE >>> MERGE DOWN
EFFECTS >>> PLUGINS >>> EYE CANDY 3 >>>
DROP SHADOW
Same settings
Reposition with your MOVER tool |
|
STEP 24
LAYERS >>> NEW RASTER LAYER
Select your TEXT TOOL
with font and settings of your choice
add your name next to the wordart
LAYERS >>> MERGE >>> MERGE DOWN |
|
STEP 25
ACTIVATE Raster 1
Right click on Title Bar and select
Copy from the options
In ANIMATION SHOP
Right click the workspace and select
'Paste As New Animation' from the options.
Depress your CTRL key and press the letter L
9 times
so that you have 10 frames total.
These are the BACKGROUND frames
|
STEP 26
Back to PSP.
Set up LAYER PALETTE as shown
Right click on Title Bar and select
Copy merged from the options
|
|
STEP 27
In ANIMATION SHOP
Right click the workspace and select
'Paste As New Animation' from the options.
Depress your CTRL key and press the letter L 9 times
so that you have 10 frames total.
These are the TOP IMAGE frames
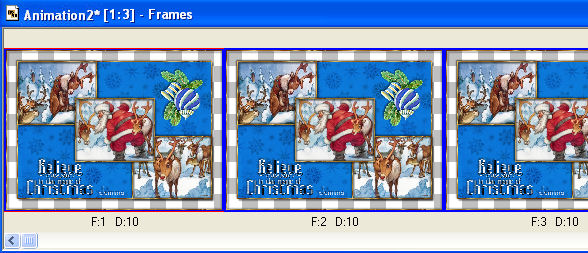
|
STEP 28
Still in ANIMATION SHOP
FILE >>> OPEN
Locate the snow-layers-xlge.psp file
Click OPEN
|
|
STEP 29
Edit >> Select All
Edit >> Copy
Edit >> Propagate Paste
ACTIVATE the BACKGROUND frames
Edit >> Select All
Edit >> Paste into selected frame
ZOOM in on the first frame (F:1)
and place the image as shown
then click your mouse button
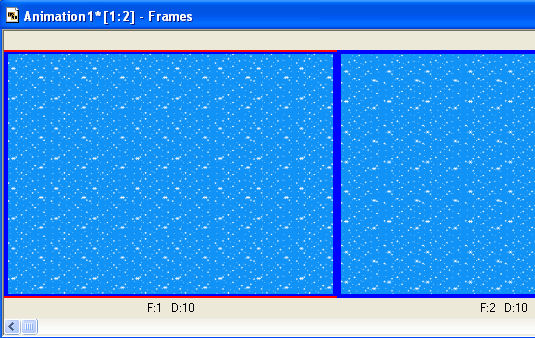
|
STEP 30
ACTIVATE the TOP IMAGE frames
Edit >> Select All
Edit >> Copy
Edit >> Propagate Paste
ACTIVATE the BACKGROUND frames
Edit >> Paste into selected frame
ZOOM in on the first frame (F:1) and place the image as shown
then click your mouse button
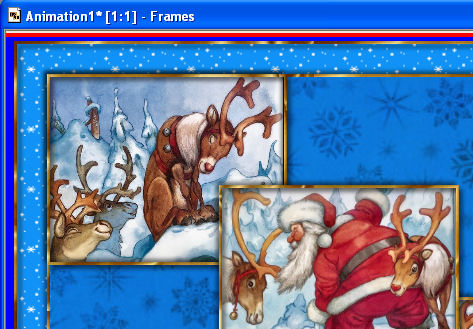
|
STEP 31
View >> Animation
and while it is still running,
File >> Save As
Locate the folder in which you wish to save it.
Name your animation.
With the Gif Optimiser keep pressing NEXT
until you get to the last one... click FINISH
Close the Animation
Close the frames.
Close Animation Shop |
|
|
|
|
|
|