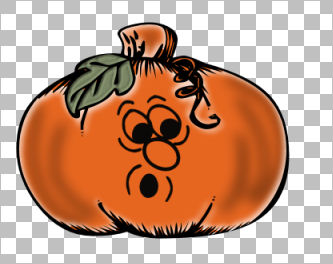
STEP 1
Open a new image 500 x 450
Transparent background
PSPX - X2: Colour Depth = 8bits/channel
PSPX3 - X6: Colour Depth RGB = 8bits/channel
VIEW >>> RULERS
|
STEP 2
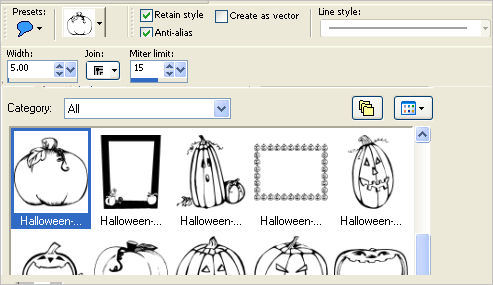
Select your PRESET SHAPES tool
LINE STYLE = + Solid
JOIN = Miter Join
SHAPE = Halloween-002-09_Lavender
(NOTE: In some higher versions of PSP the "Width" option may not show BUT by using
"Retain style" will add the image correctly.)
|
STEP 3
Starting at 80 pixels across and 30 pixels down
drag your cursor to 420 pixels across and 300 pixels down
and release |
|
STEP 4
With your MAGIC WAND
Mode = Replace
Match Mode = RGB Value
Tolerance = 0
Feather = 0
Antialias = Checked (Outside)
Sample Merged = UNCHECKED
PSP9 - X6: Check CONTIGUOUS
PSPX - X6: There is no " Sample Merged"
PSPX - X6: Use all layers = UNChecked
Select the OUTER transparent area
SELECTIONS >>> INVERT
SELECTIONS >>> MODIFY >>> CONTRACT = 2
LAYERS >>> NEW RASTER LAYER
LAYERS >>> ARRANGE >>> MOVE DOWN
Flood fill with ORANGE #e66620
DO NOT DESELECT
|
|
STEP 5
In your MATERIALS PALETTE
Load BLACK in your foreground
LAYERS >>> NEW RASTER LAYER
Select your PAINT BRUSH tool
PRESET = +Round 05
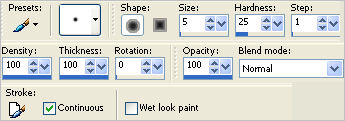
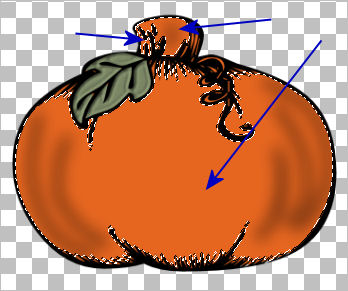
Draw some curved lines at each side of the pumpkin
and
one at the TOP as shown
|
|
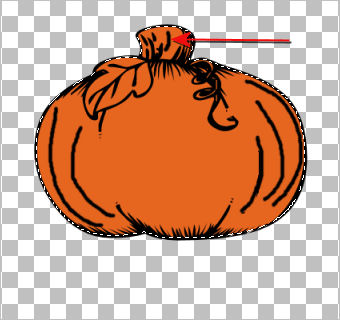
STEP 6
ADJUST >>> BLUR >>> GAUSSIAN BLUR
Radius = 8.00
DESELECT
ACTIVATE Raster 1
With your MAGIC WAND.... Same settings.
and while depressing your SHIFT KEY...
Select the leaf
SELECTIONS >>> MODIFY >>> EXPAND = 1
|
|
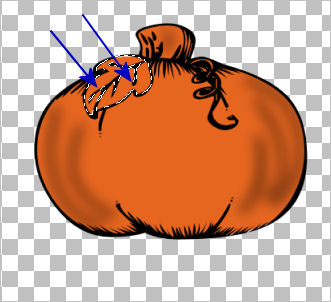
STEP 7
LAYERS >>> NEW RASTER LAYER
LAYERS >>> ARRANGE >>> MOVE DOWN
Flood fill with GREEN #a2b186
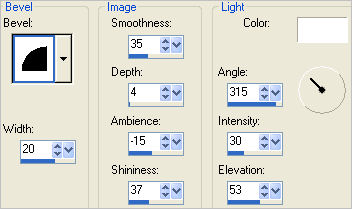
EFFECTS >>> 3D EFFECTS >>> INNER BEVEL
|
|
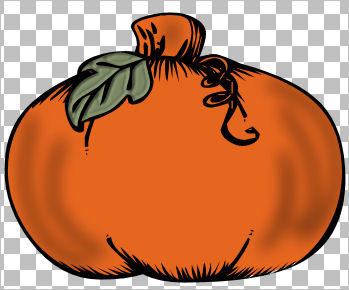
STEP 8
DESELECT |
|
STEP 9
ACTIVATE Raster 1
LAYERS >>> MERGE >>> MERGE DOWN
With your MAGIC WAND.... Same settings.
BUT change the TOLERANCE to 2
and while depressing your SHIFT KEY...
Select the areas shown
|
|
STEP 10
SELECTIONS >>> MODIFY >>> EXPAND = 2
LAYERS >>> NEW RASTER LAYER
LAYERS >>> ARRANGE >>> MOVE DOWN
SELECTIONS >>> INVERT
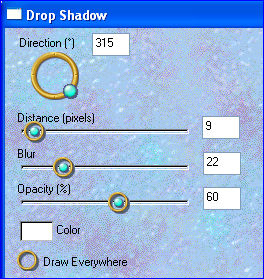
EFFECTS >>> 3D EFFECTS >>> DROP SHADOW
Vertical & Horizontal offsets = 4
Colour = WHITE
Opacity = 70
Blur = 10.00
Repeat Drop Shadow effect changing
Vertical & Horizontal Offsets to - ( minus ) 4
Click OK
DESELECT
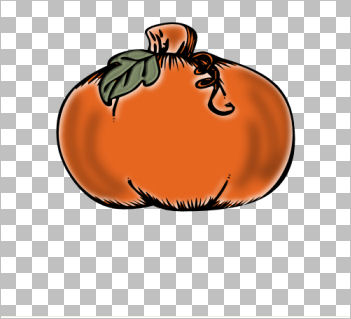
LAYERS >>> MERGE >>> MERGE VISIBLE
Rename this layer Pumpkin
|
|
NOTE:
PSPX3-PSPX6 TIP: These versions have a very different way of adding text
However if you hold down the shift key when
clicking on the A (Text Tool) the box will show up as other versions
otherwise type the text and then click on the apply changes
(green button in the tools options next to presets)
|
STEP 11
LAYERS >>> NEW RASTER LAYER
In your MATERIALS PALETTE
Load BLACK in the foreground AND background
Select your TEXT tool
FONT = Face off!
(NOTE: In versions PSPX - X6 you will have to adjust the "Size" to make it fit.
IE: Make it
a higher setting)
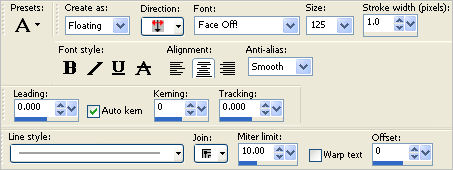
Enter the letter " k " in the TEXT BOX
Click APPLY
|
STEP 12
Reposition as shown and DESELECT |
|
STEP 13
With your MAGIC WAND.... Same settings.
Select the eyes as shown
SELECTIONS >>> MODIFY >>> EXPAND = 2
LAYERS >>> NEW RASTER LAYER
LAYERS >>> ARRANGE >>> MOVE DOWN
|
|
STEP 14
Flood fill with WHITE
EFFECTS >>> 3D EFFECTS >>> INNER BEVEL
|
|
STEP 15
DESELECT
ACTIVATE Raster 1
With your MAGIC WAND.... Same settings.
Select the nose as shown
SELECTIONS >>> MODIFY >>> EXPAND = 2
ACTIVATE Raster 2
Flood fill with BROWN #554327
|
|
STEP 16
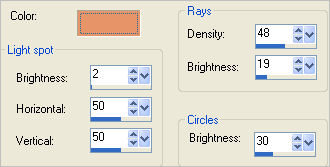
EFFECTS >>> ILLUMINATION EFFECTS >>> SUNBURST
COLOUR = #e69468
|
|
STEP 17
ADJUST >>> BLUR >>> GAUSSIAN BLUR
RADIUS = 2.00
DESELECT
ACTIVATE Raster 1
With your MAGIC WAND.... Same settings.
Select theTEETH
(ZOOM in if you need to)
SELECTIONS >>> MODIFY >>> EXPAND = 2
ACTIVATE Raster 2
Flood fill with WHITE
DESELECT
|
|
STEP 18
ACTIVATE Raster 1
With your MAGIC WAND.... Same settings.
Select theTONGUE
SELECTIONS >>> MODIFY >>> EXPAND = 2
ACTIVATE Raster 2
Flood fill with RED #f00808
DESELECT
ACTIVATE Raster 1
LAYERS >>> MERGE >>> MERGE DOWN
Rename this layer face 1
|
|
STEP 19
CLOSE face 1 layer
LAYERS >>> NEW RASTER LAYER
With BLACK in your foreground and background
in your MATERIALS PALETTE
Select your TEXT tool
Same settings
Enter the letter " v "
Click APPLY
Reposition as shown and DESELECT
|
|
STEP 20
With your MAGIC WAND.... Same settings.
Select the EYES
SELECTIONS >>> MODIFY >>> EXPAND = 2
LAYERS >>> NEW RASTER LAYER
LAYERS >>> ARRANGE >>> MOVE DOWN
Flood fill with WHITE
EFFECTS >>> 3D EFFECTS >>> INNER BEVEL
Same settings
DESELECT |
|
STEP 21
ACTIVATE Raster 1
With your MAGIC WAND.... Same settings.
Select the nose as shown
SELECTIONS >>> MODIFY >>> EXPAND = 2
ACTIVATE Raster 2
Flood fill with BROWN #554327
EFFECTS >>> ILLUMINATION EFFECTS >>> SUNBURST
Same settings
ADJUST >>> BLUR >>> GAUSSIAN BLUR
RADIUS = 2.00
DESELECT
|
|
STEP 22
ACTIVATE Raster 1
With your MAGIC WAND.... Same settings.
Select theTEETH
SELECTIONS >>> MODIFY >>> EXPAND = 2
ACTIVATE Raster 2
Flood fill with WHITE
DESELECT
ACTIVATE Raster 1
LAYERS >>> MERGE >>> MERGE DOWN
Rename this layer face 2
|
|
STEP 23
CLOSE face 2 layer
LAYERS >>> NEW RASTER LAYER
With BLACK in your foreground and background
in your MATERIALS PALETTE
Select your TEXT tool
Same settings
Enter the letter " d "
Click APPLY
Reposition as shown and DESELECT |
|
STEP 24
With your MAGIC WAND.... Same settings.
Select the EYES
SELECTIONS >>> MODIFY >>> EXPAND = 2
LAYERS >>> NEW RASTER LAYER
LAYERS >>> ARRANGE >>> MOVE DOWN
Flood fill with WHITE
EFFECTS >>> 3D EFFECTS >>> INNER BEVEL
Same settings
DESELECT |
|
STEP 25
ACTIVATE Raster 1
With your MAGIC WAND.... Same settings.
Select the nose
SELECTIONS >>> MODIFY >>> EXPAND = 2
ACTIVATE Raster 2
Flood fill with BROWN #554327
EFFECTS >>> ILLUMINATION EFFECTS >>> SUNBURST
Same settings
ADJUST >>> BLUR >>> GAUSSIAN BLUR
RADIUS = 2.00
DESELECT
ACTIVATE Raster 1
LAYERS >>> MERGE >>> MERGE DOWN
Rename this layer face 3
|
|
STEP 26
CLOSE face 3 layer
LAYERS >>> NEW RASTER LAYER
With BLACK in your foreground and background
in your MATERIALS PALETTE
Select your TEXT tool
Same settings
Enter the letter " t "
Click APPLY
Reposition as shown and DESELECT |
|
STEP 27
With your MAGIC WAND.... Same settings.
Select the nose
SELECTIONS >>> MODIFY >>> EXPAND = 2
LAYERS >>> NEW RASTER LAYER
LAYERS >>> ARRANGE >>> MOVE DOWN
Flood fill with BROWN #554327
EFFECTS >>> ILLUMINATION EFFECTS >>> SUNBURST
Same settings
ADJUST >>> BLUR >>> GAUSSIAN BLUR
RADIUS = 2.00
DESELECT
ACTIVATE Raster 1
LAYERS >>> MERGE >>> MERGE DOWN
Rename this layer face 4
|
|
STEP 28
LAYERS >>> NEW RASTER LAYER
LAYERS >>> ARRANGE >>> SEND TO BOTTOM
Flood fill with BLACK
ACTIVATE the Pumpkin layer
EFFECTS >>> PLUGINS >>> EYE CANDY 3 >>>
DROP SHADOW
COLOUR = WHITE
|
|
STEP 29
EDIT >>> Repeat Drop Shadow.. change DIRECTION to 135 |
|
STEP 30
ACTIVATE THE TOP LAYER
Open up the frame image in your PSP workspace
Right click on the Title Bar and select COPY from the options
Right click on the Title Bar of your tag image
and select PASTE AS NEW LAYER from the options.
Rename this layer frame
|
|
STEP 31
Open up the TLTTrickorTreat-ame image
in your PSP workspace
Right click on the Title Bar and select COPY from the options
Right click on the Title Bar of your tag image
and select PASTE AS NEW LAYER from the options.
EFFECTS >>> 3D EFFECTS >>> DROP SHADOW
Vertical & Horizontal offsets = 4
Colour = WHITE
Opacity = 70
Blur = 4.00
Reposition with your MOVER tool
Rename this layer text
|
|
STEP 32
LAYERS >>> NEW RASTER LAYER
ADD your NAME
using a font of your choice.
Rename this layer name
|
|
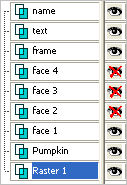
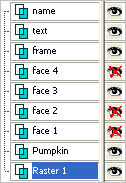
STEP 33
Set up LAYER PALETTE as shown
Right click on Title Bar and select
Copy merged from the options
|
|
STEP 34
In ANIMATION SHOP
Right click the workspace and select
'Paste As New Animation' from the options.
Back to PSP.
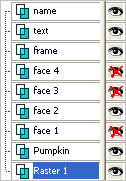
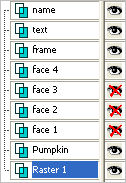
Set up LAYER PALETTE as shown
Right click on Title Bar and select
Copy merged from the options
|
|
STEP 35
In ANIMATION SHOP
Right click top of frame image and select
'Paste After Current Frame' from the options.
Back to PSP.
Set up LAYER PALETTE as shown
Right click on Title Bar and select
Copy merged from the options
|
|
STEP 36
In ANIMATION SHOP
Right click top of frame image and select
'Paste After Current Frame' from the options.
Back to PSP.
Set up LAYER PALETTE as shown
Right click on Title Bar and select
Copy merged from the options |
|
STEP 37
In ANIMATION SHOP
Right click top of frame image and select
'Paste After Current Frame' from the options.
Edit >> Select All
Right click on Title Bar of frames
Select 'Frame Properties' from the options
Display time = 60
|
STEP 38
View >> Animation
and while it is still running,
File >> Save As
Locate the folder in which you wish to save it.
Name your animation.
With the Gif Optimiser keep pressing NEXT
until you get to the last one... click FINISH
Close the Animation
Close the frames.
Close Animation Shop |
|
|
|
|