NOTE...FOR ARTISTRY MASTERS ONLY
If you are feeling lazy and wish to save time and eliminate STEP 1 to STEP 3
you can download the resized images HERE
then commence the tutorial at STEP 4 |
STEP 1
Open up the 7pandas image in your PSP workspace
WINDOW >>> DUPLICATE
Close the original Image
CLOSE Raster 7
Starting with Raster 6 and working through to Raster 1....
IMAGE >>> RESIZE = 35%
Ensure "Resize all layers" is UNCHECKED
Resample using WEIGHTED AVERAGE
..... on each layer.
|
STEP 2
Starting with Raster 1 and working through to Raster 6....
ADJUST >>> SHARPNESS >>> SHARPEN
..... on each layer.
|
STEP 3
Starting with Raster 7 and working through to Raster 1....
EFFECTS >>> 3D EFFECTS >>> INNER BEVEL
..... on each layer.
Minimize for now.
|
|
STEP 4
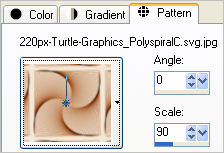
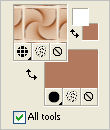
In your MATERIALS PALETTE load
220px-Turtle-Graphics_PolyspiralC.svg pattern
in the foreground and
TAN " #b3795f " in your background
|
 .  |
STEP 5
Open a new image 600 x 600
Transparent background
PSPX - X2: Colour Depth = 8bits/channel
PSPX3: Colour Depth RGB = 8bits/channel
Flood fill with TAN
LAYERS >>> NEW RASTER LAYER
Flood fill with the Pattern
IMAGE >>> RESIZE = 80%
Ensure "Resize all layers" is UNCHECKED
Resample using WEIGHTED AVERAGE
EFFECTS>>> GEOMETRIC EFFECTS >>> CIRCLE
EDGE MODE = Transparent
|
|
STEP 6
IMAGE >>> RESIZE = 80%
Ensure "Resize all layers" is UNCHECKED
Resample using WEIGHTED AVERAGE
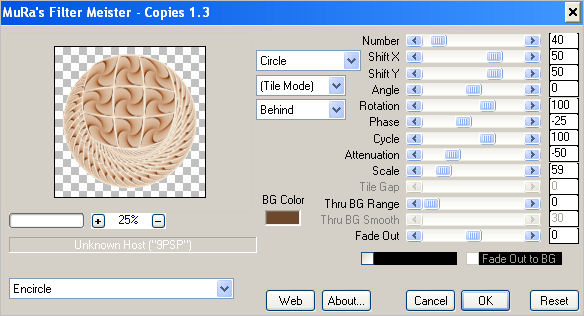
EFFECTS >>> PLUGINS >>> MuRa's Meister >>> Copies >>> Encircle
|
STEP 7
EFFECTS >>> 3D EFFECTS >>> INNER BEVEL
ADJUST >>> SHARPNESS >>> SHARPEN
|
|
STEP 8
EFFECTS >>> PLUGINS >>> EYE CANDY 3 >>>
DROP SHADOW |
|
STEP 9
EDIT >>> Repeat Drop Shadow..
change DIRECTION to 135 |
|
STEP 10
Activate Raster 1
SELECTIONS >>> SELECT ALL
SELECTIONS >>> MODIFY >>> CONTRACT = 12
SELECTIONS >>> INVERT
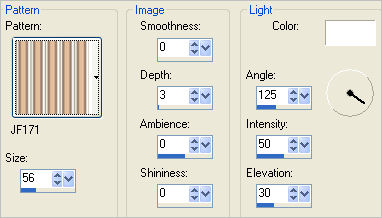
EFFECTS >>> TEXTURE EFFECTS >>> SCULPTURE
PATTERN = JF171
|
STEP 11
EFFECTS >>> 3D EFFECTS >>> INNER BEVEL
Same settings
EFFECTS >>> 3D EFFECTS >>> DROP SHADOW
Vertical & Horizontal offsets = 1
Colour = Black
Opacity = 70
Blur = 0
Repeat Drop Shadow effect changing
Vertical & Horizontal Offsets to - ( minus ) 1
Click OK
SELECTIONS >>> INVERT
|
|
STEP 12
EFFECTS >>> 3D EFFECTS >>> OUTER BEVEL
COLOUR = #c0c0c0
|
|
STEP 13
SELECTIONS >>> INVERT
EFFECTS >>> 3D EFFECTS >>> CHISEL
COLOUR = #f3e3dc
|
|
STEP 14
SELECTIONS >>> INVERT
SELECTIONS >>> MODIFY >>> CONTRACT = 12
SELECTIONS >>> INVERT
EFFECTS >>> 3D EFFECTS >>> CHISEL
Same settings
EFFECTS >>> PLUGINS >>> EYE CANDY 3 >>>
DROP SHADOW
Same settings
EDIT >>> Repeat Drop Shadow..
change DIRECTION to 315
SELECTIONS >>> INVERT
SELECTIONS >>> MODIFY >>> CONTRACT = 5
|
|
STEP 15
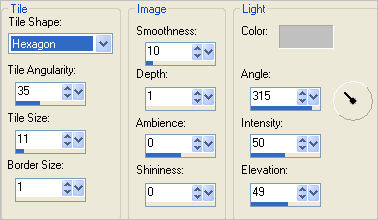
EFFECTS >>> TEXTURE EFFECTS >>> TILES
COLOUR = #c0c0c0
|
STEP 16
EFFECTS >>> EDGE EFFECTS >>> ENHANCE
EFFECTS >>> 3D EFFECTS >>> INNER BEVEL
COLOUR = #d1a797
DESELECT
|
|
STEP 17
LAYERS >>> MERGE >>> MERGE VISIBLE
LAYERS >> NEW RASTER LAYER
Select your TEXT TOOL
with font and settings of your choice
add your name to the bottom left corner of the layer.
Rename this layer name.
|
|
STEP 18
Maximize the duplicated pandas image
in your PSP workspace
Activate Raster 2
Right click on the Title Bar and select
COPY from the options
Right click on the Title Bar of your tag image
and select PASTE AS NEW LAYER from the options.
Reposition with your MOVER tool
|
|
STEP 19
Back to the duplicated pandas image
in your PSP workspace
Activate Raster 3
Right click on the Title Bar and select
COPY from the options
Right click on the Title Bar of your tag image
and select PASTE AS NEW LAYER from the options.
Reposition with your MOVER tool |
|
STEP 20
Back to the duplicated pandas image
in your PSP workspace
Activate Raster 4
Right click on the Title Bar and select
COPY from the options
Right click on the Title Bar of your tag image
and select PASTE AS NEW LAYER from the options.
Reposition with your MOVER tool |
|
STEP 21
Back to the duplicated pandas image
in your PSP workspace
Activate Raster 5
Right click on the Title Bar and select
COPY from the options
Right click on the Title Bar of your tag image
and select PASTE AS NEW LAYER from the options.
Reposition with your MOVER tool |
|
STEP 22
Back to the duplicated pandas image
in your PSP workspace
Activate Raster 6
Right click on the Title Bar and select
COPY from the options
Right click on the Title Bar of your tag image
and select PASTE AS NEW LAYER from the options.
Reposition with your MOVER tool |
|
STEP 23
Back to the duplicated pandas image
in your PSP workspace
Activate Raster 1
Right click on the Title Bar and select
COPY from the options
Right click on the Title Bar of your tag image
and select PASTE AS NEW LAYER from the options.
Reposition with your MOVER tool |
|
STEP 24
Back to the duplicated pandas image
in your PSP workspace
Activate Raster 7
Right click on the Title Bar and select
COPY from the options
Right click on the Title Bar of your tag image
and select PASTE AS NEW LAYER from the options.
Reposition with your MOVER tool |
|
STEP 25
CLOSE ALL LAYERS except the Merged and name layers
Activate the name layer
Open up the LDD_wordart_0079 image
in your PSP workspace
Right click on the Title Bar and select COPY from the options
Right click on the Title Bar of your tag image
and select PASTE AS NEW LAYER from the options.
IMAGE >>> RESIZE = 50%
Ensure "Resize all layers" is UNCHECKED
Resample using WEIGHTED AVERAGE
EFFECTS >>> PLUGINS >>> EYE CANDY 3 >>> PERSPECTIVE SHADOW
|
|
STEP 26
Reposition with your MOVER tool
CLOSE this layer
|
|
STEP 27
OPEN layers Raster 1 to Raster 7
ACTIVATE Raster 7
EFFECTS >>> PLUGINS >>> EYE CANDY 3 >>> PERSPECTIVE SHADOW
ACTIVATE Raster 6
EDIT >>> Repeat Perspective Shadow
ACTIVATE Raster 5
EDIT >>> Repeat Perspective Shadow
ACTIVATE Raster 4
EDIT >>> Repeat Perspective Shadow
ACTIVATE Raster 3
EDIT >>> Repeat Perspective Shadow
ACTIVATE Raster 2
EDIT >>> Repeat Perspective Shadow
ACTIVATE Raster 1
EDIT >>> Repeat Perspective Shadow
|
|
STEP 28
Set up LAYER PALETTE as shown
Right click on Title Bar and select
Copy merged from the options
|
|
STEP 29
In ANIMATION SHOP
Right click the workspace and select
'Paste As New Animation' from the options.
Back to PSP.
Set up LAYER PALETTE as shown
Right click on Title Bar and select
Copy merged from the options
|
|
STEP 30
In ANIMATION SHOP
Right click the workspace and select
'Paste After Current Frame' from the options.
Back to PSP.
Set up LAYER PALETTE as shown
Right click on Title Bar and select
Copy merged from the options |
|
STEP 31
In ANIMATION SHOP
Right click the workspace and select
'Paste After Current Frame' from the options.
Back to PSP.
Continue in this manner up to and including Raster 7
Your should have 8 frames

|
STEP 32
Edit >> Select All
Right click on Title Bar of frames
Select 'Frame Properties' from the options
Display time =65
|
STEP 33
Click inside the first frame (F:1) to activate
Right click and
Select 'Frame Properties' from the options
Display time =130
|
STEP 34
Click inside the last frame (F:8) to activate
Right click and
Select 'Frame Properties' from the options
Display time =85 |
STEP 35
View >> Animation
and while it is still running,
File >> Save As
Locate the folder in which you wish to save it.
Name your animation.
With the Gif Optimiser keep pressing NEXT
until you get to the last one... click FINISH
Close the Animation
Close the frames.
Close Animation Shop |
|
|
|
|