STEP 1
Open up the alligator image in your PSP workspace
WINDOW >>> DUPLICATE
Close the original Image |
STEP 2
ACTIVATE RASTER 1
Open up the pjw-wave-78t5-8-9 image
in your PSP workspace
Right click on the Title Bar and select COPY from the options
Right click on the Title Bar of your tag image
and select PASTE AS NEW LAYER from the options.
Reposition with your MOVER tool
|
|
STEP 3
ADJUST >>> HUE & SATURATION >>> COLORIZE
In your LAYER PALETTE change the OPACITY to 100%
LAYERS >>> MERGE >>> MERGE VISIBLE
|
|
STEP 4
LAYERS >>> DUPLICATE (4 times)
Rename the layers gator1 to gator5
Activate gator1
|
|
STEP 5
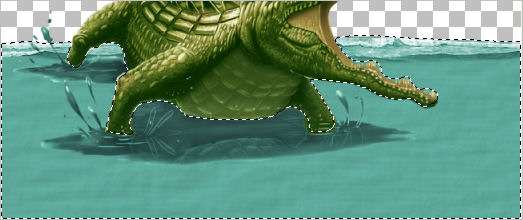
Choose your FREEHAND SELECTION TOOL
Selection Type = Point to Point
Mode = Replace
Feather = 0
Antialias = Checked
Select the water area shown

|
STEP 6
EFFECTS >>> DISTORTION EFFECTS >>> RIPPLE

|
STEP 7
ACTIVATE gator2
EFFECTS >>> DISTORTION EFFECTS >>> RIPPLE
CHANGE "Wavelength" to = 24 |
|
STEP 8
ACTIVATE gator3
EFFECTS >>> DISTORTION EFFECTS >>> RIPPLE
CHANGE "Wavelength" to = 23 |
|
STEP 9
ACTIVATE gator4
EFFECTS >>> DISTORTION EFFECTS >>> RIPPLE
CHANGE "Wavelength" to = 22 |
|
STEP 10
ACTIVATE gator5
EFFECTS >>> DISTORTION EFFECTS >>> RIPPLE
CHANGE "Wavelength" to = 21
DESELECT
|
|
STEP 11
LAYERS >>> NEW RASTER LAYER
LAYERS >>> ARRANGE >>> SEND TO BOTTOM
Flood fill with
#5da99c
Open up the anna.br_luzes_21-11-10 image
in your PSP workspace
Right click on the Title Bar and select COPY from the options
Right click on the Title Bar of your tag image
and select PASTE AS NEW LAYER from the options.
|
STEP 12
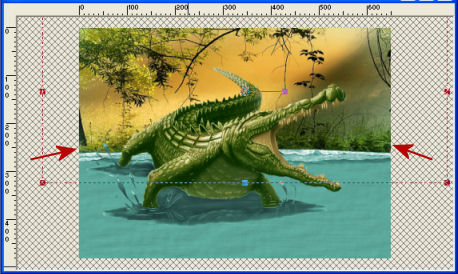
Select your DEFORMATION tool
Mode = SCALE
use default settings
PSPX-X3:Select your PICK tool
Pull the sides of your image out so the nodes are visible
and adjust as shown below

Click the RESET RECTANGLE arrow
Select your MOVER tool to disengage
the Deformation / Pick tool
In your LAYER PALETTE change the
BLEND MODE to LUMINANCE (L)
LAYERS >>> MERGE >>> MERGE DOWN
Rename this layer bgd |
STEP 13
Choose your SELECTION TOOL then click on the
CUSTOM SELECTION symbol
and enter these coordinates.
SELECTIONS >>> INVERT
EDIT >>> CLEAR
DESELECT
|
|
STEP 14
Activate the gator5 layer
Open up the hanging-gecko image in your PSP workspace
Right click on the Title Bar and select COPY from the options
Right click on the Title Bar of your tag image
and select PASTE AS NEW LAYER from the options.
IMAGE >>> RESIZE = 70%
Ensure "Resize all layers" is UNCHECKED
Resample using WEIGHTED AVERAGE
ADJUST >>> SHARPNESS >>> SHARPEN
Reposition with your MOVER tool
Rename this layer gecko1
|
|
STEP 15
LAYERS >>> DUPLICATE (4 times)
Rename the layers gecko2 to gecko5
Activate gecko5
PSP9:IMAGE >>> ROTATE >>> FREE ROTATE = LEFT 10
Ensure "All layers" is UNCHECKED
PSPX - PSPX3: IMAGE >>> FREE ROTATE = LEFT 10
Ensure "All layers" is UNCHECKED
Reposition with your MOVER tool so the 'hand' is directly
over the 'hand' beneath
|
|
STEP 16
CLOSE gecko5
Activate gecko4
PSP9:IMAGE >>> ROTATE >>> FREE ROTATE = LEFT 5
Ensure "All layers" is UNCHECKED
PSPX - PSPX3: IMAGE >>> FREE ROTATE = LEFT 5
Ensure "All layers" is UNCHECKED
Reposition with your MOVER tool so the 'hand' is directly
over the 'hand' beneath. |
|
STEP 17
CLOSE gecko4
Activate gecko3
PSP9:IMAGE >>> ROTATE >>> FREE ROTATE = RIGHT 5
Ensure "All layers" is UNCHECKED
PSPX - PSPX3: IMAGE >>> FREE ROTATE = RIGHT 5
Ensure "All layers" is UNCHECKED
Reposition with your MOVER tool so the 'hand' is directly
over the 'hand' beneath. |
|
STEP 18
CLOSE gecko3
Activate gecko2
PSP9:IMAGE >>> ROTATE >>> FREE ROTATE = RIGHT 10
Ensure "All layers" is UNCHECKED
PSPX - PSPX3: IMAGE >>> FREE ROTATE = RIGHT 10
Ensure "All layers" is UNCHECKED
Reposition with your MOVER tool so the 'hand' is directly
over the 'hand' beneath. |
|
STEP 19
In your LAYER PALETTE
move gecko1 up and under
the gecko4 layer |
|
STEP 20
CLOSE layers gator3, gator4, gator5,
Activate gator2 layer
Choose your FREEHAND SELECTION TOOL
Selection Type = Point to Point
Mode = Replace
Feather = 0
Antialias = Checked
Select the area shown
EFFECTS >>> DISTORTION EFFECTS >>> PUNCH
Strength = 10% |
|
STEP 21
CLOSE layers gator2
OPEN & Activate gator3 layer
EFFECTS >>> DISTORTION EFFECTS >>> PUNCH
Strength = 13%
**************
CLOSE layers gator3
OPEN & Activate gator4 layer
EFFECTS >>> DISTORTION EFFECTS >>> PUNCH
Strength = 16%
**************
CLOSE layers gator4
OPEN & Activate gator5 layer
EFFECTS >>> DISTORTION EFFECTS >>> PUNCH
Strength = 20%
DESELECT
|
STEP 22
Activate gecko5
Open up the gator-frame image in your PSP workspace
Right click on the Title Bar and select COPY from the options
Right click on the Title Bar of your tag image
and select PASTE AS NEW LAYER from the options.
Rename this layer frame
|
|
STEP 23
LAYERS >> NEW RASTER LAYER
Select your TEXT TOOL
with font and settings of your choice
add your name to the bottom of the layer.
Rename this layer name.
|
|
STEP 24
ACTIVATE the gecko5 layer
EFFECTS >>> PLUGINS >>> EYE CANDY 3 >>> PERSPECTIVE SHADOW
|
|
STEP 25
OPEN & ACTIVATE the gecko4 layer
EDIT >>> Repeat Perspective Shadow.
OPEN & ACTIVATE the gecko3 layer
EDIT >>> Repeat Perspective Shadow.
ACTIVATE the gecko2 layer
EDIT >>> Repeat Perspective Shadow.
ACTIVATE the gecko1 layer
EDIT >>> Repeat Perspective Shadow.
|
|
STEP 26
Set up LAYER PALETTE as shown
Right click on Title Bar and select
Copy merged from the options
|
|
STEP 27
In ANIMATION SHOP
Right click the workspace and select
'Paste As New Animation' from the options.
Back to PSP.
Set up LAYER PALETTE as shown
Right click on Title Bar and select
Copy merged from the options
|
|
STEP 28
In ANIMATION SHOP
Right click top of frame image and select
'Paste After Current Frame' from the options.
Back to PSP.
Set up LAYER PALETTE as shown
Right click on Title Bar and select
Copy merged from the options |
|
STEP 29
In ANIMATION SHOP
Right click top of frame image and select
'Paste After Current Frame' from the options.
Back to PSP.
EDIT >>> Empty clipboard
Set up LAYER PALETTE as shown
Right click on Title Bar and select
Copy merged from the options |
|
STEP 30
In ANIMATION SHOP
Right click top of frame image and select
'Paste After Current Frame' from the options.
Back to PSP.
Set up LAYER PALETTE as shown
Right click on Title Bar and select
Copy merged from the options |
|
STEP 31
In ANIMATION SHOP
Right click top of frame image and select
'Paste After Current Frame' from the options
Edit >> Select All
Edit >> Copy
Edit >> Paste After Current Frame
You now have 10 frames
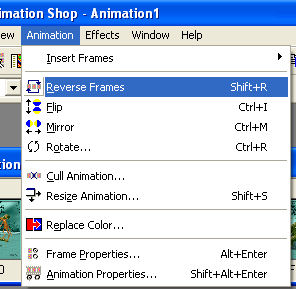
Hold down your SHIFT key and select frames 6 (F:6) to frame 10 (F:10)
ANIMATION >>> Reverse Frames
 Edit >> Select None
|
STEP 32
Click inside frame 6 (F:6) to select
Edit >> Delete
Edit >> Select All
Right click on Title Bar of frames
Select 'Frame Properties' from the options
Display time =15
|
|
STEP 33
LEFT Click inside frame 1 (F:1) to select, then....
RIGHT
Click inside frame 1 (F:1) and select
'Frame Properties' from the options
Display time =5
|
STEP 34
View >> Animation
and while it is still running,
File >> Save As
Locate the folder in which you wish to save it.
Name your animation.
With the Gif Optimiser keep pressing NEXT
until you get to the last one... click FINISH
Close the Animation
Close the frames.
Close Animation Shop |
|
|
|
|
|
|