|
|
I was going to have you create the mouse animation ( cookiefight_ani.psp )
BUT
the tutorial would have been twice as long and I felt you would lose interest.
So I have supplied the animation for you.
*S*
|
STEP 1
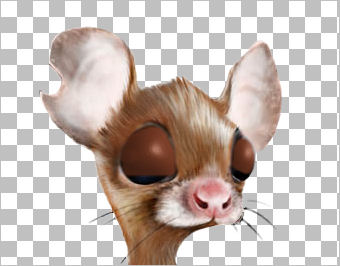
Open up the bu image in your PSP workspace
WINDOW >>> DUPLICATE
Close the original Image
DELETE the bgd and artist layers
LAYERS >>> DUPLICATE
Choose your FREEHAND SELECTION TOOL
Selection Type = Point to Point
Mode = Add (Shift)
Feather = 1
Antialias = Checked
Select the areas shown
|
|
NOTE: RE STEP 1 / STEP 2
If you are using higher versions of PSP you may need to create a new layer
for the selected
eye areas... flood fill... do the bevel... deselect... and merge down
|
STEP 2
Flood fill with #5c2e1c
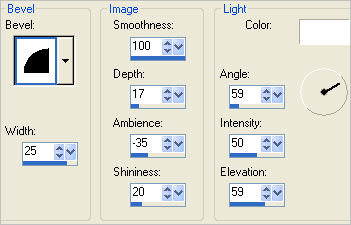
EFFECTS >>> 3D EFFECTS >>> INNER BEVEL
DESELECT
|
 |
STEP 3
Select your SOFTEN BRUSH tool

PRESET = +Round 05

Brush around the edges of the eyelids to soften a little

IMAGE >>> RESIZE = 50%
Ensure "Resize all layers" is CHECKED
Resample using WEIGHTED AVERAGE
|
STEP 4
ADJUST >>> SHARPNESS >>> SHARPEN
EFFECTS >>> PLUGINS >>> EYE CANDY 3 >>>
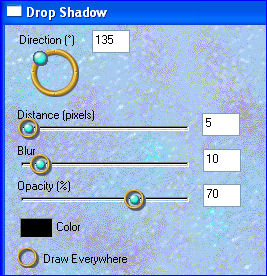
DROP SHADOW

ACTIVATE the mouse layer
ADJUST >>> SHARPNESS >>> SHARPEN
EFFECTS >>> PLUGINS >>> EYE CANDY 3 >>>
DROP SHADOW
Same settings
Save as bu_layers.pspimage
Minimize for now
|
STEP 5
OK... now we'll create the background for the animation
In your MATERIALS PALETTE
Load PINK " #e8d1c6" in your foreground
Load BROWN " #5c2e1c " in your background
Then click on the GRADIENT option
in your foreground palette
and use these settings
STYLE = Linear
|
|
STEP 6
Open a new image 600 x 600
Transparent background
PSPX - X2: Colour Depth = 8bits/channel
PSPX3: Colour Depth RGB = 8bits/channel
Flood fill with the gradient
EFFECTS >>> TEXTURE EFFECTS >>> BLINDS
|
|
STEP 7
EFFECTS >>> IMAGE EFFECTS >>> PAGE CURL
Curl settings > Color = #e86524
Edge mode > Color = #808080 |
|
STEP 8
EFFECTS >>> IMAGE EFFECTS >>> PAGE CURL
Same settings
BUT
check Upper Right Corner
|
|
STEP 9
EFFECTS >>> IMAGE EFFECTS >>> PAGE CURL
Same settings
BUT
check Lower Right Corner |
|
STEP 10
EFFECTS >>> IMAGE EFFECTS >>> PAGE CURL
Same settings
BUT
check Lower Left Corner
|
|
STEP 11
With your MAGIC WAND
Mode = ADD (Shift)
Match Mode = RGB Value
Tolerance = 0
Feather = 0
Antialias = UNchecked
Sample Merged = UNCHECKED
PSP9 - X3: Check CONTIGUOUS
PSPX - X3: There is no " Sample Merged"
PSPX - X3: Use all layers = UNChecked
Select the 4 grey corners
EFFECTS >>> TEXTURE EFFECTS >>> BLINDS
Same settings BUT check HORIZONTAL
DESELECT
|
|
STEP 12
LAYERS >>> DUPLICATE
IMAGE >>> RESIZE = 85%
Ensure "Resize all layers" is UNCHECKED
Resample using WEIGHTED AVERAGE
IMAGE >>> MIRROR
EFFECTS >>> IMAGE EFFECTS >>> PAGE CURL
Same settings
|
|
STEP 13
EFFECTS >>> IMAGE EFFECTS >>> PAGE CURL
Same settings
BUT
check Lower Right Corner
|
|
STEP 14
EFFECTS >>> IMAGE EFFECTS >>> PAGE CURL
Same settings
BUT
check Upper Right Corner
EFFECTS >>> IMAGE EFFECTS >>> PAGE CURL
Same settings
BUT
check Upper Left Corner
|
|
STEP 15
IMAGE >>> FLIP
EFFECTS >>> PLUGINS >>> EYE CANDY 3 >>>
DROP SHADOW
Same settings
EDIT >>> Repeat Drop Shadow..
change DIRECTION to 315
|
|
STEP 16
LAYERS >>> DUPLICATE
IMAGE >>> RESIZE = 85%
Ensure "Resize all layers" is UNCHECKED
Resample using WEIGHTED AVERAGE
EFFECTS >>> DISTORTION EFFECTS >>>
POLAR COORDINATES
|
|
STEP 17
EFFECTS>>> GEOMETRIC EFFECTS >>> CIRCLE
Edge mode = Transparent
IMAGE >>> RESIZE = 85%
Ensure "Resize all layers" is UNCHECKED
Resample using WEIGHTED AVERAGE
EFFECTS >>> 3D EFFECTS >>> INNER BEVEL
Same settings
|
|
STEP 18
LAYERS >>> DUPLICATE
IMAGE >>> RESIZE = 85%
Ensure "Resize all layers" is UNCHECKED
Resample using WEIGHTED AVERAGE
ADJUST >>> SHARPNESS >>> SHARPEN
LAYERS >>> DUPLICATE
IMAGE >>> RESIZE = 85%
Ensure "Resize all layers" is UNCHECKED
Resample using WEIGHTED AVERAGE
ADJUST >>> SHARPNESS >>> SHARPEN
|
|
STEP 19
ACTIVATE Raster 1
EFFECTS >>> 3D EFFECTS >>> INNER BEVEL
Same settings as in STEP 2
ACTIVATE Copy (4) of Raster 1
LAYERS >>> NEW RASTER LAYER
Flood fill with gradient
SELECTIONS >>> SELECT ALL
SELECTIONS >>> MODIFY >>> CONTRACT = 12
EDIT >>> CLEAR
SELECTIONS >>> INVERT
EFFECTS >>> TEXTURE EFFECTS >>> BLINDS
Same settings
EFFECTS >>> TEXTURE EFFECTS >>> BLINDS
Same settings.... UNCHECK HORIZONTAL
|
|
STEP 20
EFFECTS >>> EDGE EFFECTS >>> ENHANCE
EFFECTS >>> PLUGINS >>> EYE CANDY 3 >>>
DROP SHADOW
Same settings
EDIT >>> Repeat Drop Shadow..
change DIRECTION to 135
DESELECT
LAYERS >>> NEW RASTER LAYER
Open up the cookie fight image in your PSP workspace
ACTIVATE the artist layer
Right click on the Title Bar and select COPY from the options
Right click on the Title Bar of your tag image
and select PASTE AS NEW SELECTION from the options.
Position at the bottom of your image
DESELECT
|
|
STEP 21
LAYERS >> NEW RASTER LAYER
Select your TEXT TOOL
with font and settings of your choice
add your name to the centre top of the layer.
|
|
STEP 22
CLOSE THE FOLLOWING LAYERS
Copy (4) of Raster 1
Copy (3) of Raster 1
Copy (2) of Raster 1
ACTIVATE RASTER 1
LAYERS >>> MERGE >>> MERGE VISIBLE
Rename this layer bgd
|
STEP 23
OPEN & ACTIVATE Copy (2) of Raster 1
EFFECTS >>> PLUGINS >>> EYE CANDY 3 >>>
DROP SHADOW
OPEN & ACTIVATE Copy (3) of Raster 1
EDIT >>> Repeat Drop Shadow
OPEN & ACTIVATE Copy (4) of Raster 1
EDIT >>> Repeat Drop Shadow
|
|
STEP 24
CLOSE the bgd layer
ACTIVATE Copy (2) of Raster 1
LAYERS >>> MERGE >>> MERGE VISIBLE
Rename this layer shape
OPEN & ACTIVATE the bgd layer
|
STEP 25
MAXIMISE the bu_layers.pspimage
you saved earlier
Activate the mouse layer
Right click on the Title Bar and select COPY from the options
Right click on the Title Bar of your tag image
and select PASTE AS NEW LAYER from the options.
LAYERS >>> ARRANGE >>> MOVE DOWN
Rename this layer bu1
|
|
STEP 26
Back to the bu_layers.pspimage
Activate the Copy of mouse layer
Right click on the Title Bar and select COPY from the options
Right click on the Title Bar of your tag image
and select PASTE AS NEW LAYER from the options.
Rename this layer bu2
|
|
STEP 27
Ensure LAYER PALETTE set up is as shown
Right click on Title Bar and select
Copy merged from the options
|
|
STEP 28
In ANIMATION SHOP
Right click the workspace and select
'Paste As New Animation' from the options.
Depress your CTRL key and press the letter L
2 times
Back to PSP.
Set up LAYER PALETTE as shown
Right click on Title Bar and select
Copy merged from the options
|
|
STEP 29
In ANIMATION SHOP
Right click inside frame 1 (F:1) and select
'Paste BEFORE Current Frame' from the options.
Right click inside frame 3 (F:3) and select
'Paste BEFORE Current Frame' from the options.
Right click inside frame 5 (F:5) and select
'Paste BEFORE Current Frame' from the options.
Right click inside frame 6 (F:6) and select
'Paste AFTER Current Frame' from the options.
You should have 7 frames in total
|
STEP 30
Edit >> Select All
Right click on Title Bar of frames
Select 'Frame Properties' from the options
Display time = 80
|
|
|
STEP 31
In ANIMATION SHOP
Open Animation

Locate the cookiefight_ani.psp
Edit >> Select All
Right click on Title Bar of frames
Select 'Frame Properties' from the options
Display time =80
Edit >> Select All
Edit >> Copy
Edit >> Propagate Paste
Activate the background animation
Edit >> Select All
Edit >> Paste into selected frame
Zoom in on Frame 1 (F:1) and insert as shown
|
|
STEP 32
View >> Animation
and while it is still running,
File >> Save As
Locate the folder in which you wish to save it.
Name your animation.
With the Gif Optimiser keep pressing NEXT
until you get to the last one... click FINISH
Close the Animation
Close the frames.
Close Animation Shop
|
|
|
.
|
|
|