STEP 1
Open up the k63t4 image in your PSP workspace
WINDOW >>> DUPLICATE
Close the original Image
LAYERS >>> Promote background layer
|
STEP 2
LAYERS >>> DUPLICATE
Choose your FREEHAND SELECTION TOOL
Selection Type = Point to Point
Mode = Replace
Feather = 1
Smoothing = 5
Antialias = Checked
Select the area shown
|
|
STEP 3
In your MATERIALS PALETTE
Load DARK BROWN/BLACK " #1a0e0b "
in your foreground
Flood fill with #1a0e0b
DESELECT
LAYERS >>> ARRANGE >>> MOVE DOWN
Rename this layer Raster 2
|
|
STEP 4
ACTIVATE Raster 1
LAYERS >>> DUPLICATE
CLOSE
Copy of Raster 1
ACTIVATE Raster 1
Select your AIRBRUSH tool
PRESET = + Default

|
STEP 5
Starting around the face area
colour in the surrounding area as shown
OPEN & ACTIVATE Copy of Raster 1
Rename this layer Raster 3 |
|
STEP 6
LAYERS >>> DUPLICATE (Twice)
CLOSE Copy (2) of Raster 3
ACTIVATE Copy of Raster 3
Rename this layer Raster 4
Choose your FREEHAND SELECTION TOOL
Selection Type = Point to Point
Mode = ADD (Shift)
Feather = 0
Antialias = Checked
Select the eyes as shown
|
|
STEP 7
Flood fill with #1a0e0b (foreground colour)
DESELECT
|
|
STEP 8
OPEN & ACTIVATE Copy (2) of Raster 3
Rename this layer Raster 5
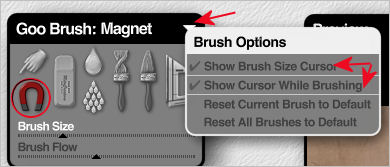
EFFECTS >>> PLUGINS >>> KPTX >>> KPTGoo
Use your PAN tool to centre the image

Select the MAGNET
Click on th white arrow and select these BRUSH OPTIONS

|
STEP 9
Click on BRUSH SIZE
Select 100 pixels
|
|
STEP 10
Click on BRUSH FLOW
Select 30%
|
|
STEP 11
Place your cursor over the centre of the face |
|
STEP 12
Drag up and to the right slightly
|
|
STEP 13
Click the "OK" tick at the bottom right of the plugin
(This will bring you back to PSP)
ADJUST >>> SHARPNESS >>> SHARPEN
LAYERS >>> DUPLICATE
Rename this layer Raster 6
|
|
STEP 14
Choose your FREEHAND SELECTION TOOL
Selection Type = Point to Point
Mode = ADD (Shift)
Feather = 0
Antialias = Checked
Select the eyes as shown |
|
STEP 15
Flood fill with #1a0e0b (foreground colour)
DESELECT
|
|
STEP 16
Open up the frame image in your PSP workspace
Right click on the Title Bar and select COPY from the options
Right click on the Title Bar of your tag image
and select PASTE AS NEW LAYER from the options.
Rename this layer frame
|
|
STEP 17
Open up the BOOhaha_bewaresign2_kd image
in your PSP workspace
Right click on the Title Bar and select COPY from the options
Right click on the Title Bar of your tag image
and select PASTE AS NEW LAYER from the options.
IMAGE >>> RESIZE = 50%
Ensure "Resize all layers" is UNCHECKED
Resample using WEIGHTED AVERAGE
ADJUST >>> SHARPNESS >>> SHARPEN
EFFECTS >>> PLUGINS >>> EYE CANDY 3 >>>
DROP SHADOW
|
|
STEP 18
Reposition with your MOVER tool
Rename this layer sign |
|
STEP 19
Open up the elegant WA nuts image
in your PSP workspace
Right click on the Title Bar and select COPY from the options
Right click on the Title Bar of your tag image
and select PASTE AS NEW LAYER from the options.
IMAGE >>> RESIZE = 50%
Ensure "Resize all layers" is UNCHECKED
Resample using WEIGHTED AVERAGE
EFFECTS >>> PLUGINS >>> EYE CANDY 3 >>>
DROP SHADOW
Same settings
Reposition with your MOVER tool
Rename this layer text
|
|
STEP 20
LAYERS >> NEW RASTER LAYER
Select your TEXT TOOL
with font and settings of your choice
add your name.
Rename this layer name.
|
|
STEP 21
Set up LAYER PALETTE as shown
Right click on Title Bar and select
Copy merged from the options
|
|
STEP 22
In ANIMATION SHOP
Right click the workspace and select
'Paste As New Animation' from the options.
Back to PSP.
CLOSE Raster 2
OPEN Raster 1
Right click on Title Bar and select
Copy merged from the options
|
STEP 23
In ANIMATION SHOP
Right click the workspace and select
'Paste After Current Frame' from the options.
Back to PSP.
CLOSE Raster 1
OPEN Raster 3
Right click on Title Bar and select
Copy merged from the options |
STEP 24
In ANIMATION SHOP
Right click the workspace and select
'Paste After Current Frame' from the options.
Back to PSP.
CLOSE Raster 3
OPEN Raster 4
Right click on Title Bar and select
Copy merged from the options |
Continue in this manner until you have 6 frames in Animation Shop
|
STEP 25
In ANIMATION SHOP
Edit >> Select All
Right click on Title Bar of frames
Select 'Frame Properties' from the options
Display time = 45
|
|
STEP 26
Right Click inside the first frame (F:1)
Select 'Frame Properties' from the options
Display time = 100
Right Click inside the fifth frame (F:5)
Select 'Frame Properties' from the options
Display time = 120
|
STEP 27
View >> Animation
and while it is still running,
File >> Save As
Locate the folder in which you wish to save it.
Name your animation.
With the Gif Optimiser keep pressing NEXT
until you get to the last one... click FINISH
Close the Animation
Close the frames.
Close Animation Shop
|
|
|
|
|