STEP 1
Open up the downloaded images in your PSP workspace and minimize.
Open a new image 600 x600 Transparent background
PSPX - X2: Colour Depth = 8bits/channel
PSPX3: Colour Depth RGB = 8bits/channel
Flood fill with black
Rename this layer bg
|
STEP 2
Activate the frame image
Right click on the Title Bar and select
COPY from the options.
Right click on the Title Bar of your 'working' image
and select PASTE AS NEW LAYER from the options.
Rename this layer frame |
STEP 3
LAYERS >> NEW RASTER LAYER
Select your TEXT TOOL
with font and settings of your choice
add your name to the bottom left corner of the layer.
Rename this layer name. |
|
STEP 4
Open up the Jen_Vrouws 491 _22-08-2011 image
Right click on the Title Bar and select COPY from the options.
Right click on the Title Bar of your 'working' image
and select PASTE AS NEW LAYER from the options.
IMAGE >> RESIZE = 85%
Ensure "Resize all layers" is UNCHECKED
ADJUST >>> SHARPNESS >>> SHARPEN
Placement as shown
Minimize for now
Rename this layer tube
|
|
STEP 5
OPEN Animation Shop
File >> Open
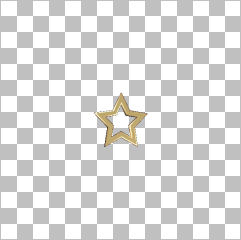
Locate the star hole 1.gif and open
EDIT >> Select All
File >>> Export to PSP
If your version doesn't allow "Export to PSP"...
then ...
EDIT >> SELECT ALL
EDIT >> COPY
Return to PSP
Right click in workspace and select 'Paste as New Image'
Rename the layers frame 1 to frame 12
starting from the bottom layer and working up
|
WINDOW >> DUPLICATE to save your master!
Minimize the Master
|
STEP 6
We are going to work from the duplicated Master star image.
Activate the original star animation
Close the star animation (Click on red X at to right of title bar)
"Save changes?"
NO
"
Would you like to update the changes
back to Animation Shop?
"
YES
Minimize frames in Animation Shop for now.
|
STEP 7
Back to PSP.
You will see your duplicated star image has 12 frames
Close all frames except Frame1
and activate Frame 1.
Open a new image 600 x 600
Transparent background
PSPX - X2: Colour Depth = 8bits/channel
PSPX3: Colour Depth RGB = 8bits/channel
NOTE: while working with the star image don't move the placement on it
or the placement when pasted to the new blank image. It will align itself. |
STEP 8
On star image
Right click on the Title Bar and select
COPY from the options.
Right click on the Title Bar
of your new blank 'working' image
and select
PASTE AS NEW LAYER from the options |
|
STEP 9
EFFECTS >> PLUGINS >> MuRa's Filter Meister >> Copies >> Encircle
use these settings
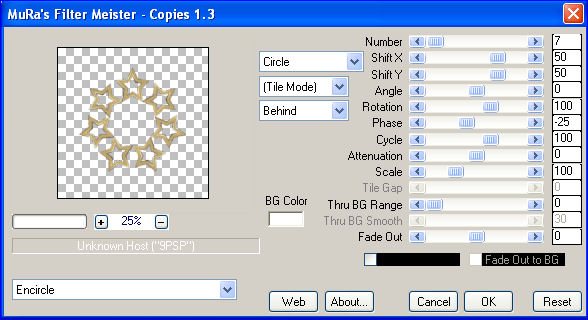
Rename this layer as1
|
STEP 10
On star image
Activate layer Frame 2
Close layer Frame 1
Right click on the Title Bar and select COPY from the options.
Right click on the Title Bar of your new blank 'working' image
and select PASTE AS NEW LAYER from the options.
|
STEP 11
EFFECTS >> PLUGINS >> Mura Meister Copies
use same settings.
Rename this layer as2
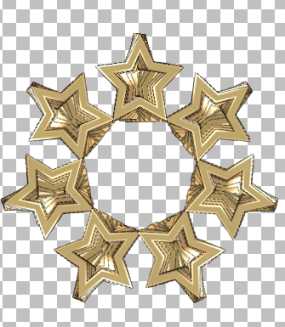
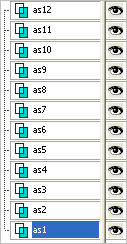
Continue these steps until all the 12 star frames
are
pasted onto the new image
and the filter copies has been
applied to each layer.
You should have this.
IMAGE >> RESIZE = 65%
Ensure "Resize all layers" is CHECKED
|
|
STEP 12
DELETE Raster 1
Your LAYER PALETTE should look like this
Right click on the Title Bar and select
COPY from the options.
|
|
STEP 13
Save as an Animation Shop compatible file
FILE >>> SAVE AS
Give the file a name such as star ani
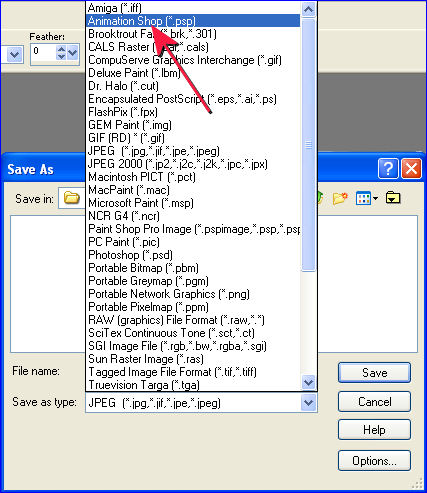
In later versions of PSP it appears as shown below.

This can be used again in future animations.
|
STEP 14
Open up ANIMATION SHOP
1: Open Animation
2: Locate and select the file you saved star ani
3: Click OPEN
|
STEP 15
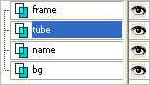
Back to PSP
Set up LAYER PALETTE as shown
Right click on Title Bar and select
Copy merged from the options
|
|
STEP 16
In ANIMATION SHOP
Right click the workspace and select
'Paste As New Animation' from the options.
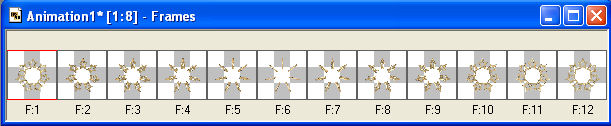
Hold down the Ctrl key and hit L 11 times until you have 12 frames.
|
STEP 17
Activate your star frames
Edit >> Select All
Edit >> Copy
Edit >> Propagate Paste
Activate your working bg image
Edit >> Select All
Edit >> Paste into selected frame
ZOOM in on first frame (F:1)
Stars will be attached to your mouse
Place top left and click the left mouse to place.
|
|
STEP 18
Back to PSP.
Open up the text image in your PSP workspace
Right click on the Title Bar and select
COPY from the options.
In ANIMATION SHOP
Right click the workspace and select
'Paste As New Animation' from the options.
Edit >> Copy
Edit >> Propagate Paste
Activate your working bg image
Edit >> Paste into selected frame
Place words inside star frame.
|
|
STEP 19
Resize if you wish
Animation >> Resize Animation>>500
|
STEP 20
View >> Animation
and while it is still running,
File >> Save As
Locate the folder in which you wish to save it.
Name your animation.
With the Gif Optimiser keep pressing NEXT
until you get to the last one... click FINISH
Close the Animation
Close the frames.
Close Animation Shop
|
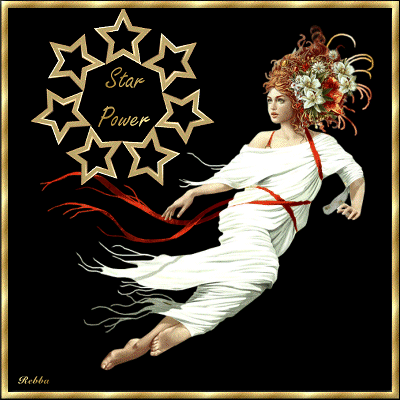
I hope you have enjoyed the animation.
Rebba
|