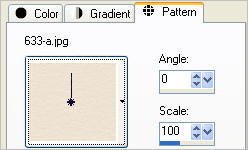
STEP 1
VIEW >>> RULERS
In your MATERIALS PALETTE load
633-a.jpg pattern in the foreground using these settings |
|
STEP 2
Open a new image 650 x 560
Transparent background
PSPX - X2: Colour Depth = 8bits/channel
PSPX3: Colour Depth RGB = 8bits/channel
Flood fill with pattern
|
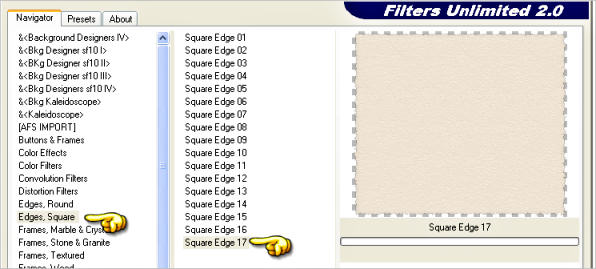
STEP 3
EFFECTS >> PLUGINS >> <I.C.NET Software >> Filters Unlimited 2.0 >> Edges, Square
use these settings.
SQUARE EDGE 17
|
STEP 4
Open framed image in your PSP workspace
Right click on the Title Bar and select COPY from the options.
Right click on the Title Bar of your 'working' image
and select PASTE AS NEW LAYER from the options.
MOVE TO LEFT SIDE AS SHOWN
NOTE: Make sure it is close to the right edge otherwise when we do the animation
the left panel won't fit correctly.
MINIMIZE THIS FOR NOW |
STEP 5
In your MATERIALS PALETTE load
5d0104t.jpg pattern in the background
using these settings
Angle = 0
Scale = 100
Open a new image 162 x 521
Transparent background
PSPX - X2: Colour Depth = 8bits/channel
PSPX3: Colour Depth RGB = 8bits/channel
Flood Fill image with
5d0104t.jpg pattern
SELECTIONS >> SELECT ALL
SELECTIONS >> MODIFY >>CONTRACT = 5
DELETE
FILL WITH BLACK
SELECTIONS >> MODIFY >>CONTRACT = 1
DELETE
|
|
STEP 6
In your MATERIALS PALETTE load
belor.jpg pattern in the background using these settings
Angle = 0
Scale = 100
Flood fill with belor pattern
SELECTIONS >> MODIFY >>CONTRACT = 5
Delete
Flood fill with BLACK
SELECTIONS >> MODIFY >>CONTRACT = 1
Delete
Flood fill with 633-a.jpg (foreground pattern)
DESELECT
|
|
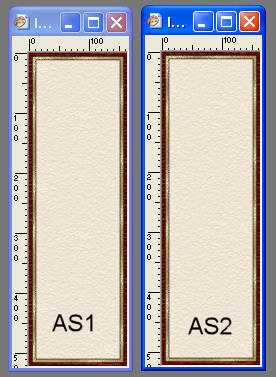
STEP 7
WINDOW >> DUPLICATE
SET THE 2 FRAMED IMAGES UP SIDE BY SIDE
LEFT IMAGE WILL BE AS 1
RIGHT IMAGE WILL BE AS2 |
|
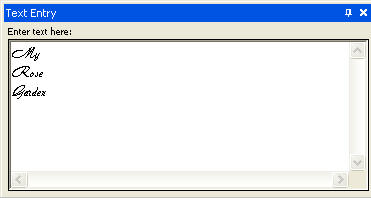
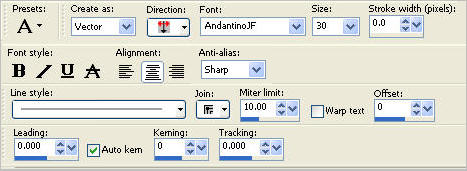
STEP 8
Working on LEFT image AS1
Select your TEXT TOOL
|
STEP 9
In your MATERIALS PALETTE
Close foreground
Load ' #782845' in your background
Type...
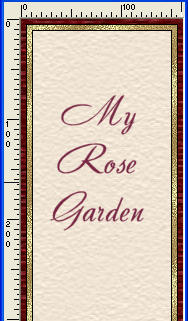
MY
ROSE
GARDEN
|
|
STEP 10
Reposition with your MOVER tool
Convert to raster layer
|
|
STEP 11
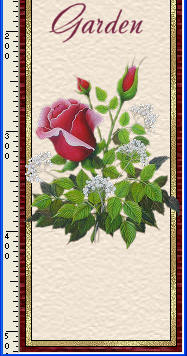
Open CJ_Pink Rose with Babybreath tube in your PSP workspace
Right click on the Title Bar and select COPY from the options.
Right click on the Title Bar of your 'working' image
and select PASTE AS NEW LAYER
from the options.
IMAGE >>> MIRROR
IMAGE >> RESIZE = 35%
Ensure "Resize all layers" is UNCHECKED
ADJUST >>> SHARPNESS >>> SHARPEN
Reposition with your MOVER tool
|
|
STEP 12
Open GG08~Roses_035 tube in your PSP workspace
ACTIVATE Layer 1
Right click on the Title Bar and select COPY from the options.
Right click on the Title Bar of your 'working' image
and select PASTE AS NEW LAYER from the options.
IMAGE >>> RESIZE = 95%
Ensure "Resize all layers" is UNCHECKED
Resample using WEIGHTED AVERAGE
ADJUST >>> SHARPNESS >>> SHARPEN
ARRANGE AS SHOWN
LAYERS >>> MERGE ALL >> FLATTEN.
FILE >> SAVE as AS1.jpg
MINIMIZE OR MOVE TO SIDE |
|
STEP 13
WORKING ON RIGHT IMAGE AS2
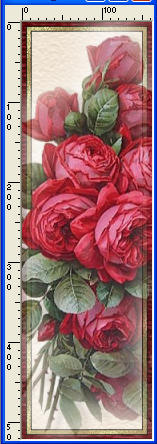
Open some-red-roses1_lizztish tube
in your PSP workspace
Right click on the Title Bar and select COPY from the options.
Right click on the Title Bar of your 'working' image
and select PASTE AS NEW LAYER from the options.
IMAGE >> ROTATE >> FREE ROTATE = RIGHT 90
Ensure "All layers" is UNCHECKED
IMAGE >>> MIRROR |
|
STEP 14
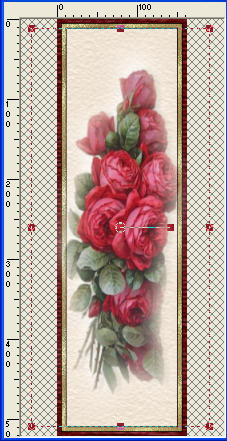
Select your DEFORMATION tool
PSPX-X3: Select your PICK tool
Use these setting

|
Your image should look like this
if you pull out the outer (blue) edges of your image
|
|
STEP 15
Click the RESET RECTANGLE arrow
Select your MOVER tool to disengage
the Deformation / Pick tool
In your LAYER PALETTE change the
BLEND MODE to MULTIPLY
LAYERS >>> MERGE ALL >> FLATTEN.
FILE >> SAVE as AS2.jpg
|
|
STEP 16
ACTIVATE AS1 image
Right click on the Title Bar and select COPY from the options.
In ANIMATION SHOP
Right click the workspace and select
'Paste As New Animation' from the options. |
STEP 17
Back to PSP.
ACTIVATE AS 2 image
Right click on the Title Bar and select COPY from the options.
In ANIMATION SHOP
Right click top of frame image and select
'Paste After Current Frame' from the options |
|
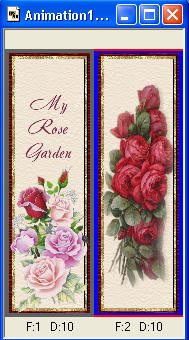
STEP 18
Select the gray edge around frame 1(F:1)
Effects >> Insert Image Transition.
Choose DOUBLE SPLIT from Effect dropdown
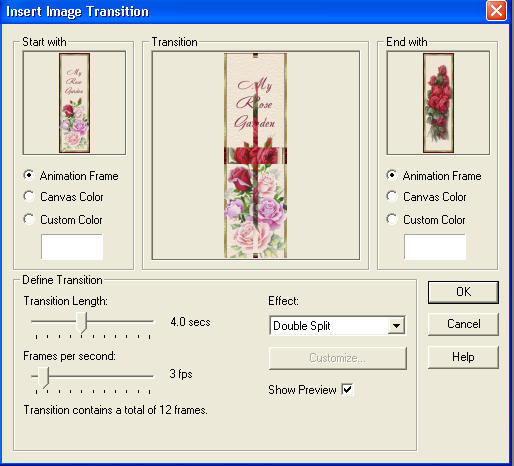
CLICK OK |
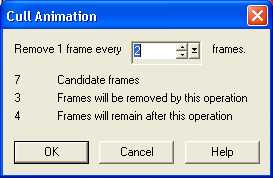
STEP 19
Edit >> Select All
ANIMATION>>CULL ANIMATION
|
|
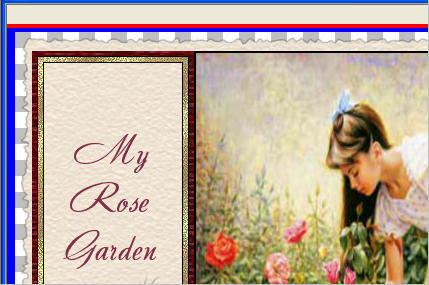
STEP 20
Back to PSP.
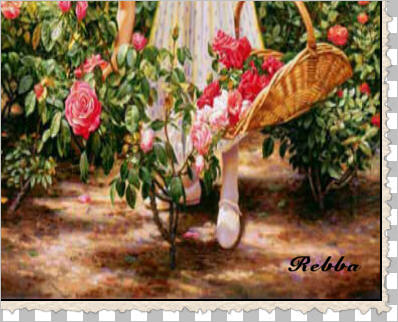
ACTIVATE the BACKGROUND GIRL image
LAYERS >> NEW RASTER LAYER
Select your TEXT TOOL
with font and settings of your choice
add your name to the bottom left corner of the layer.
Right click on Title Bar and select
Copy merged from the options
|
|
STEP 21
In ANIMATION SHOP
Right click the workspace and select
'Paste As New Animation' from the options.
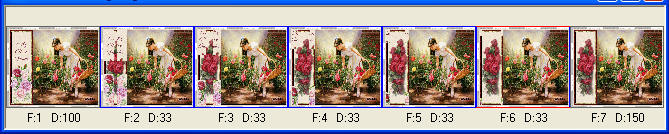
We need 7 frames for the ANIMATION
Depress your CTRL key and press the letter L
(Upper Case) 6 times
|
STEP 22
ACTIVATE the SIDE frames
Edit >> Select All
Edit >> Copy
Edit >> Propagate Paste
ACTIVATE BACKGROUND IMAGE
Edit >> Select All
Zoom in on frame 1 (F:1)
Edit >> Paste into selected frame
THE FRAME WILL BE ATTACHED TO THE ARROW
MOVE TO LEFT SIDE
CLICK TO SET THE IMAGE
|
|
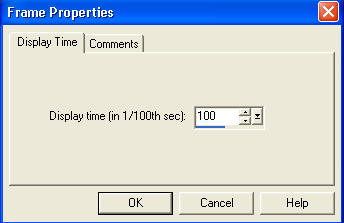
STEP 23
Select the blue edge around frame1(F:1)
Right click on top of frames
Select 'Frame Properties' from the options
Display time =100 |
|
STEP 24
Select the gray edge around frame 7 (F:7)
Right click on top of frames
Select 'Frame Properties' from the options
Display time =150 |
|
STEP 25
While depressing your SHIFT key....
select frames 2, 3, 4, 5 and 6
Right click on top of frames
Select 'Frame Properties' from the options
Display time =33
|
STEP 26
View >> Animation
and while it is still running,
File >> Save As
Locate the folder in which you wish to save it.
Name your animation.
With the Gif Optimizer keep pressing NEXT
until you get to the last one... click FINISH
Close the Animation
Close the frames.
Close Animation Shop |
RESIZING ANIMATIONS
Click on the Title Bar of the frames
Animation >> Resize animation
Select width and height in pixels
Click OK
Save your animation |
| |
|
I hope you enjoyed the tutorial
Rebba |