STEP 1
Open up the downloaded images in your PSP workspace and minimize.
Open tuberclaudiaviza-mijer639 tube in your PSP workspace
WINDOW >> DUPLICATE
Close the original image
Delete tuber information layer (Trama 5)
VIEW >>> RULERS
IMAGE >> RESIZE = 85%
Ensure "Resize all layers" is UNCHECKED
Rename this layer tube
LAYERS >> NEW RASTER LAYER
LAYERS >>> ARRANGE >>> MOVE DOWN
Flood Fill with #0c212c
Rename this layer bg
|
STEP 2
Choose your SELECTION TOOL then click on the
CUSTOM SELECTION symbol
and enter these coordinates
|
|
STEP 3
SELECTIONS >>> INVERT
LAYERS >>> NEW RASTER LAYER
In your MATERIALS PALETTE
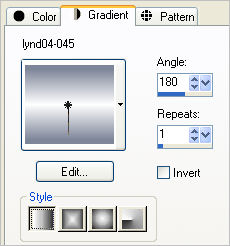
Load lynd04-045 in your foreground
Flood Fill with lynd04-045 gradient
|
|
STEP 4
Note: if you don't have this filter use another one or just add a texture effect
EFFECTS >> PLUGINS >> AP 01[Innovations] >> Lines >> SilverLining
use these settings.
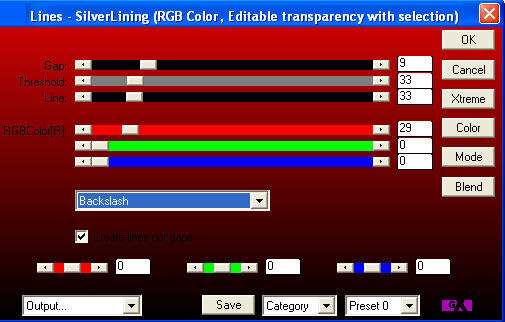
Rename this layer silver band
DESELECT |
STEP 5
Activate the frame image
Right click on the Title Bar and select
COPY from the options.
Right click on the Title Bar of your 'working' image
and select PASTE AS NEW LAYER from the options.
Rename this layer frame |
|
STEP 6
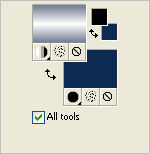
In your MATERIALS PALETTE
Load #0d2a52 in your background
|
|
STEP 7
LAYERS >> NEW RASTER LAYER
Select Preset Shapes Tool ....
find AltemusBordersFour-*

|
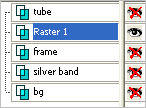
STEP 8
Close all layer except Raster 1 |
|
STEP 9
Draw out a shape about 60 pixel long...
starting at 260 pixels down and 290 pixels across
drag down and out to
300 pixels down and 350 pixels across
|
|
STEP 10
EFFECTS >> PLUGINS >> MuRa's Filter Meister >> Copies
use these settings
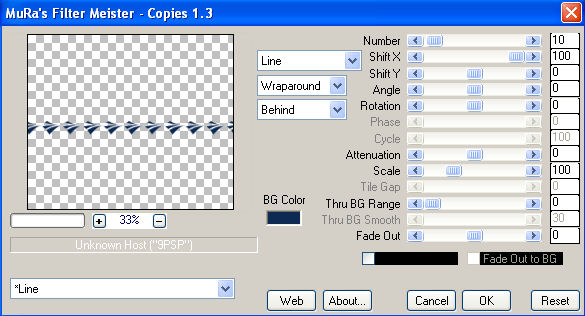
Rename this layer shape trim |
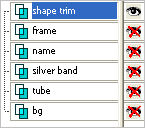
STEP 11
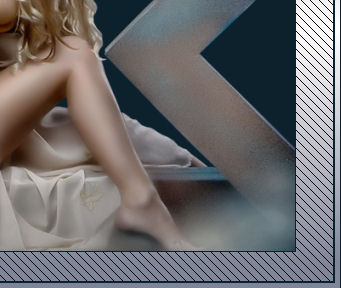
OPEN ALL LAYERS
The shape trim will be in the center of your image
LAYERS >> NEW RASTER LAYER
Select your TEXT TOOL
with font and settings of your choice
add your name to the bottom left corner of the layer.
Rename this layer name.
Place this over the picture part not the outer silver. |
|
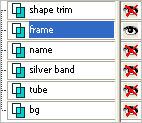
STEP 12
Set up LAYER PALETTE as shown
Right click on Title Bar and select
Copy merged from the options |
|
STEP 13
In ANIMATION SHOP
Right click the workspace and select
'Paste As New Animation' from the options.
Hold down the Ctrl hit the L key 8 times
until you have 9 frames.
Minimize for now |
STEP 14
Back to PSP.
Set up LAYER PALETTE as shown
Right click on the Title Bar and select
COPY from the options |
|
STEP 15
In ANIMATION SHOP
Right click the workspace and select
'Paste As New Animation' from the options.
Hold down the Ctrl hit the L key 1 time
You now have 2 frames

|
STEP 16
Highlight frame 1 (F:1)
Effects >> Insert Image Transition.
Choose "Wipe" as shown
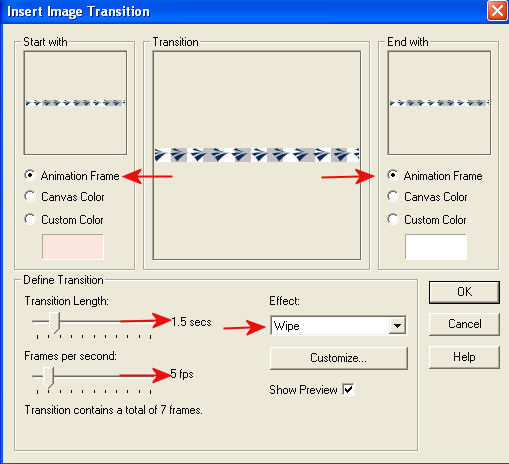
Click customize set as shown
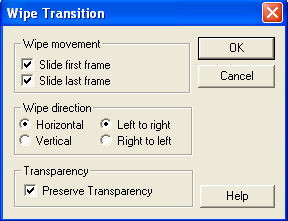
Click OK
We will call this trim top
|
STEP 17
Shift D to duplicate it
This is trim bottom.
Edit >> Select All >> Animation Flip >> Animation Mirror
Edit >> Select All
Edit >> Copy
Edit >> Propagate Paste
Activate the bgd working frames
Edit >> Select All
Edit >> Paste into selected frame
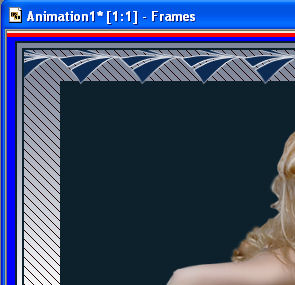
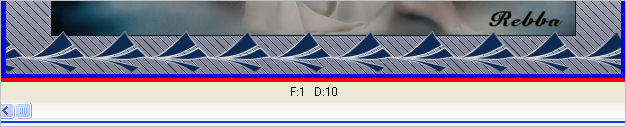
Zoom in on frame 1 (F:1)
Image is attached to the mouse across bottom
and let it touch the dark tube part
Left click mouse to place image
|
STEP 18
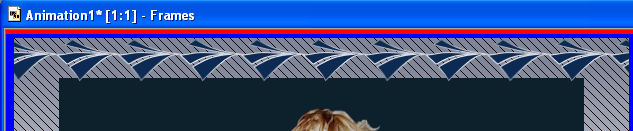
Activate trim top
Edit >> Select All
Edit >> Copy
Edit >> Propagate Paste
Activate BG working image
Edit >> Select All
Zoom in on frame 1 (F:1)
Edit >> Paste into selected frame
Image is attached to the mouse place across top
and let it touch the dark tube part.
Left click mouse to place image.
..................................................A12 |
STEP 19
Back to PSP.
Set up LAYER PALETTE as shown
Right click on the Title Bar and select
COPY from the options |
|
STEP 20
In ANIMATION SHOP
Right click the workspace and select
'Paste As New Animation' from the options.
Edit >> Copy
Edit >> Propagate Paste
Activate BG working image
Edit >> Select All
Zoom in on frame 1 (F:1)
Edit >> Paste into selected frame
Center on Image and click mouse to place frame image. |
|
STEP 21
Right click inside frame 1 (F:1) to activate
and select DELETE from the options
Animation >> Resize Animation
to 500 wide ..
or your choice of size |
|
STEP 22
View >> Animation
and while it is still running,
File >> Save As
Locate the folder in which you wish to save it.
Name your animation.
With the Gif Optimiser keep pressing NEXT
until you get to the last one... click FINISH
Close the Animation
Close the frames.
Close Animation Shop
|
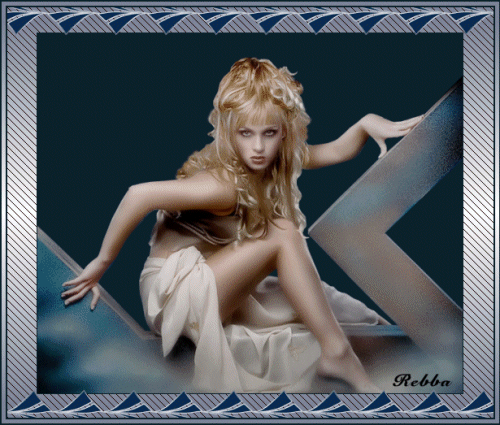
I hope you have enjoy the tutorial.
Rebba
|
| .
|
. |