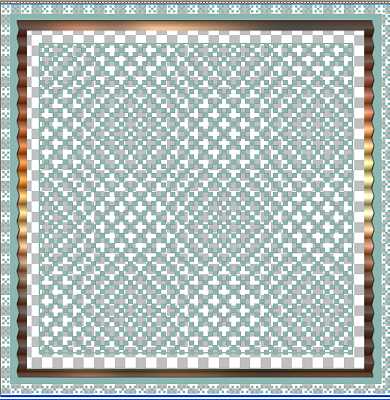
STEP 1
Open up the downloaded images in your PSP workspace and minimize.
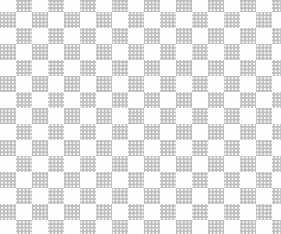
Open pattern1 tube in your PSP workspace
WINDOW >> DUPLICATE
Close the original image
I have made most of the supplies because I want
you to learn how to do a 45 degree scrolling background.
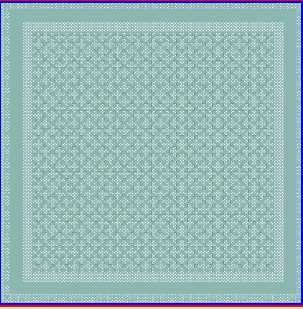
NOTE: when making a template for a background scroll pattern to show through,
have some places open, some solid and a pattern over some.
This will give you different effects.
Rename this layer template
|
STEP 2
LAYERS >> NEW RASTER LAYER
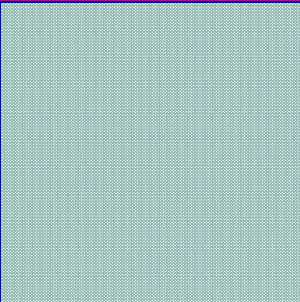
Flood Fill with #8cb6b0
Rename this layer bg and close layer |
STEP 3
Open outer frame tube in your PSP workspace
Right click on the Title Bar and
select COPY from the options.
Right click on the Title Bar of your 'working' image
and select PASTE AS NEW LAYER from the options.
Rename this layer outer frame |
|
STEP 4
Open hands inner frame tube
in your PSP workspace
Right click on the Title Bar and
select COPY from the options.
Right click on the Title Bar of your 'working' image
and select PASTE AS NEW LAYER from the options.
Move this down a little to line up equal space around it.
Rename this layer hands
|
|
STEP 5
LAYERS >> NEW RASTER LAYER
Select your TEXT TOOL
with font and settings of your choice
add your name to the bottom left corner of the layer.
Rename this layer name.
IMAGE ... Minimize for now |
Empty Clipboard Often
going between programs.
This takes a lot of memory and will freeze up. |
STEP 6
Open a new image 800 x 800
Transparent background
PSPX - X2: Colour Depth = 8bits/channel
PSPX3: Colour Depth RGB = 8bits/channel
Flood fill with black
EFFECTS >> TEXTURE EFFECTS >> WEAVE
and use these settings.
. |
|
STEP 7
EFFECTS >> PLUGINS >> Transparency
>>Eliminate Black
you have this now.
Save as a pspimage for future use. |
|
STEP 8
Right click on Title Bar and select
Copy from the options
In ANIMATION SHOP
Right click the workspace and select
'Paste As New Animation' from the options.
Edit >> Copy
Edit >> Paste After Current Frame |
STEP 9
Activate frame1
Effects >> Insert Image Transition.
Use these setting then click customize
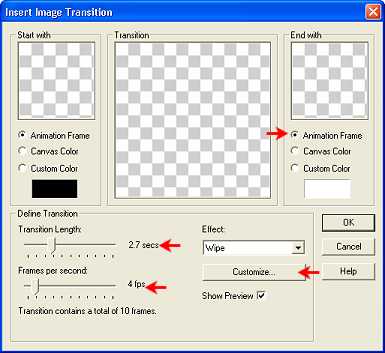
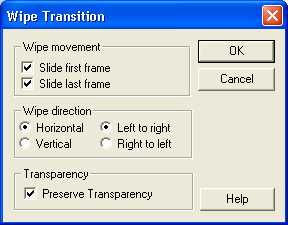
Click OK |
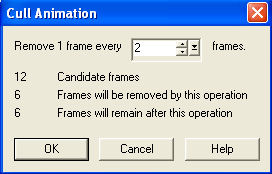
STEP 10
Edit >> Select All
Animation >> Cull Animation
|
|
STEP 11
Edit >> Select All
FILE>> EXPORT FRAMES >> To Paint Shop Pro
(If you do not have this option... Select All >> Copy
return to PSP Right click in your PSP Workspace
and select Paste Animation as Multiple Images.
Rename the layers Frame1 to Frame6 starting on the bottom layer and working up.)
In PSP
WINDOW >> DUPLICATE
Close the ANIMATION SHOP copy
click No to save images
click Yes to update back to ANIMATION SHOP
|
STEP 12
In ANIMATION SHOP
minimize ANIMATION SHOP for now
Back to PSP.
Empty Clipboard
IMAGE >> ROTATE >> FREE ROTATE = LEFT 45
Ensure "All layers" is CHECKED
PSPX - PSPX2:IMAGE >> FREE ROTATE = LEFT 45
Ensure "All layers" is CHECKED |
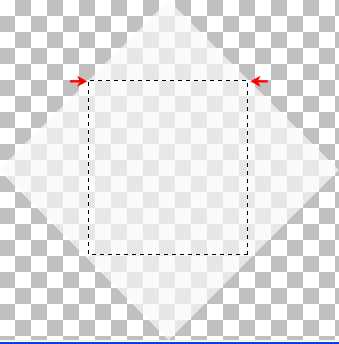
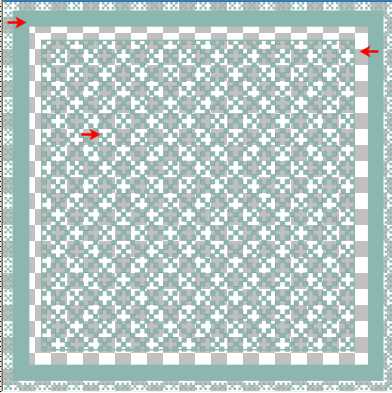
STEP 13
Select your CROP Tool
Draw out a square starting in middle of
45 degree angle
Picture showN with selection tool so you can see it .
Click APPLY to crop.
Make sure there is pattern all around the area.
NOTE:
You could use your SELECTION Tool
Selecton Type = Square
Mode = Replace
Feather = 0
Antialias = Unchecked
Then "Crop to selection"
|
|
STEP 14
IMAGE >> RESIZE = 600X600 PIXELS
Uncheck lock aspect ratio (not necessary if you used the Selection Tool)
Ensure "Resize all layers" is CHECKED
Open & Activate frame1
Close all other layers
Right click on the Title Bar and
select COPY from the options.
|
STEP 15
In ANIMATION SHOP
Right click the workspace and select
'Paste As New Animation' from the options.
Back to PSP.
Activate frame 2
Close frame 1
Right click on the Title Bar and
select COPY from the options.
|
STEP 16
In ANIMATION SHOP
Right click top of frame image and select
'Paste After Current Frame' from the options.
Empty Clipboard
Continue copying the next frame and pasting after current
frame until all frames are in ANIMATION SHOP. |
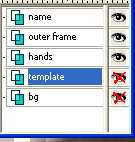
STEP 17
Back to PSP.
OPEN YOUR MINIMIZED WORKING IMAGE
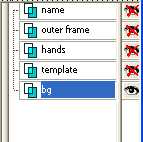
Set up LAYER PALETTE as shown
Right click on the Title Bar and select
COPY from the options.
|
|
STEP 18
In ANIMATION SHOP
Right click the workspace and select
'Paste As New Animation' from the options.
|
STEP 19
Edit >> Copy
Edit >> Paste After Current Frame
Hold down Ctrl key hit the L key 5 times so
you have 6 frames.
Select the dot animation
Edit >> Select All
Edit >> Copy
Edit >> Propagate Paste
|
STEP 20
Select the green bg
Edit >> Select All
Edit >> Paste into selected frame
Your image will be attached to the mouse
center it and click to place image.
|
|
STEP 21
Back to PSP.
Set up LAYER PALETTE as shown
.
Right click on the Title Bar and select
COPY from the options. |
|
STEP 22
In ANIMATION SHOP
Right click the workspace and select
'Paste As New Animation' from the options.
NOTE: since your bg and animation is pasted together
you only need 1 copy of the images now.
Also since the propagate paste is on you don't have to
click it each time.
|
STEP 23
Activate the template image
Edit >> Copy
Active the working image
Edit >> Select All
Edit >> Paste into selected frame
Your image will be attached to the mouse
center it and click to place image.
|
|
STEP 24
Back to PSP.
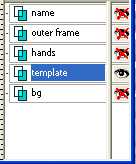
Set up LAYER PALETTE as shown
Right click on Title Bar and select
Copy merged from the options |
|
STEP 25
In ANIMATION SHOP
Right click the workspace and select
'Paste As New Animation' from the options.
Edit >> Copy
Activate working image
Edit >> Select All
Edit >> Paste into selected frame
Your image will be attached to the mouse
center it and click to place image.
|
|
STEP 26
Edit >> Select All
Animation >> Resize Animation>> 500
Click OK |
STEP 27
View >> Animation
and while it is still running,
File >> Save As
Locate the folder in which you wish to save it.
Name your animation.
With the Gif Optimiser keep pressing NEXT
until you get to the last one... click FINISH
Close the Animation
Close the frames.
Close Animation Shop
|
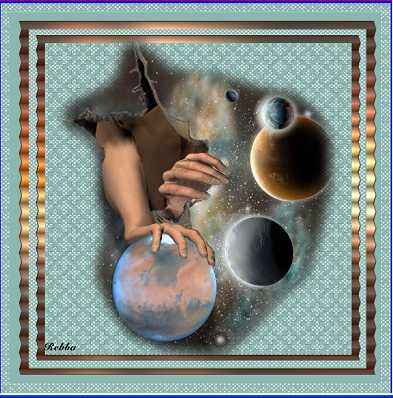
I hope you enjoyed the tutorial and will try it with different
animation and template images.
Rebba
|