STEP 1
In your MATERIALS PALETTE
Load ' #84512c ' in your foreground
Load ' #c9b815 ' in your background
Open a new image 480 x 550
Transparent background
PSPX - X2: Colour Depth = 8bits/channel
PSPX3: Colour Depth RGB = 8bits/channel
Flood fill with background colour
Rename this layer bgd
|
STEP 2
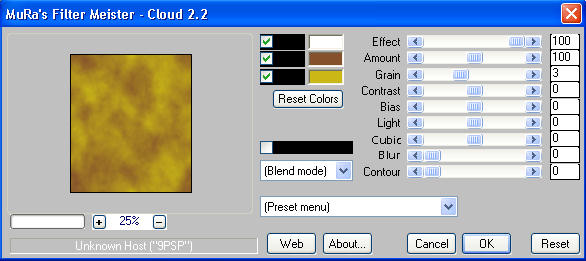
EFFECTS >>> PLUGINS >>> MuRa's Meister >>> Cloud

|
STEP 3
LAYERS >>> NEW RASTER LAYER
Flood fill with #59531b
Choose your SELECTION TOOL then click on the
CUSTOM SELECTION symbol
and enter these coordinates.
|
|
STEP 4
EDIT >>> CLEAR
SELECTIONS >>> INVERT
EFFECTS >>> TEXTURE EFFECTS >>> BLINDS
Colour = Black
|
|
STEP 5
DESELECT
Choose your SELECTION TOOL then click on the
CUSTOM SELECTION symbol
and enter these coordinates.
|
|
STEP 6
EFFECTS >>> TEXTURE EFFECTS >>> BLINDS
Same settings BUT CHECK "Horizontal"
COLOUR =
#685e5e
DESELECT
|
|
STEP 7
Choose your SELECTION TOOL then click on the
CUSTOM SELECTION symbol
and enter these coordinates. |
|
STEP 8
EFFECTS >>> TEXTURE EFFECTS >>> BLINDS
Same settings
DESELECT
|
|
STEP 9
EFFECTS >>> EDGE EFFECTS >>> ENHANCE
EFFECTS >>> 3D EFFECTS >>> INNER BEVEL |
|
STEP 10
EFFECTS >>> PLUGINS >>> EYE CANDY 3 >>> DROP SHADOW |
|
STEP 11
EDIT >>> Repeat Drop Shadow.. change DIRECTION to 135
Rename this layer outer frame |
|
STEP 12
LAYERS >>> DUPLICATE
IMAGE >>> RESIZE = 75%
Ensure "Resize all layers" is UNCHECKED
Resample using WEIGHTED AVERAGE
ADJUST >>> SHARPNESS >>> SHARPEN
Rename this layer inner frame |
|
STEP 13
Open up the owls5 image in your PSP workspace
Right click on the Title Bar and select COPY from the options
Right click on the Title Bar of your tag image
and select PASTE AS NEW LAYER from the options.
IMAGE >>> RESIZE = 85%
Ensure "Resize all layers" is UNCHECKED
Resample using WEIGHTED AVERAGE
ADJUST >>> SHARPNESS >>> SHARPEN
Reposition with your MOVER tool
Rename this layer tube
|
|
STEP 14
EFFECTS >>> 3D EFFECTS >>> DROP SHADOW
Vertical & Horizontal offsets = 1
Colour = Black
Opacity = 70
Blur = 0
EFFECTS >>> PLUGINS >>> EYE CANDY 3 >>> DROP SHADOW
|
|
STEP 15
Open up the closed_eyes image in your PSP workspace
Activate owl1 layer
Right click on the Title Bar and select COPY from the options
Right click on the Title Bar of your tag image
and select PASTE AS NEW LAYER from the options.
Reposition with your MOVER tool
Rename this layer owl1
|
|
STEP 16
Back to the closed_eyes image in your PSP workspace
Activate owl2 layer
Right click on the Title Bar and select COPY from the options
Right click on the Title Bar of your tag image
and select PASTE AS NEW LAYER from the options.
Reposition with your MOVER tool
Rename this layer owl2 |
|
STEP 17
Back to the closed_eyes image in your PSP workspace
Activate owl3 layer
Right click on the Title Bar and select COPY from the options
Right click on the Title Bar of your tag image
and select PASTE AS NEW LAYER from the options.
Reposition with your MOVER tool
Rename this layer owl3 |
|
STEP 18
Back to the closed_eyes image in your PSP workspace
Activate owl4 layer
Right click on the Title Bar and select COPY from the options
Right click on the Title Bar of your tag image
and select PASTE AS NEW LAYER from the options.
Reposition with your MOVER tool
Rename this layer owl4
|
|
STEP 19
Back to the closed_eyes image in your PSP workspace
Activate owl5 layer
Right click on the Title Bar and select COPY from the options
Right click on the Title Bar of your tag image
and select PASTE AS NEW LAYER from the options.
Reposition with your MOVER tool
Rename this layer owl5 |
|
STEP 20
ACTIVATE THE tube LAYER
LAYERS >>> NEW RASTER LAYER
Select your TEXT TOOL
with font and settings of your choice
add your name to the bottom right corner of the layer.
Rename this layer name.
|
|
LET'S ANIMATE!!!
|
STEP 21
ACTIVATE the bgd layer
Right click on Title Bar and select
Copy from the options
In ANIMATION SHOP
Right click the workspace and select
'Paste As New Animation' from the options.
Right click top of frame image and select
'Paste After Current Frame' from the options
|
|
STEP 22
Click inside the first frame (F:1) to activate
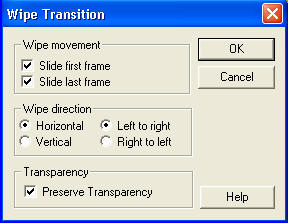
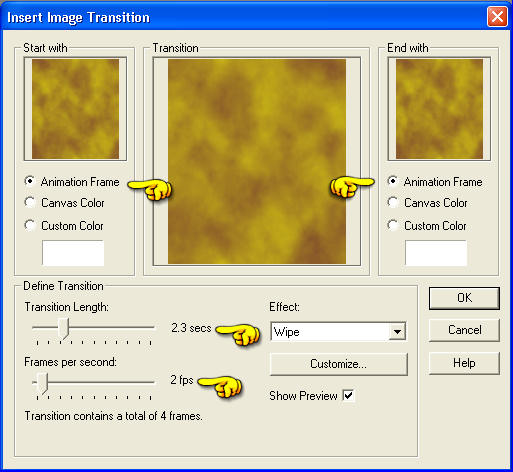
Effects >> Insert Image Transition. >> WIPE
Click the CUSTOMIZE button first and enter these settings

Click OK and enter these settings

Click OK
|
STEP 23
Back to PSP
Set up LAYER PALETTE as shown
Right click on Title Bar and select
Copy merged from the options
|
|
STEP 24
In ANIMATION SHOP
Right click the workspace and select
'Paste As New Animation' from the options.
|
|
STEP 25
Back to PSP
EDIT >> Empty Clipboard
OPEN the owl1 layer
Right click on Title Bar and select Copy merged from the options
In ANIMATION SHOP
Right click top of frame image and select
'Paste After Current Frame' from the options.
|
|
STEP 26
Back to PSP
EDIT >> Empty Clipboard
CLOSE the owl1 layer
OPEN the owl2 layer
Right click on Title Bar and select Copy merged from the options
In ANIMATION SHOP
Right click top of frame image and select
'Paste After Current Frame' from the options. |
STEP 27
Back to PSP
EDIT >> Empty Clipboard
CLOSE the owl2 layer
OPEN the owl3 layer
Right click on Title Bar and select Copy merged from the options
In ANIMATION SHOP
Right click top of frame image and select 'Paste After Current Frame' from the options. |
STEP 28
Back to PSP
EDIT >> Empty Clipboard
CLOSE the owl3 layer
OPEN the owl4 layer
Right click on Title Bar and select Copy merged from the options
In ANIMATION SHOP
Right click top of frame image and select 'Paste After Current Frame' from the options. |
STEP 29
Back to PSP
EDIT >> Empty Clipboard
CLOSE the owl4 layer
OPEN the owl5 layer
Right click on Title Bar and select Copy merged from the options
In ANIMATION SHOP
Right click top of frame image and select 'Paste After Current Frame' from the options.
|
STEP 30
Edit >> Select All
Edit >> Copy
Edit >> Propagate Paste
ACTIVATE the background animation
Edit >> Select All
ZOOM in on the first frame (F:1)
Edit >> Paste into selected frame
|
STEP 31
View >> Animation
and while it is still running,
File >> Save As
Locate the folder in which you wish to save it.
Name your animation.
With the Gif Optimiser keep pressing NEXT
until you get to the last one... click FINISH
Close the Animation
Close the frames.
Close Animation Shop |
.. |