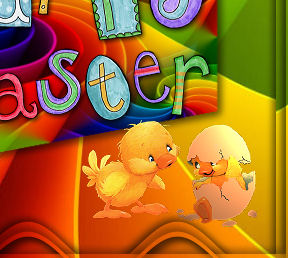
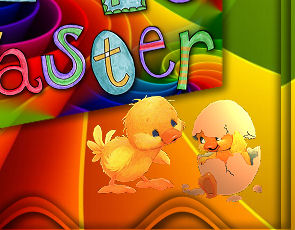
STEP 1
Open up the poussins image in your PSP workspace
WINDOW >>> DUPLICATE
Close the original Image
|
STEP 2
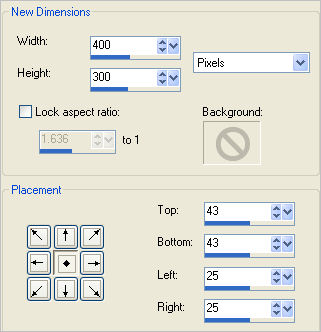
IMAGE >>> CANVAS SIZE
|
|
STEP 3
LAYERS >>> DUPLICATE
Close the bottom layer
|
|
STEP 4
Working on the Copy of Fusionné layer
Choose your FREEHAND SELECTION TOOL
Selection Type = Point to Point
Mode = Replace
Feather = 0
Antialias = Checked
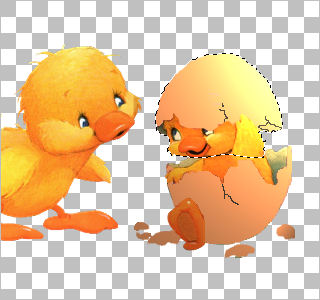
Select the area shown
|
|
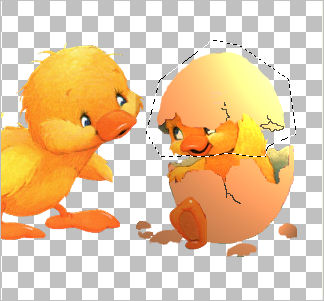
STEP 5
Click inside the 'marching ants' to select the
chick's head
|
|
STEP 6
In your LAYER PALETTE
Right click on Floating Selection layer
and select
'Promote selection to layer'
|
|
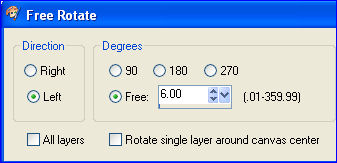
STEP 7
PSP8 - PSP9:IMAGE >>> ROTATE >>> FREE ROTATE = LEFT 6.00
Ensure "All layers" is UNCHECKED
PSPX - PSPX3: IMAGE >>> FREE ROTATE = LEFT 6.00
Ensure "All layers" is UNCHECKED
DESELECT
|
|
.STEP 8
.LAYERS >>> DUPLICATE
Repeat STEP 7
ADJUST >>> SHARPNESS >>> SHARPEN
CLOSE the Promoted Selection layer
|
|
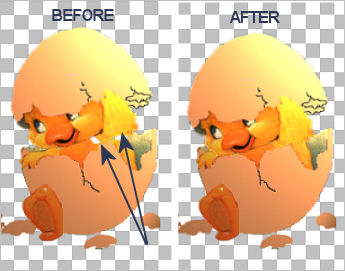
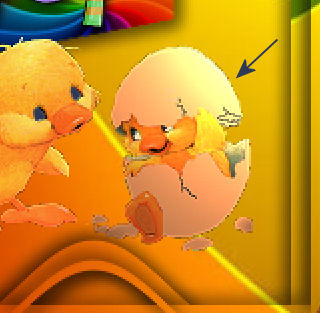
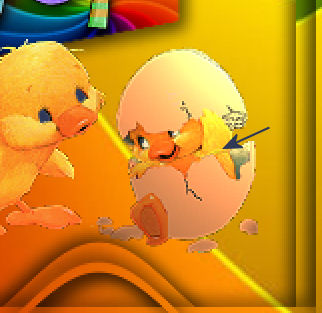
STEP 9
Working on the Copy of Promoted Selection layer
With your MOVER Tool drag the head down
carefully so the white spaces ("BEFORE" image)
are no longer visible
("AFTER" image)
|
|
STEP 10
LAYERS >>> ARRANGE >>> MOVE DOWN
OPEN & ACTIVATE the Promoted Selection layer
CLOSE the Copy of Promoted Selection layer
With your MOVER Tool drag the head down
OPEN the Copy of Promoted Selection layer
and check to see if the top of the eggs are level.
If not click on the Promoted Selection chick
and use your keyboard arrows to level them up.
|
|
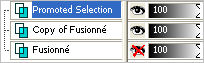
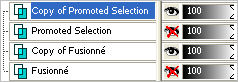
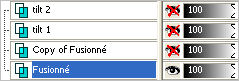
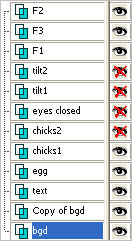
STEP 11
Make sure your layer palette is set as in top image
Change the names of the top 2 layers
as in lower image
Activate the Fusionné layer
|
|
STEP 12
LAYERS >>> DUPLICATE
CLOSE the Fusionné layer
Choose your FREEHAND SELECTION TOOL
Selection Type = Point to Point
Mode = Add(Shift)
Feather = 0
Antialias = Checked
Select the eye areas shown
|
|
STEP 13
In your LAYER PALETTE
Right click on Copy of Fusionné layer
and select
'Promote Selection to Layer'
DESELECT
SELECTIONS >>> SELECT ALL
SELECTIONS >>> FLOAT
SELECTIONS >>> DEFLOAT
Flood fill the eyes with #2f3955
DESELECT
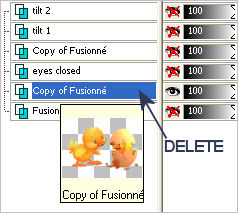
Rename the layer eyes closed
DELETE the Copy of Fusionné layer indicated
|
|
STEP 14
IMAGE >>> RESIZE = 50%
Ensure "Resize all layers" is CHECKED
Resample using WEIGHTED AVERAGE
Apply ADJUST >>> SHARPNESS >>> SHARPEN to each layer
Save your work as a .pspimage
Don't worry about which layers are visible.
Minimise for the moment while we work on the rest of the tag.
|
STEP 15
VIEW >>> RULERS
Open up the rainbowtwist image in your PSP workspace
WINDOW >>> DUPLICATE
Close the original Image
LAYERS >>> Promote background Layer
Rename this layer bgd |
STEP 16
LAYERS >>> DUPLICATE
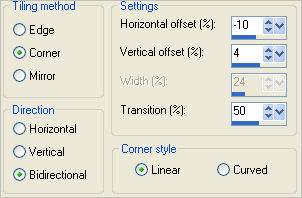
EFFECTS >>> IMAGE EFFECTS >>>
SEAMLESS TILING
|
|
STEP 17
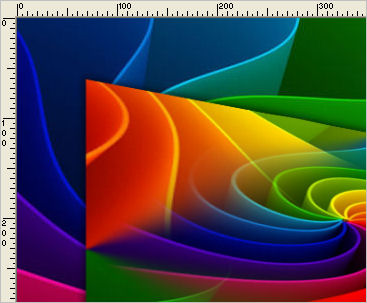
IMAGE >>> RESIZE =85%
Ensure "Resize all layers" is UNCHECKED
Resample using WEIGHTED AVERAGE
EFFECTS>>> GEOMETRIC EFFECTS >>>
PERSPECTIVE-HORIZONTAL
|
|
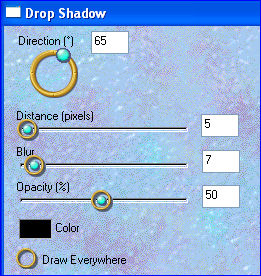
STEP 18
EFFECTS >>> PLUGINS >>> EYE CANDY 3 >>>
DROP SHADOW
EDIT >>> Repeat Drop Shadow.. change DIRECTION to 135
|
|
STEP 19
IMAGE >>> RESIZE = 95%
Ensure "Resize all layers" is UNCHECKED
Resample using WEIGHTED AVERAGE
Reposition with your MOVER tool
|
|
STEP 20
Open up the happy-easter image
in your PSP workspace
Right click on the Title Bar and
select COPY from the options
Right click on the Title Bar of your tag image
and select PASTE AS NEW LAYER from the options
IMAGE >>> RESIZE = 50%
Ensure "Resize all layers" is UNCHECKED
Resample using WEIGHTED AVERAGE
ADJUST >>> SHARPNESS >>> SHARPEN
Reposition with your MOVER tool
Rename this layer text
|
|
STEP 21
ACTIVATE the bgd layer
SELECTIONS >>> SELECT ALL
SELECTIONS >>> MODIFY >>> CONTRACT = 15
SELECTIONS >>> INVERT
EDIT >>> Copy
Right click on the Title Bar of your tag image
and select PASTE AS NEW LAYER from the options
DESELECT
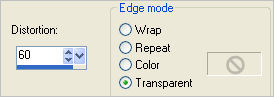
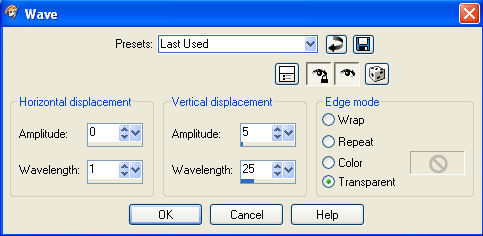
EFFECTS >>> DISTORTION EFFECTS >>> WAVE
|
STEP 22
EFFECTS >>> PLUGINS >>> EYE CANDY 3 >>>
DROP SHADOW
Same settings
EDIT >>> Repeat Drop Shadow..
change DIRECTION to 315
Rename this layer F1
|
|
STEP 23
ACTIVATE the bgd layer
SELECTIONS >>> SELECT ALL
SELECTIONS >>> MODIFY >>> CONTRACT = 5
SELECTIONS >>> INVERT
EDIT >>> Copy
Right click on the Title Bar of your tag image
and select PASTE AS NEW LAYER from the options
DESELECT
LAYERS >>> ARRANGE >>> MOVE UP
Rename this layer F2
LAYERS >>> DUPLICATE
EFFECTS >>> PLUGINS >>> EYE CANDY 3 >>>
DROP SHADOW
Same settings
EDIT >>> Repeat Drop Shadow..
change DIRECTION to 135

Rename this layer F3 |
STEP 24
ACTIVATE layer F2
LAYERS >>> ARRANGE >>> MOVE UP
EFFECTS >>> DISTORTION EFFECTS >>> WAVE
Same settings
EFFECTS >>> PLUGINS >>> EYE CANDY 3 >>>
DROP SHADOW
Same settings
EDIT >>> Repeat Drop Shadow..
change DIRECTION to 315
|
|
STEP 25
ACTIVATE the text layer
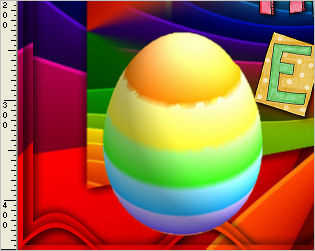
Open up the rainbowegg image
in your PSP workspace
Right click on the Title Bar and select
COPY from the options
Right click on the Title Bar of your tag image
and select PASTE AS NEW LAYER from the options.
IMAGE >>> RESIZE = 58%
Ensure "Resize all layers" is UNCHECKED
Resample using WEIGHTED AVERAGE
ADJUST >>> SHARPNESS >>> SHARPEN
Reposition with your MOVER tool
|
|
STEP 25
EFFECTS >>> PLUGINS >>> EYE CANDY 3 >>>
DROP SHADOW
Same settings
Rename this layer egg
Rearrage the layers in your Layer Palette |
|
STEP 25
Open up the easter_chick_mask image
in your PSP workspace
Right click on the Title Bar and select
COPY from the options
Right click on the Title Bar of your tag image
and select PASTE AS NEW LAYER from the options.
IMAGE >>> MIRROR
IMAGE >>> RESIZE = 58%
Ensure "Resize all layers" is UNCHECKED
Resample using WEIGHTED AVERAGE
ADJUST >>> SHARPNESS >>> SHARPEN
EFFECTS >>> PLUGINS >>> EYE CANDY 3 >>>
DROP SHADOW
Same settings
Reposition with your MOVER tool
LAYERS >>> MERGE >>> MERGE DOWN
|
|
STEP 26
Maximize the 2 chicks tube you created earlier
Activate the Fusionné layer
Right click on the Title Bar and select
COPY from the options
Right click on the Title Bar of your tag image
and select PASTE AS NEW LAYER from the options.
Reposition with your MOVER tool
Rename this layer chicks1 |
|
STEP 27
Back to your 2 chicks tube
Open and activate the Copy of Fusionné layer
Right click on the Title Bar and select
COPY from the options
Right click on the Title Bar of your tag image
and select PASTE AS NEW LAYER from the options.
Reposition with your MOVER tool over the top
of the chicks below
Rename this layer chicks2
|
STEP 28
Back to your 2 chicks tube
Open and activate the eyes closed layer
Right click on the Title Bar and select
COPY from the options
Right click on the Title Bar of your tag image
and select PASTE AS NEW LAYER from the options.
You'll have to ZOOM in to find the eyes
in the middle of your image
Reposition with your MOVER tool over the top
of the left chick's eyes
Rename this layer eyes closed |
|
STEP 29
Back to your 2 chicks tube
Open and activate the tilt1 layer
Right click on the Title Bar and select
COPY from the options
Right click on the Title Bar of your tag image
and select PASTE AS NEW LAYER from the options.
Reposition with your MOVER tool over the top
of the right chick's head
Rename this layer tilt1 |
|
STEP 30
Back to your 2 chicks tube
Open and activate the tilt2 layer
Right click on the Title Bar and select
COPY from the options
Right click on the Title Bar of your tag image
and select PASTE AS NEW LAYER from the options.
Reposition with your MOVER tool over the top
of the right chick's head
Rename this layer tilt2 |
|
STEP 31
ACTIVATE the chicks1 layer
EFFECTS >>> PLUGINS >>> EYE CANDY 3 >>>
DROP SHADOW
|
|
STEP 32
ACTIVATE the chicks2 layer
EDIT >>> Repeat Drop Shadow.
ACTIVATE the tilt1 layer
EDIT >>> Repeat Drop Shadow.
ACTIVATE the tilt2 layer
EDIT >>> Repeat Drop Shadow.
|
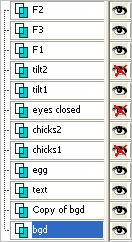
STEP 33
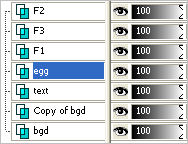
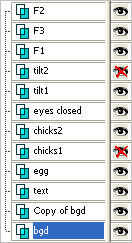
Set up your LAYER PALETTE as shown
Right click on Title Bar and select
Copy merged from the options
|
|
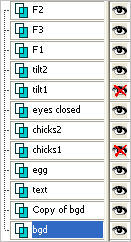
STEP 34
In ANIMATION SHOP
Right click the workspace and select
'Paste As New Animation' from the options.
Back to PSP.
Set up your LAYER PALETTE as shown
Right click on Title Bar and select
Copy merged from the options
|
|
STEP 35
In ANIMATION SHOP
Right click top of frame image and select
'Paste After Current Frame' from the options.
Back to PSP.
Set up your LAYER PALETTE as shown
Right click on Title Bar and select
Copy merged from the options |
|
STEP 36
In ANIMATION SHOP
Right click top of frame image and select
'Paste After Current Frame' from the options.
Back to PSP.
Set up your LAYER PALETTE as shown
Right click on Title Bar and select
Copy merged from the options |
|
STEP 37
In ANIMATION SHOP
Right click top of frame image and select
'Paste After Current Frame' from the options.
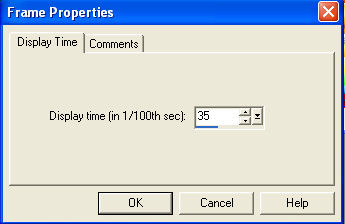
Edit >> Select All
Right click on Title Bar of frames
Select 'Frame Properties' from the options
Display time =35
|
|
STEP 38
View >> Animation
and while it is still running,
File >> Save As
Locate the folder in which you wish to save it.
Name your animation.
With the Gif Optimiser keep pressing NEXT
until you get to the last one... click FINISH
Close the Animation
Close the frames.
Close Animation Shop |