USING EYE CANDY 3 - Jiggle |
STEP 1
Open up the winterwaterfallmistyez image in your PSP workspace
WINDOW >>> DUPLICATE
Close the original Image
In your LAYER PALETTE delete the 'Watermark' layer
LAYERS >>> DUPLICATE (Twice)
|
STEP 2
With your MAGIC WAND

Select various parts of the waterfall similar to that shown below
|
STEP 3
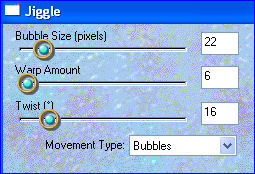
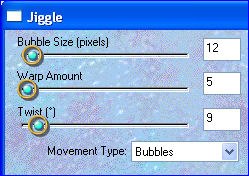
With Copy (2) of waterfall active
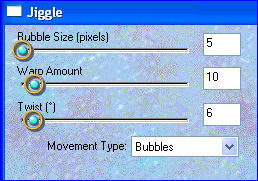
EFFECTS >>> PLUGINS >>> EYE CANDY 3.1 >>> Jiggle
|
|
STEP 4
CLOSE Copy (2) of waterfall
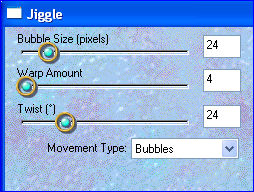
ACTIVATE
Copy of waterfall
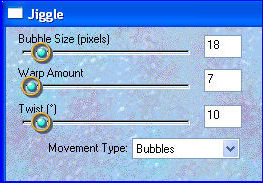
EFFECTS >>> PLUGINS >>> EYE CANDY 3.1 >>> Jiggle
|
|
STEP 5
CLOSE Copy of waterfall
ACTIVATE waterfall layer
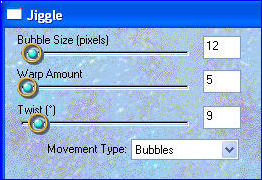
EFFECTS >>> PLUGINS >>> EYE CANDY 3.1 >>> Jiggle
DESELECT
|
|
STEP 6
LAYERS >>> NEW RASTER LAYER
Flood fill with GREY #808080
LAYERS >>> ARRANGE >>> MOVE DOWN
|
|
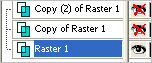
STEP 7
Set up LAYER PALETTE as shown.
Right click on Title Bar and select
Copy merged from the options
|
|
STEP 8
In ANIMATION SHOP
Right click the workspace and select
'Paste As New Animation' from the options.
Back to PSP.
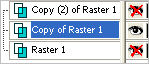
Set up LAYER PALETTE as shown.
Right click on Title Bar and select
Copy merged from the options
|
|
STEP 9
In ANIMATION SHOP
Right click top of frame image and select
'Paste After Current Frame' from the options.
Back to PSP.
Set up LAYER PALETTE as shown.
Right click on Title Bar and select
Copy merged from the options |
|
STEP 10
In ANIMATION SHOP
Right click top of frame image and select
'Paste After Current Frame' from the options.
View >> Animation
and while it is still running,
File >> Save As
Locate the folder in which you wish to save it.
Name your animation.
With the Gif Optimiser keep pressing NEXT
until you get to the last one... click FINISH
Close the Animation
Close the frames.
Close Animation Shop
|
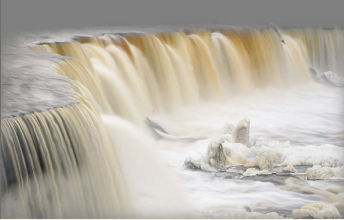
You result should be similar to this.
 TIP:
Play around with the "Jiggle" settings to see the different effects.
TIP:
Play around with the "Jiggle" settings to see the different effects.
|
NOW... Let's try an ocean scene
|
STEP 1
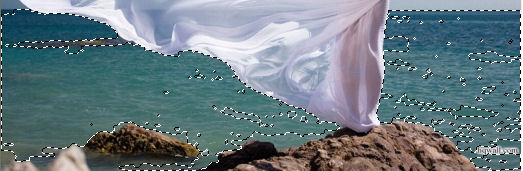
Open up the you ought to see her fly WP image in your PSP workspace
WINDOW >>> DUPLICATE
Close the original Image
LAYERS >>> Promote background Layer
LAYERS >>> DUPLICATE (Twice) |
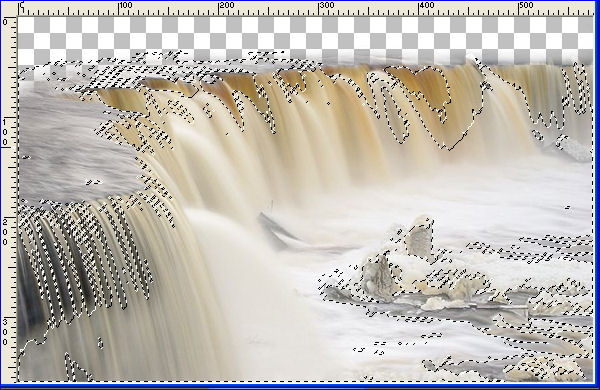
STEP 2
With your MAGIC WAND

Select various parts of the water similar to that shown below
|
STEP 3
Now... we don't want her dress included in the animation... so....
SELECTIONS >>> MODIFY >>> CONTRACT = 2

|
STEP 4
With Copy (2) of Raster 1 active
EFFECTS >>> PLUGINS >>> EYE CANDY 3.1 >>> Jiggle |
|
STEP 5
CLOSE Copy (2) of Raster 1
ACTIVATE Copy of Raster 1
EFFECTS >>> PLUGINS >>> EYE CANDY 3.1 >>> Jiggle |
|
STEP 6
CLOSE Copy of Raster 1
ACTIVATE Raster 1
EFFECTS >>> PLUGINS >>> EYE CANDY 3.1 >>> Jiggle
DESELECT
|
|
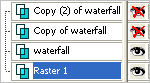
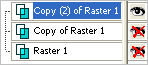
STEP 7
Set up LAYER PALETTE as shown.
Right click on Title Bar and select
Copy from the options
|
|
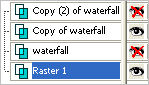
STEP 8
In ANIMATION SHOP
Right click the workspace and select
'Paste As New Animation' from the options.
Back to PSP.
Set up LAYER PALETTE as shown.
Right click on Title Bar and select
Copy from the options
|
|
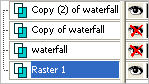
STEP 9
In ANIMATION SHOP
Right click top of frame image and select
'Paste After Current Frame' from the options.
Back to PSP.
Set up LAYER PALETTE as shown.
Right click on Title Bar and select
Copy from the options |
|
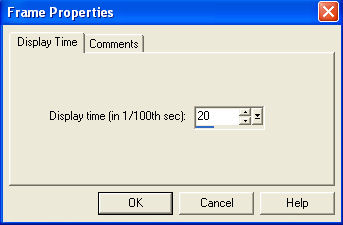
STEP 10
In ANIMATION SHOP
Right click top of frame image and select
'Paste After Current Frame' from the options.
EDIT >> Select All
Right click on Title Bar of frames
Select 'Frame Properties' from the options
Display time =20
|
|
STEP 11
View >> Animation
and while it is still running,
File >> Save As
Locate the folder in which you wish to save it.
Name your animation.
With the Gif Optimiser keep pressing NEXT
until you get to the last one... click FINISH
Close the Animation
Close the frames.
Close Animation Shop |
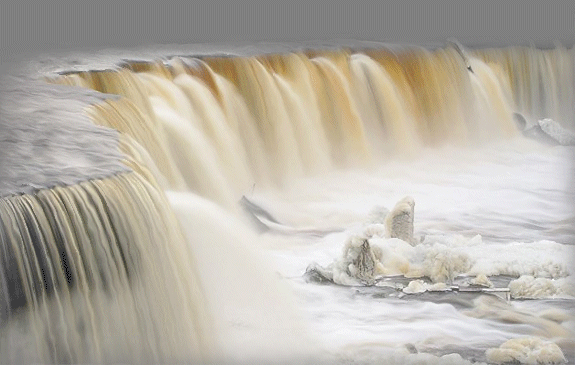
You result should be similar to this.

|
. |
. |